Welcome to Salesforce DX in The Welkin Suite Bloom R6
For many years, we were waiting for some game-changing approach in Salesforce, which would bring Salesforce development closer to the other regular development platforms like Java or .NET. With Salesforce DX out here now, we can start enjoying all benefits of version control, continuous delivery, and continuous integration, without dealing with any of the complex workflows, that we were using previously. And we also now have the great Scratch orgs, which will significantly increase the development speed.

While Salesforce DX is still in beta, we are proud to introduce our implemented SFDX support in The Welkin Suite IDE, so you now can try this out for yourself and your team, and enjoy working with SFDX in a 'The Welkin Suite' way, without loosing the benefits of the IDE.
SalesforceDX CLI Installation
Working with SFDX-related functionality requires you to have the Salesforce DX Command-Line Interface installed on your PC:
- If you already have the latest version of SFDX CLI installed - you don't need to do anything.
- If you are installing the Bloom R6 version of The Welkin Suite IDE, using the installer from the website, you will have an option to 'Install Salesforce DX CLI' as a part of your installation.
- If you already have TWS installed, and once it is updated to the Bloom R6 version, you will need to install the CLI manually from the official website.
New project type - Salesforce DX Project
Previously, The Welkin Suite provided only one possible type of projects for regular Salesforce development. In that project, we were storing a whole bunch of information that was tied up directly with you Salesforce organization - credentials (encrypted), ID's, and other significants for our information processes.
Now, with new abilities provided by SFDX, your code and metadata are no longer tied up with your organization, so we are introducing a new project type specifically for this. The differences between the regular Salesforce project and SalesforceDX projects are:
- Information about Salesforce organizations is not stored in the project file
- The project structure is the same as with all the projects that are created using the SalesforceDX command-line interface
- Information about files, which are included in a project, is not stored in a project file - the project folder and files in it defines the project content
To create a new SalesforceDX project please use the same 'File → New → Project' option from the main menu, select 'Salesforce DX Project', change the location of the project (if needed) and click 'OK'.
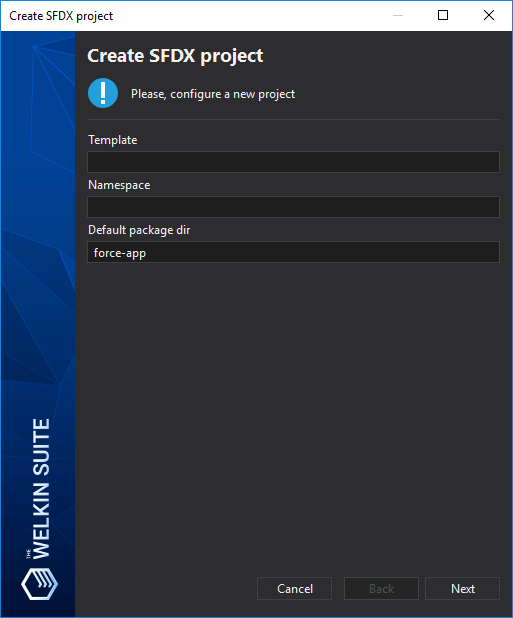
In the project creation wizard, you have the following optional fields to specify - they will be passed to the 'force:project:create' command:
- Template - The template, which is used to create a project. Translates into '-t | --template' argument.
- Namespace - The namespace which is associated with this project, and any connected scratch orgs. Translates into '-s | --namespace' argument.
- Default package dir - The default package directory name. Metadata items are placed inside this folder. The default value is 'force-app'. Translates into '-p | --defaultpackagedir' argument.
After the wizard finishes, you will have your new project opened in the IDE, with the default SFDX structure.
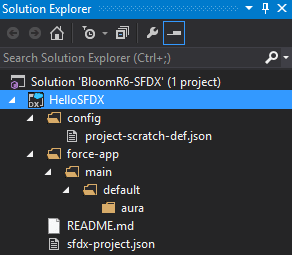
Once your Salesforce DX project is opened, you can use most of the features of the IDE, we will additionally cover this topic below.
Built-in Command Line
SalesforceDX starts with the command line, and of course we have added the command line right into The Welkin Suite IDE, so if you need to do anything directly with the command line you will not need to switch to 'cmd' - it's available for you in the 'Command Line' panel which you can enable in the 'View' menu.
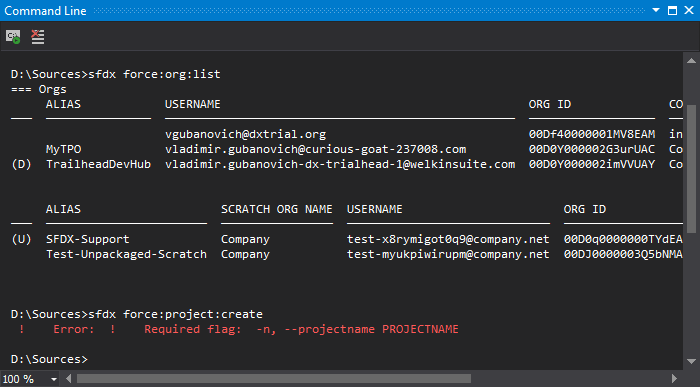
In the Command Line panel, you have a regular Windows cmd, so you can execute there not only SFDX related commands.
By default, when you open the Command Line, your working directory will be set to your project's directory.
In the toolbar of this panel you have the following options:
- Open the standard Windows CMD in the currently active directory
- Clear output
In cases where any errors would appear when executing something in the command line, the IDE will highlight them in a red color. If you'd like to change this color, you can do this using the 'Tools → Options' menu, navigate to the 'General → Fonts and Colors' and find 'Command Line - Text' or 'Command Line - Error' items.
Organizations Manager
As we've said previously - SFDX starts with the command line, but why should you have to use this for common operations, if you could be doing the same thing using the great friendly UI that we've built?
One of the very cool features that we got with Salesforce DX, is that it provides us with a very convenient way of managing Dev Hubs and Scratch orgs. The only thing that separates it from being ideal, is a lack of the UI, so we've implemented one and called it 'Organizations Manager'. You can access this panel as usual from the 'View' menu.
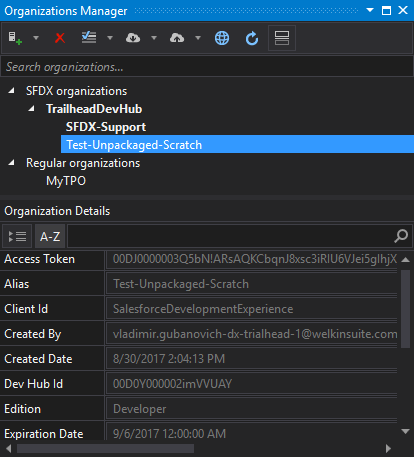
The 'Organizations Manager' consists of 3 main parts:
- Toolbar
- List of organizations, that are stored in the SFDX CLI
- Details pane with information about a selected organization
Let's go through them in more details.
In the toolbar you have the following items:
- Option to add a Dev Hub or regular Organizations to the list of orgs, or to create a new scratch organization. Please note that the option to create a new scratch org is available only when the Dev Hub organization is selected in the list.
- 'Delete' or 'Exclude' button - it deletes scratch orgs or excludes regular and dev hub orgs from the SFDX CLI list of organizations.
- 'Make default' - allows you to mark a dev hub as a default dev hub or certain scratch organization as a default scratch organization. You can do this both globally, or just locally - for a current project. We will go through the usage of default dev hubs and scratch orgs below, when we will explain how existing features of the IDE are working for SFDX projects.
- 'Pull' and 'Push' - they are enabled only when some scratch org is selected in the list. These buttons allow you to pull or push sources of the current project to the selected organization. For both push and pull, you also have an option to make a 'force push' and 'force pull' - this translates to '-f | --forceoverwrite' argument for 'force:source:push' and 'force:source:pull' commands and executes a push/pull even if there are any conflicts.
- 'Open in browser' opens a selected organization in your default browser. This is a handy way to execute the 'force:org:open' command without touching the command-line.
- 'Refresh' executes full refresh of the organizations list, so it executes 'force:org:list' command.
- 'Toggle details pan' shows or hides the details pane in the lower part of the Organizations manager.
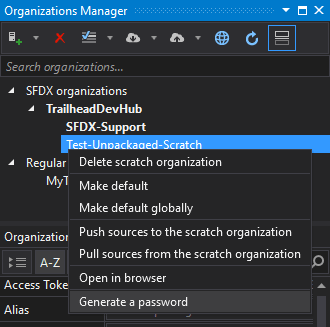
In the organizations list, you can find the list of your organizations, separated into two groups - SFDX organizations (includes Dev Hubs and Scratch orgs), and Regular organizations (includes Production environments, Sandboxes and Developer orgs). Information that is displayed in the list is the same as which you can get using the 'force:org:list' CLI command.
For each Dev Hub in the list, you will also see the list of Scratch orgs that were created using that Dev Hub.
In the context menu for orgs, in the list you will get the same options as in the toolbar, however, for scratch orgs, you will also have an option to easily generate a password in just one click.
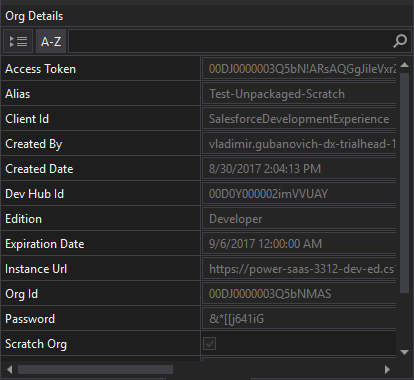
In the lower part of the panel, you can find the 'Organization details' pane. Here you will see detailed information about your selected organization. All the properties that you can get using the 'force:org:display' command will be shown in a convenient way, with additional options to filter properties by name, show them in alphabet order, or by categories. There is also a possibility to copy values, in case you need them somewhere else.
Creating Scratch orgs
When you select the 'Create Scratch org' action from the toolbar or context menu in the 'Organizations manager' panel, you will see the following wizard, which will guide you through the Scratch org execution process.
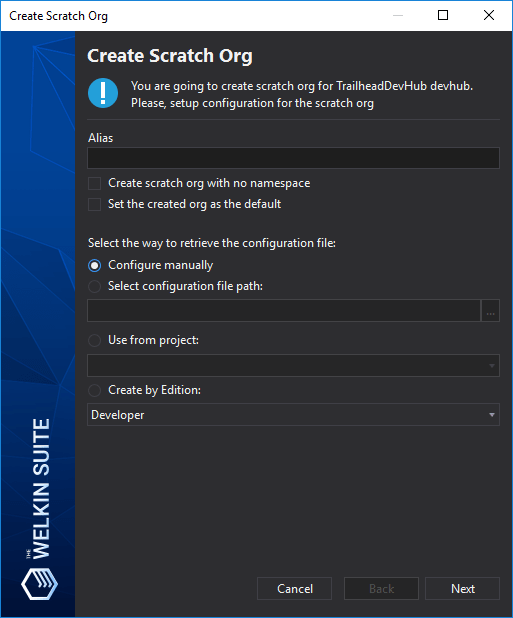
Let's go through the options on the first step of the wizard. These options will be passed to the 'force:org:create' CLI command:
- Alias - the short name (or alias) of the scratch org you are creating. Passed to the CLI as the '-a | --setalias' argument.
- Create scratch org with no namespace - creates a scratch org with no namespace. This would be useful when using a scratch org to test installations of packages with namespaces. Passed to the CLI as the '-n | --nonamespace' argument.
- Set the created org as the default - sets the created org as the default username. Translates into the '-s | --setdefaultusername' argument.
Additionally, you have one of the four options to select which scratch org configuration should be used:
- Configure manually option, this will lead you to the second step of the wizard, where you will be able to configure different parameters of a scratch organization.
- Select configuration file path option, this allows you to manually select a json file that you'd like to use as a scratch org definition.
- Use from project option, this gives you an ability to select a default scratch org definition file from one of the opened Salesforce DX projects
- Create by edition option, this creates a scratch org of the selected edition, with the default configuration.
If you have selected a manual configuration of your scratch org, you will see the following window when you will click on the 'Next' button:
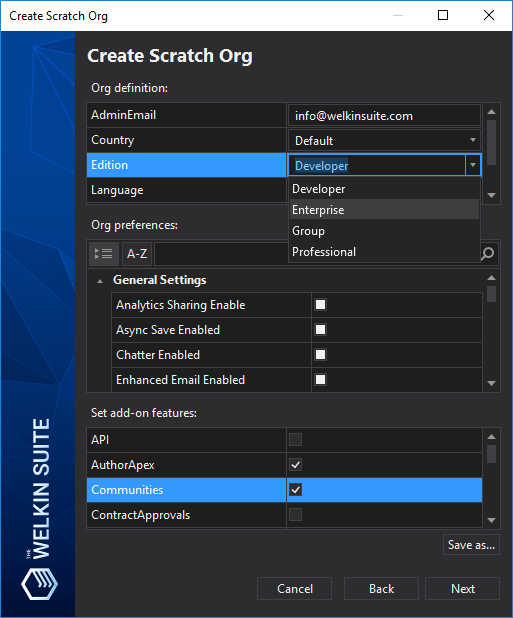
On this step you are able to configure the following parameters for the Scratch org:
- Org definition section, which contains the general parameters that are required for an org creation. You need to fill in all the fields, in this section.
- Org preferences section, which contains various preferences of the organization, like what functionality is available. Please note that the checkboxes in this category have 3 states - enabled, disabled and default.
- Set add-on features section, which allows you to select additional features to be enabled for the organization.
Once you finish with all the settings for the organization and press 'Next' button, the IDE will call the 'force:org:create' command with the selected attributes, and if it is successful, it will additionally call the 'force:org:display' command to show you the properties of your new organization.
Using The Welkin Suite's existing features with Salesforce DX projects
As you might guess, the changes from the 'organization-centric' to the 'sources-centric' approach have led to a huge amount of modifications in the existing functionality of the IDE. The main reason for this is that different parts of the application were tightly coupled with the information about your Salesforce organization - from now on, for DX projects, there won't be such information.
Taking this into account, the behavior of some of the existing features were changed accordingly:
- Content of a project is not defined by '.sfproj' or 'package.xml' files - instead of this, The Welkin Suite monitors your project folder, and automatically updates the Solution Explorer with any changes that happened in a file system.
- For 'Test Results', 'Code Coverage', and 'Logs' panels, in addition to regular projects, you will see a root-level item corresponding to your current default scratch organization. This means that if you have a default scratch org - these three panels will monitor the given organization and show you everything as for any usual project. In cases when you change your default scratch organization, this panel will reflect the change with a minimal delay.
- sObjects and Custom Settings definitions for the Apex Code Assistance functionality are retrieved for your default scratch organization. If you would switch your default scratch org, the IDE will retrieve the details for your new org in the background, and it will show you the corresponding completions after a small delay.
- 'Execute Anonymous Apex' and 'SOQL Executor' are also working with your default scratch organization.
- 'Pending Changes' panel is disabled for SFDX projects, since this information is handled by the SFDX CLI, and it is not available for TWS.
- The regular 'Pull from Salesforce' option is not available for SFDX projects, because there is no direct project-organization connection - instead, you can pull sources from a specific organization using the 'Organizations Manager' panel.
Known limitations related to Salesforce DX projects
While we are happy to bring you the Bloom R6 version of The Welkin Suite IDE, which has an ability to make the most common and important actions related to SFDX, every feature of the IDE, still is not available for SFDX projects. As the changes brought to us by the new SFDX approach require a significant amount of work, we will keep working in this direction, however, please find a list of disabled features or features with limited functionality for DX project below:
- Local History and Version Control panels are disabled.
- The built-in previewer for Lightning Components and Applications editor is temporarily disabled.
- The Apex Retrospective Debugger, Profiler, and 'Go to source' option from debug logs are not yet available, due to a large amount of changed information in the project definition file, and in order to avoid significant performance drops.
- Unit tests results, that appear directly in the apex editor, options to execute unit tests directly from the apex editor, as well as navigation from the test results panel to the apex classes is not working for SFDX projects, due to the loose (or absent) connection between the project and organization. This will be enabled later.
- Due to the decomposition of sObjects into separate fields in the SFDX approach, the sObjects Inspector is also temporarily unavailable for SFDX projects
Other changes
The second big part of our release is not directly related to any particular feature of the IDE - we have made a complete refactoring and optimization of our codebase. As a result of these changes, a lot of different areas in the application have been affected - starting from fixing multiple different bugs, up to improving the performance of almost every operation in the IDE.
In some cases, this refactoring has resulted in improved functionality, such as the objects deployment process is now being properly indicated in the output panel, in the same way as 'Build' process.
We have also worked on code assistance improvements - we have resolved a couple performance related issues, that were reported by our users for Visualforce and Apex editing. We have also implemented the 'Collapse to definitions' functionality for Apex - you can access it using the 'Edit → Outlining → Collapse to definitions' menu.
The irony that autumn is approaching does not pass us, as autumn is the time to reflect and see the fruits of everyone's labor, and this allows all of us to rest more comfortably that all will endure into the next year, ahead of the game. We now have eyes on SFDX, and we have had the first taste of the promises that if offers, but as always, there is work to be done. The Welkin Suite Team is happy to be part of all of this, and as with all the other aspects of work dealing with declarative and admin work in Salesforce, we will continue to do our part in making your work more simple and enjoyable.
Full list of changes
Features
- Added Salesforce DX specific project types with corresponding new and updated functionality
- Added an 'Organizations Manager' panel for managing all SFDX-related organizations, including Dev Hubs and Scratch Orgs
- Added a built-in command line panel
- Added a Scratch org creation wizard
Improvements
- Improved the 'Deploy objects' process to display the process of execution in the Output panel
- Improved performance of almost each operation in the IDE
- Improved general stability of the IDE and its components
Fixes
- Fixed performance issues in the Visualforce editor
- Fixed performance issues in the Apex editor
- Fixed multiple bugs and issues across the whole IDE




Your comment may be the first