


Lightning Components: An Innovative Bridge to the Future of Development
Ever since Salesforce announced its Lightning Component Framework, not only has it immediately become the core of a series of discussions--it has also raised the bar for technological advancement of Salesforce applications and IDEs. As a result, in a number of ways this has established the direction for Salesforce development by introducing a set of integral features, which have to be taken into account and added to the functionality.


This article is dedicated to the essentials of working with Lightning components, namely, how to create the basic component, and build a UI that will consequently correspond to your ultimate development goals.
Despite the fact that Lightning components were introduced a few months ago, this technology is far from being fully adapted into the process of Salesforce development that most programmers are accustomed to. Likewise, not all of the existing Salesforce IDEs provide full-fledged coverage of Lightning Components Framework, which is rapidly evolving and gaining popularity among Salesforce end users. For this matter, the choice of the platforms on which the Lightning technology can be illustrated is limited. However, there are a few IDEs that keep up with the progress better than the others, and which have already adopted Lightning Components Framework to a great extent. From this viewpoint, The Welkin Suite IDE can be regarded as one of the leaders, with a considerable potential for future improvements.
Where to begin?
Logically, when taking a closer look at the Lightning components, the first thing to discuss is how to create these elements.
However, before you do so, you need to make sure your software is up-to-date. Namely, you need to have a Salesforce Developer org that dates back to summer 2015 or later, with ‘My Domain’ feature enabled in this org. Apart from that, you need to ensure that you have the latest version of The Welkin Suite IDE installed.
While Lightning Components Framework introduces a new level of complexity to Salesforce development, it is best to start by creating a simple component that will both illustrate the potential of the technology, and be easy enough to master. An Opportunities component that allows us to view and filter opportunities by stages will be perfect for sampling the Lightning Experience.
The first step is to create the Lightning component as such called OpportunitiesViewer. However, to be able to view the results of our work in the first place, it is essential to create a Lightning app to display the aforesaid component. Let’s name it AppTotest.
To do so, it is necessary to go through the following steps in The Welkin Suite IDE:
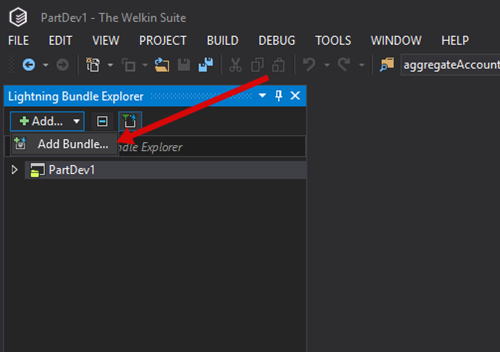
- Open the View menu in the Main Menu, and then select ‘Lightning Bundle Explorer’.
- In this Lightning Bundle Explorer, select ‘Add Bundle’ option.
- Choose ‘LightningApplicationBundle’ and name it AppTotest. All the remaining settings can be kept default.
- Go through Step 2 once again and add a new bundle, but this time select LightningComponentBundle in the ‘Add New Item’ window. Let’s name this component OpportunitiesViewer, and keep all the other options unchanged.
Also, to work with this component, you’ll need an Apex class. To create it, find the Solution Explorer panel on your right, then right-click on the name of the newly created component and choose ‘Add New Item.’
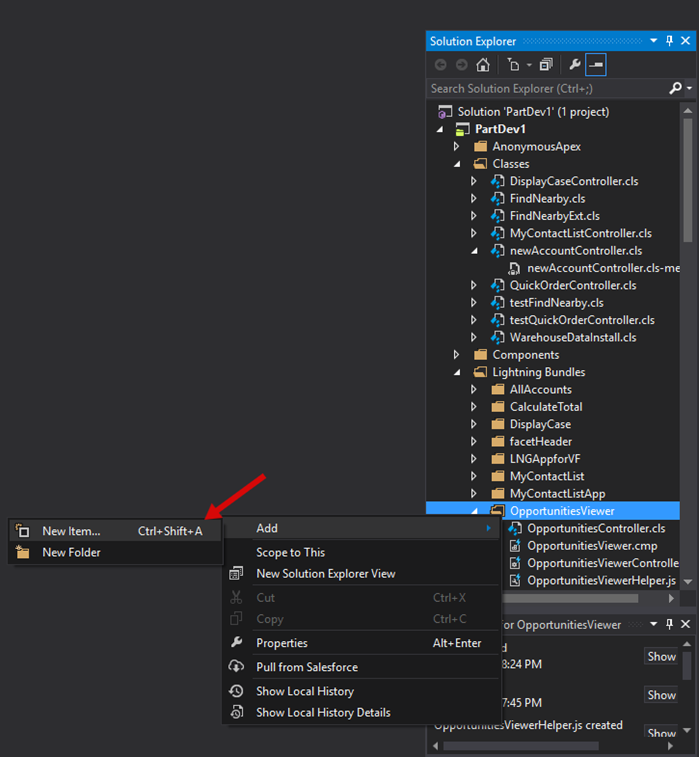
Select Apex Class as a type of the document and name it OpportunitiesController.
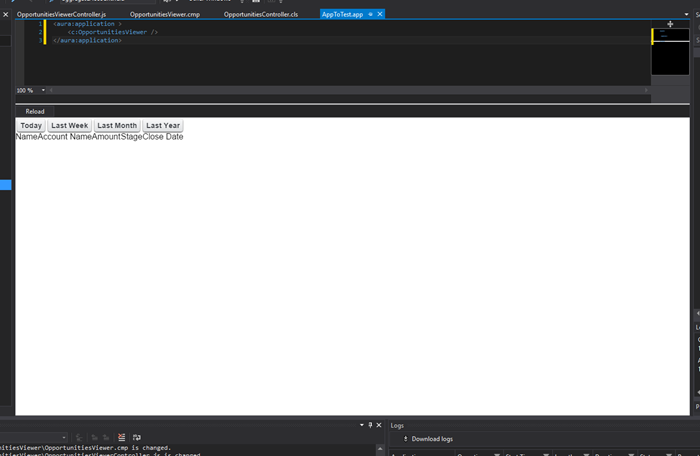
Now you have prepared the ground for creating the first Lightning component. In order to be able to view the results of our actions, it is best to add this component to the application. Please open AppTotest that you created before and change the content of this file to the following strings of code:
<aura:application >
	<c:OpportunitiesViewer />
</aura:application>
Upon saving the file, you will see a white bar at the bottom of your screen, which appears due to the fact the component is still empty and does not feature anything that can be displayed yet. However, this is the window to check whenever you need to examine the results of your work.
Now that the component is created, it is time to investigate what it does.
- On the server’s side, the Opportunities collection and the available list of stages get called.
- The collections are passed to the client’s side.
- A table with the Opportunities is rendered along with the checkboxes with stages.
- The user selects the stages to be displayed and/or the date the Opportunity was closed.
- These conditions are gathered on the client’s side and transferred back to the server.
- A new collection with the appropriate conditions is called on the server’s side.
- This collection is passed to the client’s side again, and is then rendered.
How to create the UI part of the Lightning component
Now that the component is created and it is obvious exactly what it does and how this process occurs, we suggest to move to creating the UI part, and specifically, the markup of the component and its controller part.
Since Aura does not allow using in-line Javascript, typed Aura attributes are used to store the object and collections. These attributes are given on the component’s page, which looks the following way:
<aura:attribute name="selectedStages" type="String[]" description="List of selected opportunity stages" />
You can call this attribute from the Javascript controller and Helper using its name in this syntax:
stageCollection = cmp.get('v.selectedStages');
cmp.set('v.selectedDate', stageCollection);
Also, it will be necessary to call these functions when loading. This can be done with the help of the Aura handler functionality:
<aura:handler name="init" value="{!this}" action="{!c.init}" />
This functionality will give the “init” function when initializing.
At this stage, you can proceed onto creating the markup of the component. Open the OpportunitiesViewerComponent and change the content of the file to the code below:
<aura:component controller="OpportunitiesController">
    <aura:attribute name="allOpportunities" type="Opportunity[]" description="List of opportunites to display" />
        <aura:attribute name="allStages" type="String[]" description="List of all available Stage Names" />
        <aura:attribute name="selectedStages" type="String[]" description="List of selected opportunity stages" />
        <aura:attribute name="selectedDate" type="String" description="Selected Date" />
        <aura:handler name="init" value="{!this}" action="{!c.init}" />
    <div>
        <ui:button aura:id="today" class="button" label="Today" press="{!c.searchDate}" />
        <ui:button aura:id="week" class="button" label="Last Week" press="{!c.searchDate}" />
        <ui:button aura:id="month" class="button" label="Last Month" press="{!c.searchDate}" />
        <ui:button aura:id="year" class="button" label="Last Year" press="{!c.searchDate}" />
    </div>
    <div>
        <aura:iteration items="{!v.allStages}" var="item">
            <label><input name="checkbox" type="checkbox" id="{!item}" onchange="{!c.selectStage}" />{!item}</label>
        </aura:iteration>
    </div>
    <table>
        <thead>
            <tr>
                <th>Name</th>
                <th>Account Name</th>
                <th>Amount</th>
                <th>Stage</th>
                <th>Close Date</th>
            </tr>
        </thead>
        <tbody>
            <aura:iteration items="{!v.allOpportunities}" var="item">
                <tr>
                    <td>{!item.Name}</td>
                    <td>{!item.Account.Name}</td>
                    <td>{!item.Amount}</td>
                    <td>{!item.StageName}</td>
                    <td>{!item.CloseDate}</td>
                </tr>
            </aura:iteration>
        </tbody>
    </table>
</aura:component>
The Apex class should be declared in the following part of the code:
<aura:component controller="OpportunitiesController"
This way, the component will call the appropriate location.
At the same time, the component allows iterating by the collection, and filling the necessary fields.
So far you have the collections for Opportunity and StageName, along with the handler that will call the execution of a function during the launch process. Apart from that, you also have a set of buttons, which are necessary to filter the Opportunity list by dates. Please pay attention to the fact that these buttons have an aura:id attribute, which will be used to define which button was hit and which date should be passed to the controller.
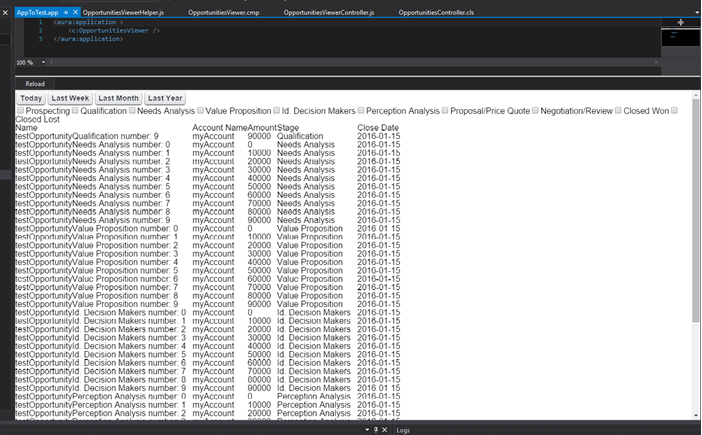
After that, the iteration by the collection of stages will generate a checkbox for each stage. That is how the table gets filled. The table header needs to be hardcoded, while the content of the lines will be generated via the iteration by the Opportunity collection received from the server. This is when you can build your project and go to the application tab. This is what this tab will display:
And then - voila - you just created the UI of your Lightning Component!
The Logic of the Client Controller
Now that we have the UI ready, it is about time to pay attention to creating the part of the logic of the client controller.
To do so, please right-click on the component name in the Lightning Bundle Explorer, and select ‘Add Controller.’
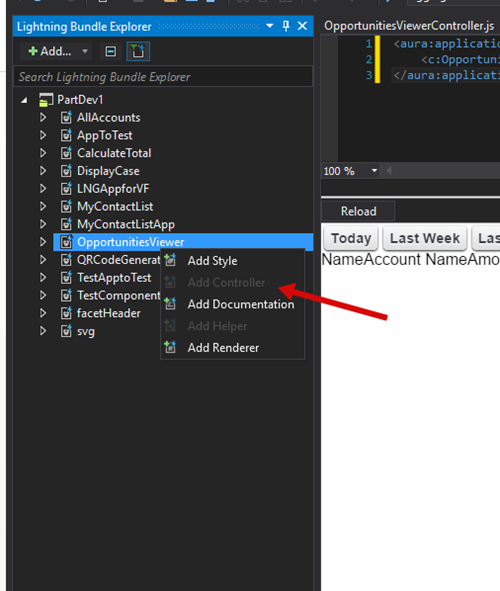
When done, please change the content of the newly created controller to this:
({
	init: function (cmp, event, helper) {
		helper.getOpportunities(cmp, event, helper, cmp.get('v.selectedDate'), cmp.get('v.selectedStages'));
		var action = cmp.get('c.getStageNames');
			action.setCallback(this, function(response){
				if (response.getState() === 'SUCCESS'){
					var stages = response.getReturnValue();
					cmp.set('v.allStages', stages);
					console.log(stages);
				} else if (response.getState() === 'ERROR'){
					var errors = response.getError();
					cmp.set('v.errorList', errors);

				}
			});
			$A.enqueueAction(action);

	},
})
Possibly, you may have noticed the following line and gotten a bit confused:
helper.getOpportunities(cmp, event, helper, cmp.get('v.selectedDate'), cmp.get('v.selectedStages'));
The case is, Aura does not allow referring to methods from the controller, so if the method is called more than once, it is best to move it to the Helper and call it from there. When calling the method, we have transferred to it the ‘(cmp)’ component which called this method. We also sent the ‘(event)’ which could also have called it, as well as the Helper itself to allow calling of other methods from this method.
We used the parameters cmp.get('v.selectedDate') and cmp.get('v.selectedStages') to transfer the collections which we took from the Aura Attribute.
Creating the getOpportunities Method
Now let’s take a closer look at the ‘getOpportunities’ method. To do so, we need to create a Helper file, similar to the way we created the Controller, and change its content to the following strings of code:
({
	getOpportunities : function(cmp, event, helper, closedDateFilter, stageCollection){

		var action = cmp.get('c.getOpportunities');
		action.setParams({ 'fromDate' : closedDateFilter, 'selectedStages' : stageCollection});
			action.setCallback(this, function(response){
				if (response.getState() === 'SUCCESS'){
					var opps = response.getReturnValue();
					cmp.set('v.allOpportunities', opps);
					console.log(opps);
				} else if (response.getState() === 'ERROR'){
					var errors = response.getError();
					cmp.set('v.errorList', errors);

				}
			});
			$A.enqueueAction(action);
	},
})
Apex Method Syntax
The syntax for calling the Apex method is as follows:
var action = cmp.get('c.getOpportunities');
		action.setParams({ 'fromDate' : closedDateFilter, 'selectedStages' : stageCollection});
			action.setCallback(this, function(response){
				if (response.getState() === 'SUCCESS'){
					var opps = response.getReturnValue();
					cmp.set('v.allOpportunities', opps);
					console.log(opps);
				} else if (response.getState() === 'ERROR'){
					var errors = response.getError();
					cmp.set('v.errorList', errors);

				}
			});
			$A.enqueueAction(action);
First off, we need to declare the syntax, so we refer to the method var action = cmp.get('c.getOpportunities');
When done, we can set the parameters for calling it. It is very important that the parameter names we have coincide with the parameter names in Apex.
After this, the server processes the response, which has the following template:
action.setCallback(this, function(response){
if (response.getState() === 'SUCCESS'){
		// Your logic for success execution
} else if (response.getState() === 'ERROR'){
		var errors = response.getError();
		cmp.set('v.errorList', errors);
				// Your logic for execution with error
	}
});
$A.enqueueAction(action);
In our case, if the function is executed correctly (meaning the collection is received, even if it’s empty), we save this collection to the Attribute and finish the method.
In case some error occurs with the execution, we will see the text of this error on the component’s page.
In general, all Apex method calls look like this. In the logic of successful/unsuccessful execution, we can process both simple operations (assignment), and calling other methods.
Now let’s get back to the previous initialization method.
After all of the above, the server method named getStageNames is called. As a result, we will get the collection of stage names, which we can save in the appropriate attribute.
At this stage, to see the first results of our work, we only need to create the server’s logic for receiving collections. To do so, we need to open the OpportunitiesController file and change its content to the following:
public class OpportunitiesController {


	@AuraEnabled
	public static List getStageNames() {
		List Stages = new List ();
		Schema.DescribeFieldResult fieldResult = Opportunity.StageName.getDescribe();
		List ple = fieldResult.getPicklistValues();
		for (Schema.PicklistEntry p : ple) {
			Stages.add(p.getLabel());
		}

		return Stages;
	}

	@AuraEnabled
	public static Opportunity[] getOpportunities(String fromDate, List  selectedStages) {

		Date closedDateFilter = Date.today();
		if (fromDate == 'today') {
			closedDateFilter = Date.today();
		} else if (fromDate == 'week') {
			closedDateFilter = Date.today().toStartOfWeek();
		} else if (fromDate == 'month') {
			closedDateFilter = Date.today().toStartOfMonth();
		} else if (fromDate == 'year') {
			Integer dayOfYear = Date.today().dayOfYear();
			closedDateFilter = Date.today().addDays(- dayOfYear);
		}

		if (selectedStages == null || selectedStages.size() < 1) {
			return[SELECT Name, Account.Name, StageName, CloseDate, Amount, Probability FROM Opportunity Where CloseDate >= : closedDateFilter Limit 50]; // Limit 50 is used for example, to avoid hiting limits of Salesforce. Pagination will be shown in next article
		} else {
			return[SELECT Name, Account.Name, StageName, CloseDate, Amount, Probability FROM Opportunity WHERE CloseDate >= : closedDateFilter AND StageName in : selectedStages Limit 50]; // Limit 50 is used for example, to avoid hiting limits of Salesforce. Pagination will be shown in next article
		}
	}
}
We’d like to remind you that we specified before that the following class is the server Controller of our component: Let’s look into this class a bit more. To make the method available for the Lightning Application/Component, it should be declared with the tag ‘@AuraEnabled’ above it.
In the method getStageNames, we are using the built-in ‘Schema’ namespace (read more about ithere) to receive the list of available stage names. This method is only used when initializing (loading) the component. It does not receive any parameters, it merely returns the collection of stage names.
The next method is in charge of calling the Opportunities collection from the database and returning it to the component. As parameters, this method takes the filtering by date line (fromDate), and the collection of stage names (selectedStages).
First off, we need to define the date for filtration. In the description of the markup we emphasized the ‘aura:id’ attribute, which is used to display buttons. The case is, Javascript and Apex have different methods for working with the date. That is why, in order to avoid creating a more complex logic in Javascript, we decided to put the periods for filtration in words, and then form the date based on them in Apex. As we can see, the default value for the date is ‘today’, which means that, when loading the page for the first time, if the user has not selected the date, the current date will be used.
Database Query
The next stage is all about dealing with the database query, which is divided into two main cases:
- The initial loading of the component, or searching without the filters. In case none of the criteria are selected, all entries with the current date are requested.
- Using filters. In this case, all stage name entries that belong to the collection received from the component are called.
Chances are, you have noticed the Limit 50 part in the query text. It was added to avoid exceeding the org limitations.
At this stage, there are just a few things we need to do to see the results of our work.
First, make sure that you have at least one Opportunity in your org with a CloseDate = Today.
Now you can build your project (click F5), and then hit ‘Refresh’ on the Applications tab.
Voila-now the results of your work are clearly visible!
Getting Filtration to Work
As great as everything looks now, there is still no filtration at the moment. We should fix this now.
As you may remember, the server’s logic is not complicated, plus we have already created it, so all we need to do now is add the client’s logic.
We have two filtration types: by date and by stage name. That is why we will create two methods (we can go with one, but it will be too complex, and quite ugly), one method per each filtration type.
Let’s open the component’s Javascript Controller tab, and add these two methods to it:
selectDate : function (cmp, event, helper) {
		cmp.set('v.selectedDate', event.getSource().getLocalId());
		helper.getOpportunities(cmp, event, helper, cmp.get('v.selectedDate'), cmp.get('v.selectedStages'));
	},

	selectStage : function (cmp, event, helper) {
		checkboxId = event.target.id;
		stageCollection = cmp.get('v.selectedStages');
		index = stageCollection.indexOf(checkboxId);
		if ( index === -1){
			stageCollection.push(checkboxId);
		} else {
			stageCollection.splice(checkboxId, 1);
		}
		cmp.set('v.selectedStages', stageCollection);
		helper.getOpportunities(cmp, event, helper, cmp.get('v.selectedDate'), cmp.get('v.selectedStages'));
	},
The first method (selectDate) is very simple, as it takes its value from the aura:id button which called it, and saves it to the selectedDate attribute. Next, it calls the server method (by sending the filtration parameters) to receive the filtered collection.
The second method (selectStage) is very similar to the first one, except the fact that it saves the whole collection in the attribute instead of a single value. To implement element deletion from the collection (when we deselect the checkbox), we first need to check if this element is featured in the collection. If it is, we can then delete it. Unfortunately, Javascript does not support the built-in Array.contains() function. That is why we will be using the indexOf() function that returns the index, by which the element we search for goes by in the collection, and returns “-1” if the element is not present there. Following our logic, if the element is not featured, it needs to be added, and vice versa.
At the next stage, this method also calls the server method to get Opportunities.
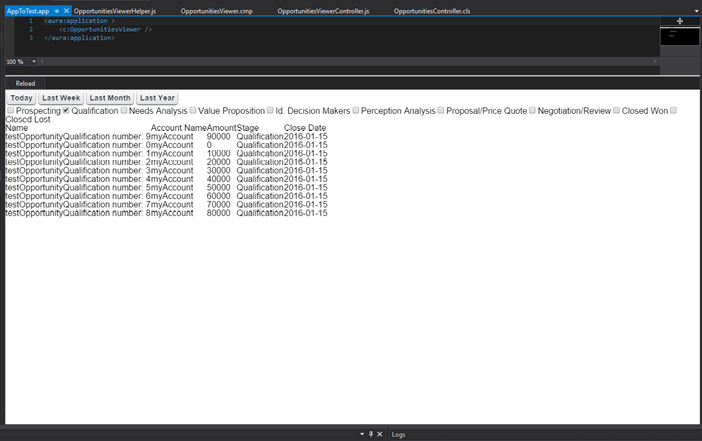
Now it’s time to build your project once again and enjoy the filtration running smoothly.
Some Post Factum Polishing
We could have stopped at this point, but you may have noticed that the above page does not look pretty at all. That is why we suggest using the Lightning Design System to add pre-set styles that have a ‘Salesforce look’ to them.
To do so, we need to go through three things:
- We need to install the Lightning Design System.
- Apply its classes to the markup.
- Disable the default Aura styles (even if they are not obvious to you, they are still enabled).
To install the Lightning Design System, please open a separate browser window and go to the ‘Salesforce Lightning Design System’ downloads page. Then look under the ‘Design System Unmanaged Packages’ section, and click on the latest version of the unmanaged package. Click ‘Install’ to have the package installed on your Salesforce org. This unmanaged package includes the Salesforce Lightning Design System as a static resource ZIP file. https://www.lightningdesignsystem.com/resources/downloadsAfter installing the Lightning Design System, it has to be connected to the application. Therefore, you need to open the application tab and after this part - <c:OpportunitiesViewer /> - please add the following line:
<ltng:require styles="/resource/slds0120/assets/styles/salesforce-lightning-design-system.css" />
NB: Please pay attention to the format of this link:
/resource/slds0120/assets/styles/salesforce-lightning-design-system.css
The numbers in slds0120 are the version of the Lightning Design System you have installed. Chances are, you will have a later version than we have in this example, so please specify the correct version.
Now we need to apply the classes to our markup. To make this happen, please open the component’s tab and change its content to the following:
<aura:component controller="OpportunitiesController">
        <aura:attribute name="allOpportunities" type="Opportunity[]" description="List of opportunites to display" />
        <aura:attribute name="allStages" type="String[]" description="List of all available Stage Names" />
        <aura:attribute name="selectedStages" type="String[]" description="List of selected opportunity stages" />
        <aura:attribute name="selectedDate" type="String" description="Selected Date" />
        <aura:handler name="init" value="{!this}" action="{!c.init}" />

    <div class="slds">
        <div class="slds-button-group" role="group">
            <ui:button aura:id="today" class="slds-button slds-button--neutral" label="Today" press="{!c.selectDate}" />
            <ui:button aura:id="week" class="slds-button slds-button--neutral" label="Last Week" press="{!c.selectDate}" />
            <ui:button aura:id="month" class="slds-button slds-button--neutral" label="Last Month" press="{!c.selectDate}" />
            <ui:button aura:id="year" class="slds-button slds-button--neutral" label="Last Year" press="{!c.selectDate}" />
        </div>
        <div class="slds-form-element">
            <aura:iteration items="{!v.allStages}" var="item">
                <label class="slds-checkbox" for="{!item}" onchange="{!c.selectStage}">
                    <input name="checkbox" type="checkbox" id="{!item}" />
                    <span class="slds-checkbox--faux"></span>
                    <span class="slds-form-element__label">{!item}</span>
                </label>
            </aura:iteration>
        </div>
        <table class="slds-table slds-table--bordered">
            <thead>
                <tr class="slds-text-heading--label">
                    <th scope="col">
                        <span class="slds-truncate">Opportunity Name</span>
                    </th>
                    <th scope="col">
                        <span class="slds-truncate">Account Name</span>
                    </th>
                    <th scope="col">
                        <span class="slds-truncate">Close Date</span>
                    </th>
                    <th scope="col">
                        <span class="slds-truncate">Stage</span>
                    </th>
                    <th scope="col">
                        <span class="slds-truncate">Confidence</span>
                    </th>
                    <th scope="col">
                        <span class="slds-truncate">Amount</span>
                    </th>
                </tr>
            </thead>
            <tbody>
                <aura:iteration items="{!v.allOpportunities}" var="item">
                    <tr class="slds-hint-parent">
                        <th data-label="opportunity-name" role="row"><a href="#" class="slds-truncate">{!item.Name}</a></th>
                        <td data-label="account"><a href="#" class="slds-truncate">{!item.Account.Name}</a></td>
                        <td data-label="activity">
                            <span class="slds-truncate">{!item.CloseDate}</span>>
                        </td>
                        <td data-label="stage">
                            <span class="slds-truncate">{!item.StageName}</span>
                        </td>
                        <td data-label="confidence">
                            <span class="slds-truncate">{!item.Probability + '%'}</span>
                        </td>
                        <td data-label="amount">
                            <span class="slds-truncate">{!item.Amount__formatted}</span>
                        </td>
                    </tr>
                </aura:iteration>
            </tbody>
        </table>
    </div>
</aura:component>
Now please open the Helper tab and add the following method to it:
removeAppStyles : function() {
        var allLinks = document.getElementsByTagName('link');
        var badLink;
        for (var i = 0; i < allLinks.length; i++) {
            thisLinkUrl=allLinks[i].href;
            var badName='/app.css';
            if (thisLinkUrl.substring( thisLinkUrl.length - badName.length, thisLinkUrl.length ) === badName){
			 allLinks[i].href = '';
			 }
        }
    }
There is one single step to go through before we are done! Create a Rendered file, and similar to the Controller and Helper, change its content to this code:
({
	afterRender : function(cmp, helper) {
        helper.removeAppStyles();
        var ret = this.superAfterRender();
        return ret;
    },
})
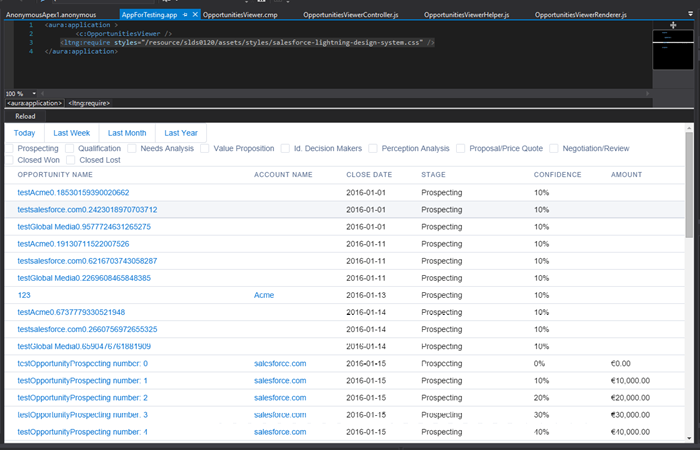
Now it’s all set! Send your project to build, and enjoy the miraculous transformation of the entire component.
Surely, what we have described above is nothing more than the tip of the iceberg, with great possibilities and complications hidden beneath the surface. And yet these basic guidelines are fundamental for understanding the principles of work with the Lightning Component Framework, and having mastered these steps, you will receive a pillar that will support your future successes in the up-to-date Salesforce development.


Your comment may be the first