


The wheels and gears at The Welkin Suite are turning as we are moving forward and extending the spectrum of features and possibilities available in our Mac version. In this release, we are glad to introduce the long-awaited Version Control support implemented through Git integration, followed by the possibility to manage your Lightning files in the Lightning Bundle Explorer. This way, you will no longer be faced with the teamwork issues - while your work with Lightning Applications and Components becomes more flexible and comfortable. 
Version Control System in The Welkin Suite - built-in Git support
In Salesforce development, it is not rare that a few developers are working on the same org - quite often, simultaneously, which inevitably triggers teamwork problems. To resolve them, version control systems (VCS) are used, which safeguard developers from losing their own progress, and overriding the work done to the file by somebody else. Git is one of the most frequently used version control systems, which provides users with a possibility to make changes to the same documents at the same time. This can be done owing to the fact that Git stores all of the files on the server, and the whole repository is locally duplicated to your PC once you check it from its central source.
In The Welkin Suite Nova, you can access the local repository in the same way you would access any local directory on your PC. This way, any of the files in this working copy are available for reading and writing. At that, The Welkin Suite makes your work even more comfortable by building in VCS integration, so you can take full advantage of Git without switching to external apps.
Now we’d like to introduce the ways you can work with Git in The Welkin Suite Nova - from setting up the repositories, up to reviewing, committing, and pushing the updates you made to the files.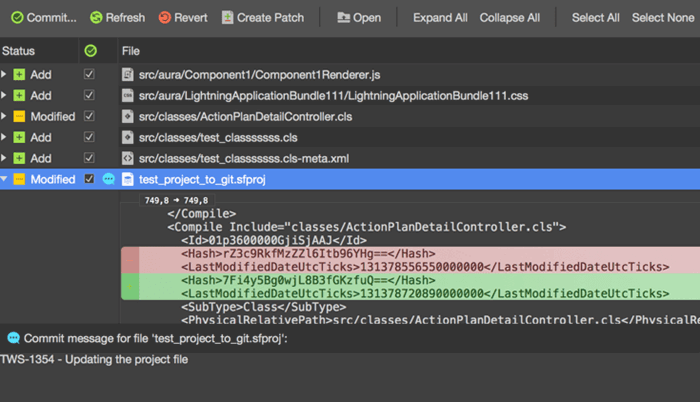
You can start working with Git directly from The Welkin Suite IDE in two ways:
- initialize the new Git repository on the remote server;
- connect to your existing remote Git repository.
We would like to draw your attention to the fact that both these options are available for your new TWS projects - when you create them, you need to select whether the project would be connected to Git or not.
If you created a project without Git settings, you won't have a possibility to change it, but you can always create a new project related to the needed Organization.
Start work with a new Git repository
If you want to initialize a new Git repository for your existing TWS project, first of all, you need to set up this repository according to the selected source control provider (GitHub, BitBucket, etc.). When done, we can start connecting to it in The Welkin Suite IDE: open the menu Version Control → Publish in Version Control....
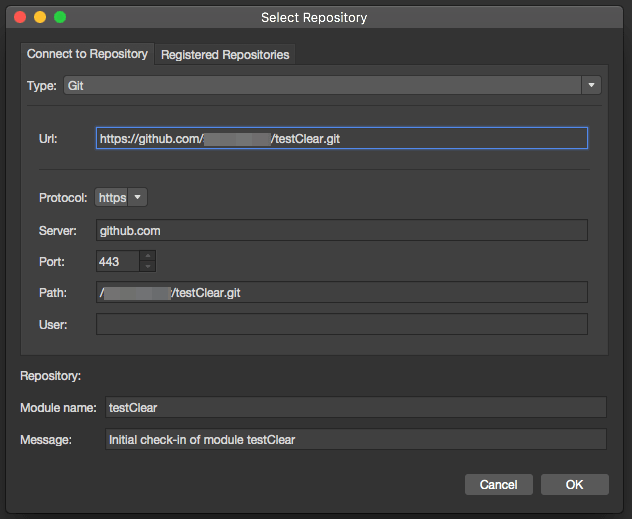
You will get the 'Select Repository' pop-up. Select the 'Connect to repository' tab, specify the name of the repository, which you would like to display locally, and paste the URL from your source control provider:
Once you click 'Ok', the confirmation message about publishing your solution on the remote server will appear. Also, it is necessary to enter your credentials to the remote repository.
If everything is correct, you will see the appropriate message or an error. When the operation is successful, project files would be displayed on the remote.
After these actions, you can navigate to the Version Control menu again, and see that all version control options for your local repository are now available: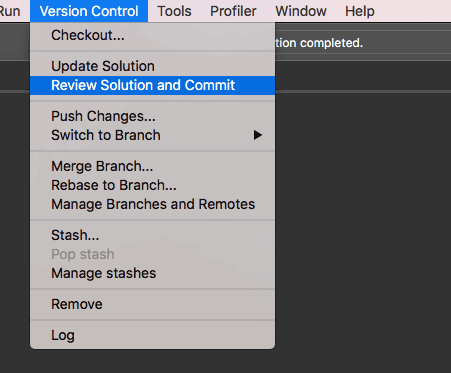
Use your existing Git repository
The most common case is when the developers are working with the existing repository shared with their teams. This option is also covered in The Welkin Suite Nova, and you can connect to your remote repository directly from the IDE.
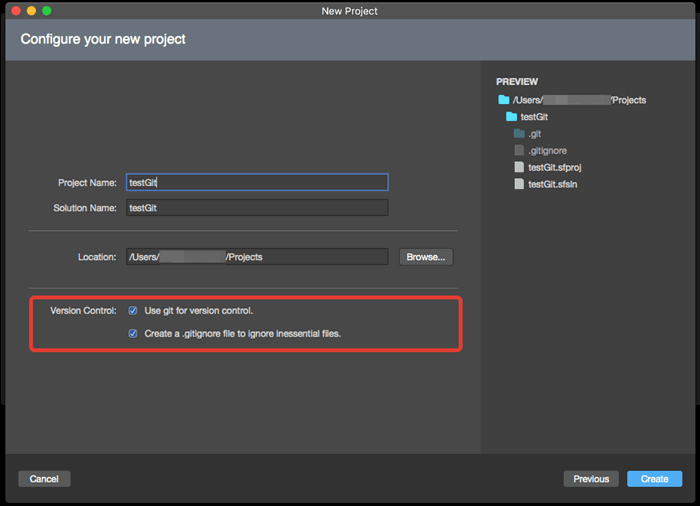
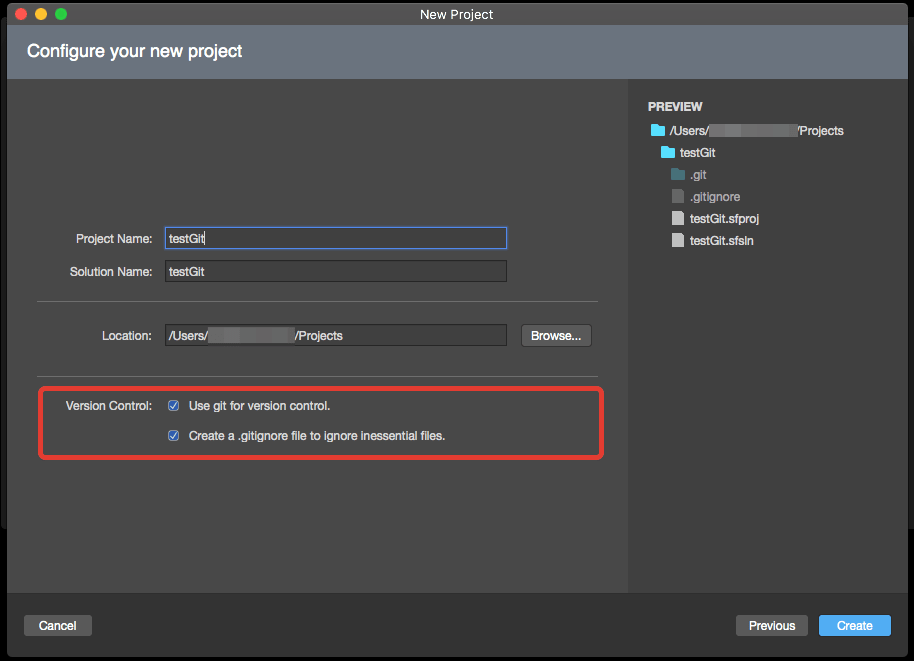
When you are creating a new project, you need to enable the checkboxes 'Use git for version control' and 'Create a .gitignore file to ignore inessentials files' when configuring your new project.
 After the solution is loaded, in the Version Control menu, you can check that all version control options are already available for the local repository.
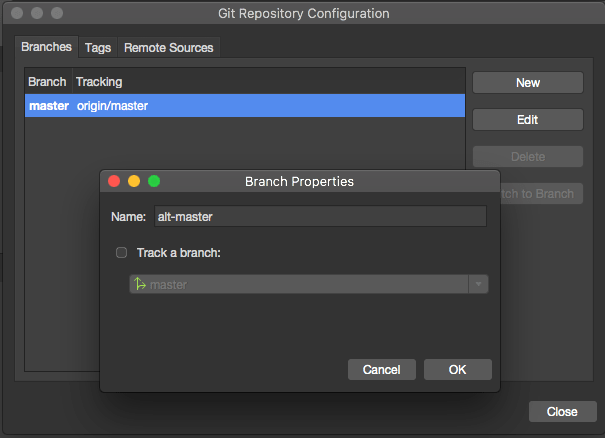
To connect to your existing repository, navigate to the same Version Control menu, and select the Manage Branches and Remotes - in the window that appears you can enter the settings for your repository.
Also, in the menu 'Branches', you have a possibility to select the branch, which you will use for your further work, specify the local name for this branch, and set a tracking for it: The selected branch will be displayed next to the name of your Solution in the Solution Explorer.
Work with Git in The Welkin Suite
After the previous actions, when your Git repository is initialized in The Welkin Suite IDE, you can proceed with your usual working process via Git directly from the IDE.
TWS provides you with the common version control options, and you can operate with them in the IDE the next way:
- Pull: to integrate the changes made by your team membres to a remote repository, you should navigate to the Version Control → Update Solution;
- Push: when you've modified the necessary files in the IDE, reviewed and committed them, and you want to share these changes with your colleagues, which have access to your remote repository, click on the Version Control → Push Changes. You will get the Push dialog, allowing you to see the committed changes, and here you can select the branch to push to:
- Commit: you can make a commit and push your changes at the same time, using the Commit dialog. To open it, navigate to the Version Control → Review Solution and Commit.
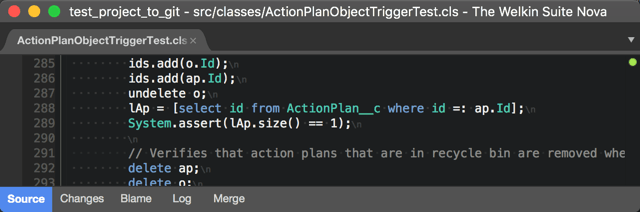
At the same time, in the bottom menu of the code editor you have the additional options in the separate tabs: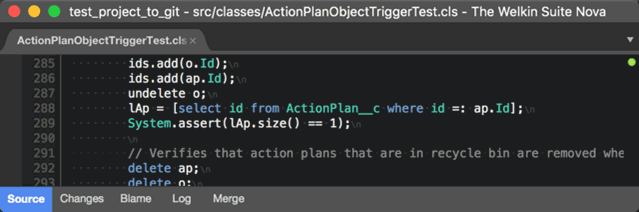
- Source options display your source code file;
- in the Changes tab, you can see the difference in the code between your local file and the base file; also, here you have the option to compare the different versions of the file from different hashes;
- using the Blame, you can check the username of the user who is related to each section of code;
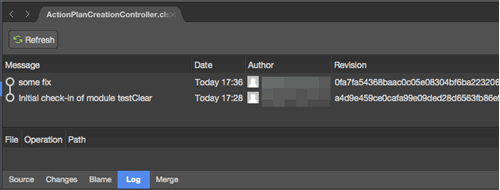
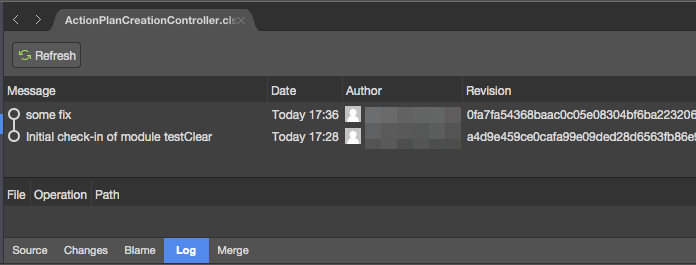
- all the commits, dates, times, messages, and responsible for the file users are present in the Log:
- in case you need to merge a conflict when you commit your changes, you can use the option from the Merge tab. Here you can find a visual representation of your changes and the other developers' one, and it allows you to combine both sections of code cleanly.
Also, The Welkin Suite Nova provides you with additional abilities to configure a style for your commit messages. Follow the next steps to get access to this tools: open the context menu of your TWS project, select Options, and you will see the newly added item in Version Control → Commit Message Style. You can easily select the Version Control Policy from the next cases:
- Parent policy - in if you select this item, the project will use the same settings for commit messages that are set for your Solution;
- Mono - these are the settings that are commonly set for Mono development, and the default configuration for your commit messages in the IDE is exactly the same;
- Custom - means that you are working with you own configured commit message style. If you've selected either of the aforesaid options, and then changed at least one of the options below - the Version Control Policy will be automatically changed to 'Custom'.
The next items that you will see are the actual settings for your commit messages, and they are as follows:
- Use bullets;
- Align message text;
- One line per file;
- Include file directories;
- Indent entries;
- Add a blank line between messages;
- File list and message in separate lines;
- Wrap.
The Previewer will help you to check the view of your commit message just when you change any of these settings, and you can choose whether or not you want to use an option at the moment: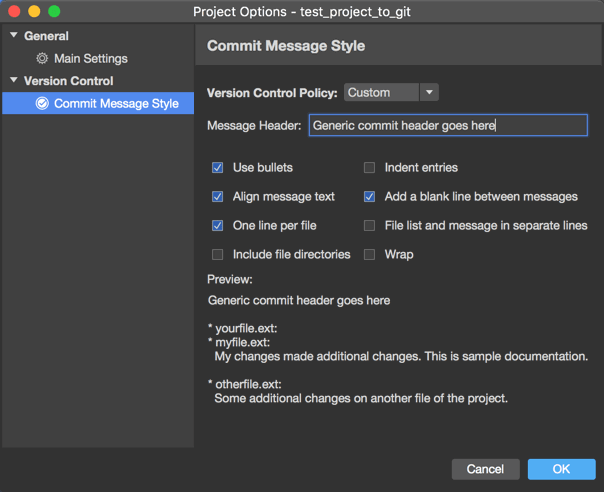
If you've just started your work with Git and you have no global settings for your repository, you can be faced with some issues which are described here and here.
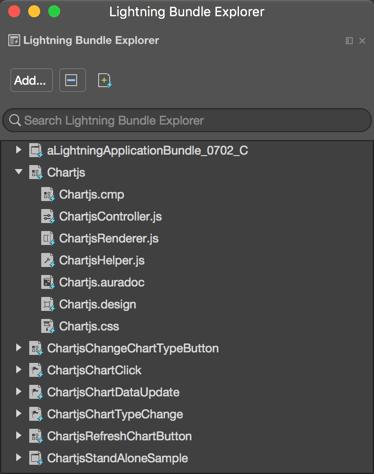
Abilities to manage your Lightning files in the Lightning Bundle Explorer
The Lightning framework becomes more and more widespread, and occupies a significant place in the Salesforce development. Furthermore, at least every other project is currently created using the Lightning - and Salesforce is consonantly working on improving the Lightning experience. It goes without saying that, to provide you with the best user experience, we need to keep up and make sure that you get the appropriate toolset for Lightning development. The Welkin Suite already supports Aura that can be included to your TWS project, and beginning from the Nova R4 version of the IDE, we are going to make your work with Lightning more convenient and faster. Now you shouldn't switch to your Organization to create Lightning components, applications, or their members - everything is available directly from The Welkin Suite IDE. Also, you can easily manage all these files in the Lightning Bundle Explorer.
You can open it via the menu View → Pads → Lightning Bundle Explorer. This way, you have a possibility to see all your Aura files separately from the other metadata, and each bundle is presented as an individual item with the included members.
In the toolbar on the panel, you will see three options that will help you during your work: Add, Collapse All, and Show Only Existing Files. The 'Collapse All' option works as its name suggest, and two other ones will be described in detail below.
Adding Lightning Bundles
Beginning from Nova R4 version of The Welkin Suite for Mac, you can create Aura Bundles directly from the IDE. In the Lightning Bundle Explorer, this possibility is implemented via Add button in the toolbar. Please click this button and follow the next steps:
- Select Add → Add...
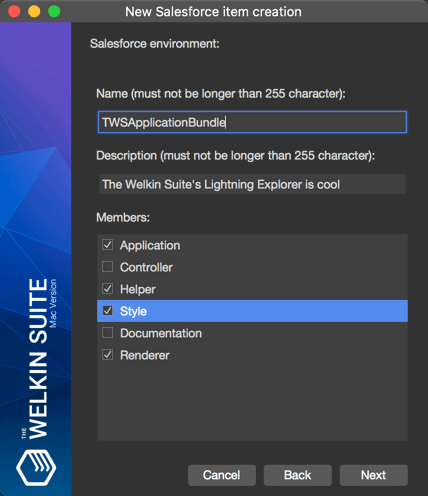
- After this, you can select which type of Bundle you have - Application, Component, Event, Interface, or Tokens, and specify the name of your Bundle.
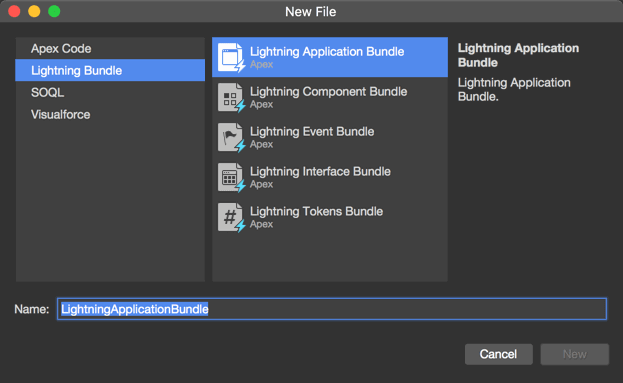

- Next, there is a possibility to add a description, and select the members that will be added to the Bundle during its creation. The checkboxes for the required members in the Bundle are enabled by default, and they cannot be unchecked.

When you made all these actions, the newly created item will appear in your project in both the Solution Explorer, and in the Lightning Bundle Explorer.
Also, the Lightning Bundles are present in the list of files that can be created, when you use the 'Add New Item' option from the main menu, or from the context menu in the Solution Explorer.
Adding members to a Lightning Bundle
Apart from adding members during the creation of a Bundle, The Welkin Suite IDE provides you with the next ways to do it for the existing Lightning Application or Components:
- in the Lightning Bundle Explorer, you can use the 'Add' button when any bundle is selected in the list; in the drop-down that appears, the members which can be added will be active;
- you can use the context menu of the selected bundle in the Lightning Bundle Explorer, and you will see at once which members are absent in the bundle;
- use the 'Show Only existing files' option from the toolbar of the Lightning Bundle Explorer - as a result, in addition to existing items, in the expanded list of bundle's members you will see the items that are not yet created with the plus icon; you can double-click on the necessary file with the plus icon, and it will be created after you accept the confirmation message.
This is but a part of updates to the Lightning technology, and in the next version you will get another great update - Lightning Components and Applications previewer!
Other changes
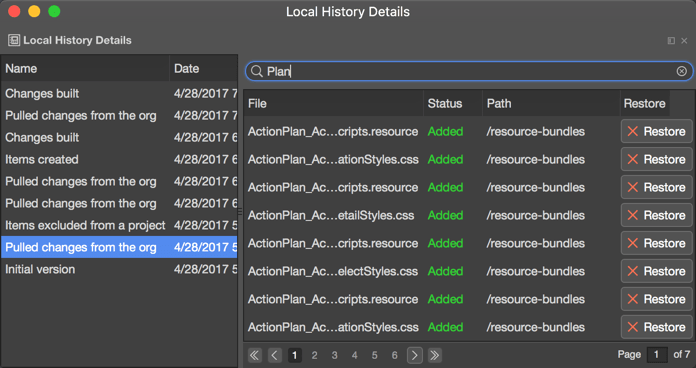
One more useful option has appeared in the Local History Details pad - now you can use the 'Search...' field for easier navigation between files in a version. 
As for Local History functionality, also, our developers have fixed the rare issue when there was no data.
In the Logs pad, we have added the column 'User' so you could see which log files are important for you.
If you were faced with the failed debugging of your Salesforce log files or test classes, this is one more reason to work with the updated version of The Welkin Suite - in Nova R4, we have solved the reasons for the error when you start the debug process.
Also, the unnecessary pull from Salesforce which was required after you built a modified Visualforce page(s) won't annoy you, since we have improved the build process with the additional check for the dependent files after updating your component files.
The UI fixes in the currently updated version solve the issues when some UI elements, like buttons or combo boxes, were invisible. Also, the case when the middle of long names of your project files was hidden in some TWS wizards, for example, in the Download wizard and in the Project metadata components one.
The rare cases when The Welkin Suite IDE was crashed are also fixed in Nova R4.
We sincerely hope that the new functionality will benefit your Salesforce development process - and we are looking forward to your user stories and experience that you share with us. If you believe it is time we add some specific feature to the Mac version of our IDE - we would love to hear your thoughts!
Full list of changes
Features
- Implemented the built-in Git support
- Added the Lightning Bundle Explorer
Improvements
- Added the search in the Local History pad
- Added the column 'User' in the Logs pad
Fixes
- Fixed rare cases when there was no data in the Local History pad
- Fixed the failed start of debugging process in rare cases
- Fixed the issue when the unnecessary pull from Salesforce was required after building edited files
- Fixed rare cases of TWS crash
- Fixed rare issues when some UI elements were not visible
- Fixed the UI issue when long names of files were cut at the middle in some TWS wizards


Your comment may be the first