Apex Class Outline, diff in deployments and VF Previewer in the Blaze R9
We just ended the 2017 year with the release of The Welkin Suite Bloom for Windows, and now we're welcoming 2018 with the release of The Welkin Suite Blaze R9 with some cool features that you will like for sure! We seem to have a bit for everyone in this, Admin Panel improvements for admins, Apex Class Outline for those who develop backend logic, and a Visualforce previewer for the old-school frontend guys - how does this sound so far? Not enough? ![]() Okay, what about a built-in data editor in the SOQL query builder, and enhanced deployments with files comparison right in the IDE?
Okay, what about a built-in data editor in the SOQL query builder, and enhanced deployments with files comparison right in the IDE? ![]() Read below about all these great features!
Read below about all these great features!

Built-in data editor
It will be 100% truthful if we'd say that the SOQL Builder is one of the most-changed components of the IDE - it's being improved all the time, and we are always hearing back great suggestions from our users. And one of the feature requests that we were periodically hearing over the last year, was the need for a built-in data editor!
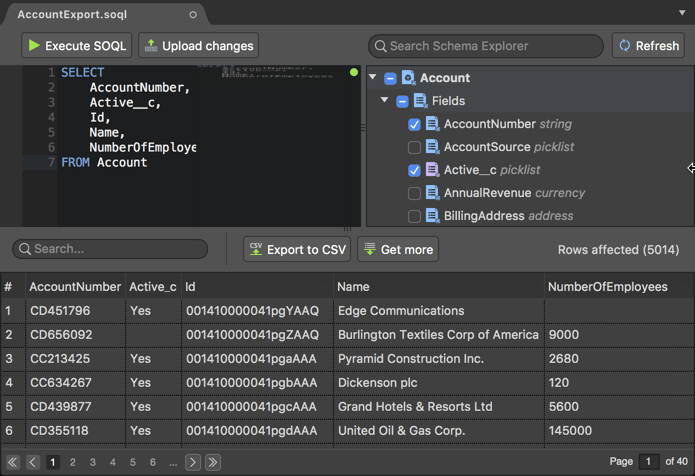
Why is it a great addition to the power of the SOQL Builder? Let's see some examples of how you can use it:
- Developers might modify records in the org to match some criteria of the logic that is being developed - to ensure that everything works as intended
- Administrators might sometimes correct records directly in the org instead of searching for the correct page layouts, and/or search for where the needed fields are available and editable
- Developers can quickly execute different logic using Anonymous Apex, and different data for example for the proof of concept of some technical approach
- Both admins and developers can clone a value of a certain field from one record to all other records, returned by the query
We bet there's much more interest in your eyes right now, so let's take a look how you can achieve this in the Blaze R9!

When you open any SOQL file and execute a query - you see the results in the lower part of the editor and all the data-editing magic will happen there. You just need to double-click on any editable field in the query results table and you will be able to edit the value.
To get a bit more information about fields - just hover the cursor over any cell and you'll see details, such as:
- Object type
- Field type
- If the field value can be set to Null or no
In the case a field is not editable - the IDE will highlight this in a hint.

Additionally, you can call a context menu for any value with the following options:
- 'Copy' - copies value of the selected cell to the clipboard
- 'Copy row' - copies the whole row in the JSON format to the clipboard
- 'Set the value for the whole column' - applies the value from the selected cell to all records, that are visible in the results (for the same field)
- 'Set value to Null' - sets the value of the selected field to Null
- 'Set original value' - if you've done any changes to the value in the selected cell, this option will revert it back to the original value, retrieved by the SOQL query

Once you're done with your changes - just press the 'Upload changes' button in the upper part of the SOQL Builder and the IDE will try to apply them. If there would be any errors - the IDE will show them in the 'Errors' pad and no changes will be applied, even if the error was related to only one of the many changed records.
In the happy case when records were updated successfully you will see the appropriate message in the SOQL Builder. Please take into account that The Welkin Suite does not re-execute the query once more, so if you need to get the real values from the org afterwards - you'll need to re-execute the SOQL query one more time.

Apex Class Outline
Finally, the Apex Class Outline is available in the Apex Editor in the Mac version of The Welkin Suite and it is a great update because of 2 reasons:
- It provides an easy and a very fast way to navigate even in very big classes
- It is the first component of The Welkin Suite Blaze to be built with the new UI approach
Let's start from the more important reason for you - how you can save you time when working with Apex, especially with large Apex classes or triggers.
The Class Outline is shown on the left side of the code editor, showing you the full list of fields, properties, constructors, methods and subclasses.
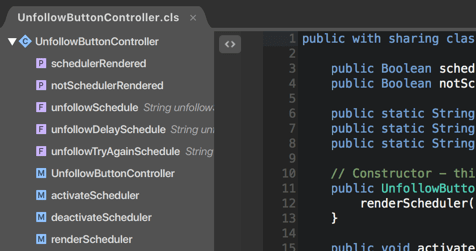
To navigate to any item in the class you just need to double-click on it and the editor will be scrolled to that item immediately.
In case if you don't need the Class Outline - you can hide it using the button on the separator between the editor and the Class Outline. The IDE will remember this, and the Class Outline will be collapsed by default until you expand it again.
And the second reason we've mentioned above - the new Class Outline is built using the native Mac UI, so it's performance impact is absolutely impact. At the same time our team have prepared to start migrating existing features to the native UI, so in the nearest future The Welkin Suite will be constantly getting better and better performance-wise!
Changes deployment and comparison
Deploying changes between different orgs and especially to production environments always requires extreme attention. The 'Deploy to organization' functionality for a project is available in The Welkin Suite for a while already, however today we are releasing a very important addition to it - built-in difference viewer for deployments!
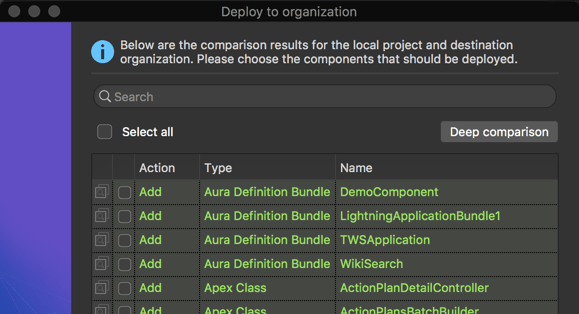
Let's first remind how the 'Deploy to organization' works.
Once you enter credentials of a target organization where something should be deployed - The Welkin Suite performs a quick comparison of your local project and the target organization. Quick comparison checks if files are present in both places, thus the deployment action for them might be 'Add', 'Delete' or 'Overwrite'. However, if some files are present in both your project and the target organization the quick comparison does not show you if there are any differences.
And here comes the 'Deep comparison' button, that, once clicked, checks the contents of such files and provides you a bit more information - are there any changes in those files or no.

And from now on you will be able to see even more details - if there are differences in files you will be able to immediately see them in the built-in diff viewer. Just press the diff button in the first column in the table and the IDE will show you all differences between files!
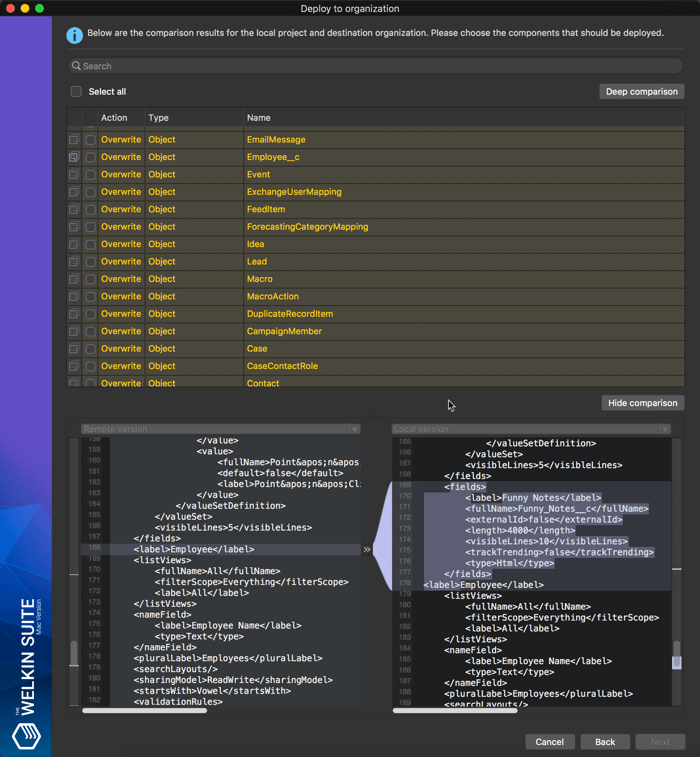
This means that you can make decisions whether to deploy something with more information and being sure what exactly will be deployed, if you choose to do so.
We are sure that this new feature will help you deploy faster and easier than it was before!
Visualforce Previewer
In the Blaze R9 version of The Welkin Suite in addition to the already-existing Lightning editor with previewer, we have just added the Visualforce previewer to help you see results of your changes as soon as possible and without any additional actions!
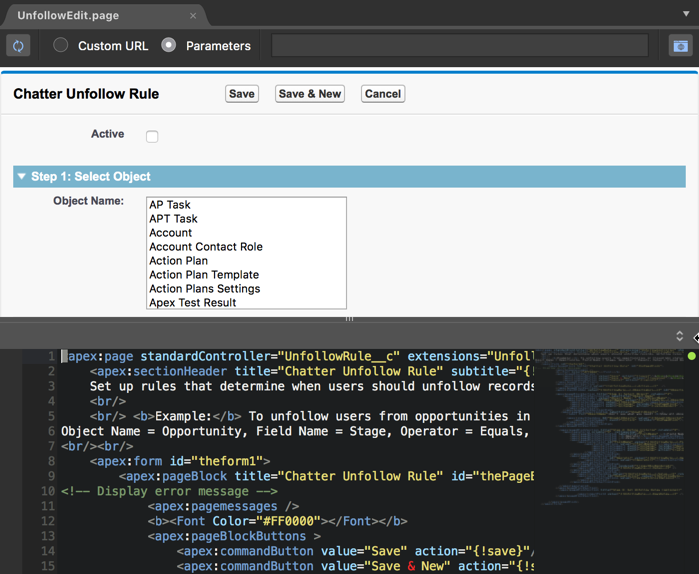
This means that when you'll open any Visualforce page in the IDE, the upper half of the editor will show you the page itself directly from your Salesforce org, while in the lower half you will see the same VF editor as before. You can drag the splitter between them to adjust the size of each part and if you don't need the previewer for a particular page - you can just extend the code editor to the maximum. The cool thing as usual is that the IDE also remembers this setting for the particular page and it won't show you the previewer next time you'll open it.
If your page accepts or expects any GET parameters you can easily pass them - just check the 'Parameters' radio button, and fill in your parameters to the text field in the top part of the previewer. But wait, there's even more! If you'd like to check your Visualforce page, for example, on the public Force.com site as a guest user - you can easily check the 'Custom URL' radio button and enter the full URL of the page that you'd like to use as a preview.
Of course, each time you build changes in your Visualforce pages - the IDE will refresh the preview automatically!
Validation Rules creation via the Admin Panel
While we're preparing some new shiny updates for the Admin Panel, we've decided to add at least one small update to it in this new version of the IDE. And as we already have a great code-completion-enabled editor for Error Condition Formulas in your Validation Rules - we've added an option to create validation rules directly from the Admin Panel.
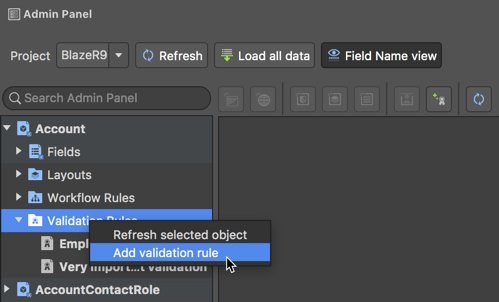
To add a new validation rule for your sObject, just right-click on the 'Validation Rules' item under the object in the Admin Panel, or click on the 'Add validation rule' button in the toolbar for an object.
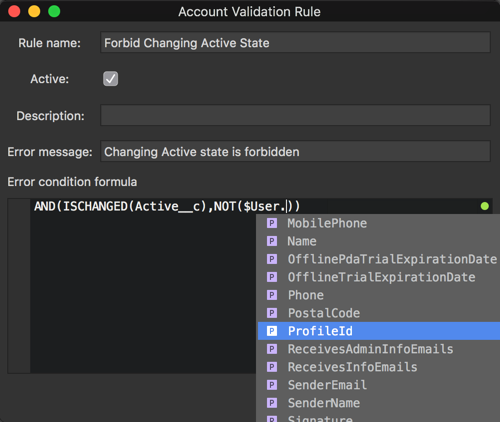
In the opened wizard you can easily specify all the required parameters of a Validation Rule, as well as specify the error condition formula in the editor with code completion, which knows about all fields, functions, and org-wide properties.
We are sure that everyone will find a useful update in this new release of The Welkin Suite IDE, no matter if you're a developer or administrator, if you're working on a frontend or a backend side
Full list of changes
New Features
- Added inline data editor for Salesforce records as a part of the SOQL Builder
- Added a built-in Visualforce pages previewer with automated refresh on building changes
- Added a built-in difference viewer for the deployment process
- Added an ability to create new Validation Rules for sObjects
- Added the Class Outline panel to the Apex Editor
Improvements
- Updated the 'Deploy to organization' process to allow fast deployments to the same organization, that was used for the project creation
Fixes
- Fixed the issue when Code Coverage highlighting was absent in the case if two or more classes with the same name were returned by Salesforce
- Fixed the issue when the 'Go to source' action for Debug Logs was not working in some cases


Your comment may be the first