Create Static Resources, track Code Coverage, and Validation & Workflow rules in Blaze R5
What is more important - developing or configuring, coding or clicking? Both are equally important for us! This is why in The Welkin Suite Blaze R5 we're releasing a bunch of handy features for everyone - Validations Rules editor with as-you-type suggestions, Static Resources manager and even one more feature for the Code Coverage. And, of course, everyone will notice a significant performance boost of the IDE itself!

If you want to quickly familiarize yourself with everything new in this release - the next 4 minutes are worth reading about the details of all the updates!
Performance improvements
Writing a code, configuring FLS, modifying Validation Rules, debugging Apex, writing new Lightning components, or working on any tasks using the IDE - you will notice the performance improvements that we've done in The Welkin Suite Blaze R5! All the operations in the IDE that are communicating with your Salesforce Organizations will be completed up to 4-5 times faster compared to what you had before!
This is one of the cases when there is not much to say about the change itself - you will just feel it ![]()
Code Coverage Improvements
We won't be wrong if we would say that unit testing is one of the most common duties for all Salesforce developers - we deal with it all the time, starting with proper testing of a logic and finalizing with the good code coverage for successful deployments. Thanks to suggestions from our great users who have pointed out two more improvements, we have updated the code coverage functionality in The Welkin Suite Blaze R5.
The first significant update gives you an ability to see the code coverage highlighting separately by test methods. To get this you can do the following actions:
- Open the 'Code Coverage' pad using the 'Application Menu → View → Pads → Code Coverage'.
- Refresh the code coverage information, if needed.
- Enable code coverage highlighting using the 'Show Coloring' button.
- Open the needed Apex class or trigger from the Code Coverage pad with a double-click on it.
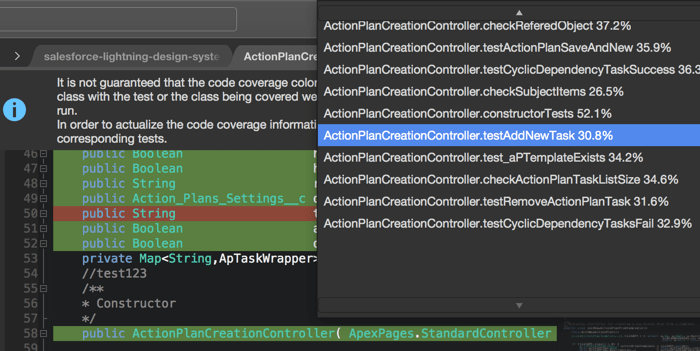
- In the upper right part of the editor, you will see the picklist with the list of test classes and code coverage percentage provided by each of them. Just select the necessary test method from the list and the appropriate code coverage highlighting will be immediately updated.
The second change is not as 'shiny' but it brings new information into the IDE, so it also should help you working on unit tests. Previously in the 'Code Coverage' pad The Welkin Suite was not showing classes and triggers for which we had not received coverage information from an Organization - for example, due to the lack of test runs related to those classes/triggers or because of the absence of the necessary tests ![]() Starting from today you will see the full list of classes and triggers in the 'Code Coverage' pad - thus finding classes without a code coverage will be much quicker!
Starting from today you will see the full list of classes and triggers in the 'Code Coverage' pad - thus finding classes without a code coverage will be much quicker!
Expressions editor with code completion for Validations and Workflows
Don't know how about you, but we are not very happy with the way how we are supposed to create validation rules and workflows - either doing tens (hundreds?) of clicks in the Setup or "enjoying" writing expressions and formulas in a plain XML. Both this approaches require a lot of actions - clicking is almost always slower than typing, for example, if you are configuring something complex e in the Error condition for a Validation Rule. Plain XML is not a gift as well - remembering all fields and functions is the first sign of a genius, so we still need to switch between the editor and list of fields and their API names.
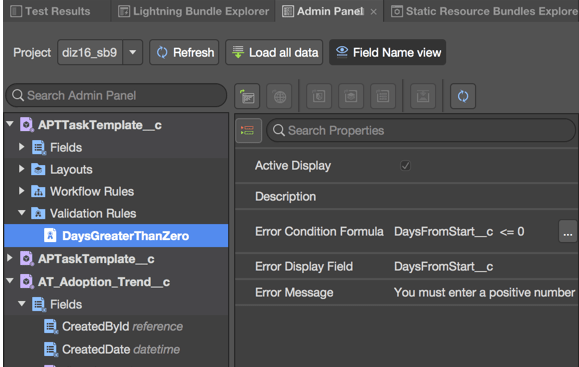
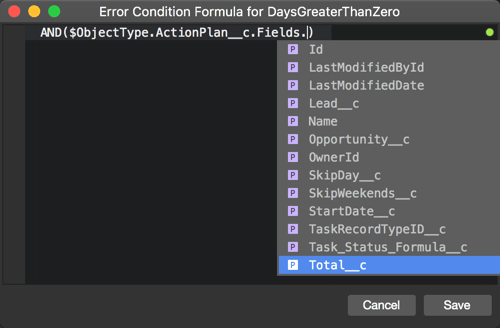
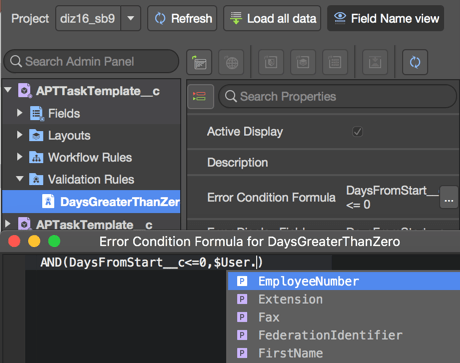
Instead of this, we are giving you a better option to do this directly in The Welkin Suite IDE, even without leaving the 'Admin Panel' that we've just recently introduced. Once you open the 'Admin Panel' and select any Validation Rule in the list - you will notice the '...' button near the 'Error Condition Formula' field. Clicking on this button will open the Expressions editor. Once you start typing anything here you will get a Code Completion prompt with a list of all standard and custom fields of an object, all functions which are available for this expression as well as system-wide variables like $User, $Label, $Setup, etc. If you have not yet typed anything in the editor, but still would like to get the full list of available completions - just press the Control+Space to get it. Of course, this expressions editor also provides you with a syntax highlighting, so it will be easier to distinguish constants, functions, and fields when working with large conditions in your validations or formulas in workflows.
The same button with the same functionality behind it is also available for Workflow Rules near the 'Formula' input.
This addition to an existing set of administrator-oriented functionality keeps us moving towards building the same great experience for both developers and administrators. We still have a lot of ideas that we are going to implement, but if you want to share your ones with us - this will be awesome!
Static Resources Management
Static resources are absolutely a must for Salesforce's frontend development using both Visualforce and Lightning components - it is much better to store your assets in a single place with caching options instead of spreading bits of CSS, Javascript, and images across a whole organization.
Since the very beginning of The Welkin Suite there were no needs to manually unzip and zip your Static Resources to make any changes, however, there were no options to modify the structure of a Static Resource until today. In the Blaze R5 version of the IDE, we have added a new 'Static Resource Bundles Explorer' pad that you can enable from the 'Application Menu → View → Pads'.
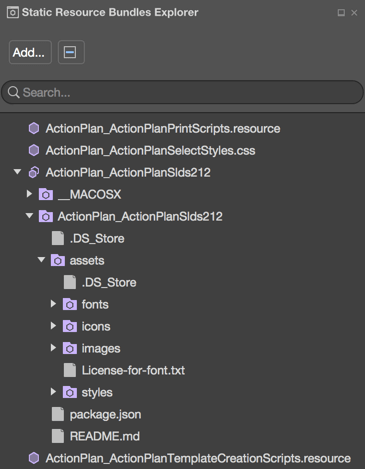
This pad gives you the following abilities in modifying your Static Resources:
- Rearranging files and folders in a Static Resource
- Adding new files and folders to a Static Resource
- Deleting existing files or folders from a Static Resource
- And finally, creating Static Resources themselves
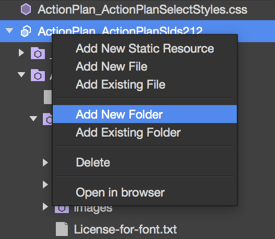
You can open any file in the editor with a simple double-click, and, at the same time, the context menu for any zipped static resource or folder provides you with an ability to use the additional options like:
- 'Add New File' - creates a new empty file in the given static resource or folder, so you can modify it later;
- 'Add Existing File' - allows you to select any existing file from your file system to include it into the static resource (or to put it into the selected folder);
- 'Add New Folder' - creates a new empty folder in the selected static resource/folder;
- 'Add Existing Folder' - provides you with an option to select an existing folder on your file system to include it (and all files and folders in it) into the Static Resource;
- 'Rename ⌘R' - quick and easy way to rename a file or folder; we want to draw your attention that it is not available for Static Resources;
- 'Delete' - removes a file or folder from a Static Resource or a Static Resource itself from the organization;
- 'Open in browser' is available only for any Static Resource in the list and redirects you to the edit page of a Static Resource in your organization.
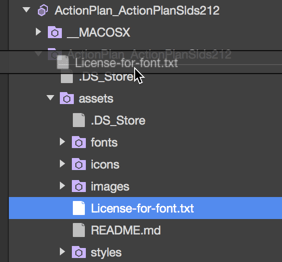
So now let's see how we can rearrange files and folders in a Static Resource. This is absolutely easy and straightforward - just drag any file or folder inside of your Static Resource in the newly added pad and drop it into the new location in the same Static Resource. That's it!
However, there are a couple important notes how exactly the changes in the 'Static Resource Bundles Explorer' are applied and how they tie up with your custom project structure in the Solution Explorer:
-
When you will do any changes on the structure of a Static Resource and content would be first reflected in the %project_folder%/resource-bundles/%static_resource_name% folder, while changes in the related zip file itself will be available after performing a build. At the same time, these changes won't be reflected in the Solution Explorer (so, if you're using project structure sync - it won't be updated as well) unless you build your changes.
-
If you would move any files that are included in your Static Resource in the Solution Explorer (thus customized the project structure) and then you would change the structure of this Static Resource - the IDE won't change the location of that files in the project structure.
Creation of a new Static Resources is not an everyday task for most developers, however, it's always good to have everything in the same place, instead of switching between the applications. This is why we have added an ability to create a Static Resources as a part of Blaze R5 release. You can do this using the same 'Static Resource Bundles Explorer': in the context menu for any item in the list you have an option called 'Add New Static Resource' and the same option is available in the dropdown list for an 'Add...' button in the pad's toolbar. Once you select this command you will see the well-known for you new file creation wizard.
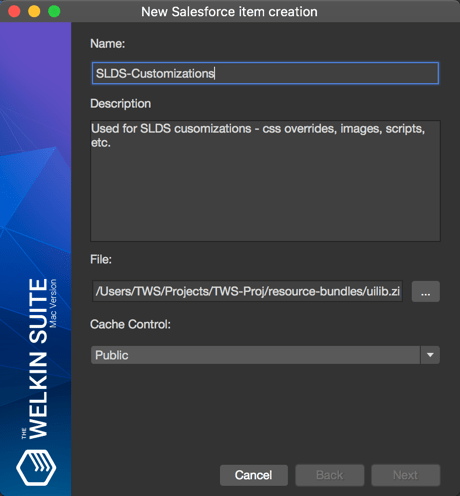
There are not so many requirements in the wizard:
- Name of the Static Resource;
- Optional description for it;
- A file itself;
- Cache Control option - public or private.
When you're done with these inputs the IDE will create a Static Resource on your organization and will immediately download it so you will see it in both Solution Explorer and 'Static Resource Bundles Explorer'.
Other changes
As usual, we haven't just provided you with new features and functionality - we have made some changes to an existing functionality to make it more useful and helpful for your working process in The Welkin Suite IDE.
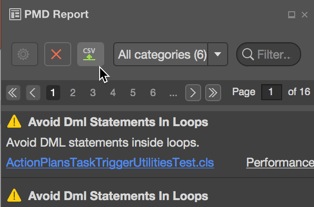
One of these improvements is that now you can store results from the 'PMD Report' in a CSV file using the newly added option 'Export'. It is available for you in the toolbar of the PMD Report pad. This could be useful if you want to share these results with your team members or work on the PMD errors and warning outside the IDE.
Also, you can view your Visualforce pages in your default browser directly on the organization - in the context menu of your Visualforce page files you will find the 'Open in browser' command for this.
In addition, our developers have worked on solving a set of known to us and reported by our users issues - you can find the whole list below.
For example, one of them is the case when loading license information related to your TWS account was endless and without any results. If you would be faced with the similar issue again, please let us know about this or about any other issues, questions, suggestions that you are faced with. We will be happy to assist and make the best IDE for your Salesforce development together! ![]()
Full list of changes
New Features
- Added an ability to create Static Resources in the IDE
- Added an ability to modify a structure of Static Resources, add or remove files and folders to them
- Implemented an ability to see the code coverage percentage and highlighting separately by test methods in a class/trigger
Improvements
- Significantly improved performance of the IDE in all operations related to the communications with Salesforce Organizations
- Added an ability to export a list of results from the PMD Report
- Extended the list of files in the Code Coverage panel with all the classes and triggers from an organization
- Added a new expressions editor with code completion for Validation and Workflow Rules
- Added the option to open Visualforce pages in a browser from the context menu
Fixes
- Fixed the issue when the IDE stuck on the 'Loading license information' process in some cases
- Fixed failing deployment to organization in case of duplicate items (like sObjects) were returned by the Salesforce API for the target organization
- Fixed the case of failing Workflows deployment to an organization due to the 'File has pending changes' error
- Fixed rare cases of TWS crashes or exceptions when selecting an object in the 'Admin Panel'
- Fixed rare cases of exceptions related to the Code Completion functionality
- Fixed TWS crash when closing object files in certain circumstances
- Fixed the issue when there was no ability to execute an anonymous apex from the context menu of a file in the Solution Explorer when the file was not opened in the editor
- Fixed the issue when the 'Compare' option in the 'Pending Changes' pad was not working







Your comment may be the first