


Track all information about sObjects in Admin Panel in Blaze R3
You have even greater workflows to take advantage of in The Welkin Suite Blaze, because our team has put to great use the longer days, which summer provides to us, to give you some new awesome possibilities.
For the most part, we are going to be talking about how now Salesforce Admins and Developers can take full advantage of working inside of our IDE. You will not regret the 10 minutes it will take you to read through this blog.
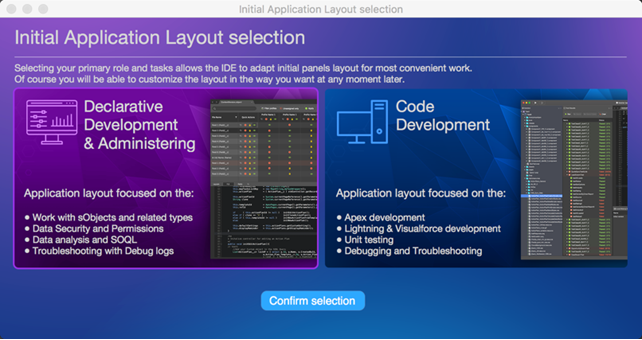
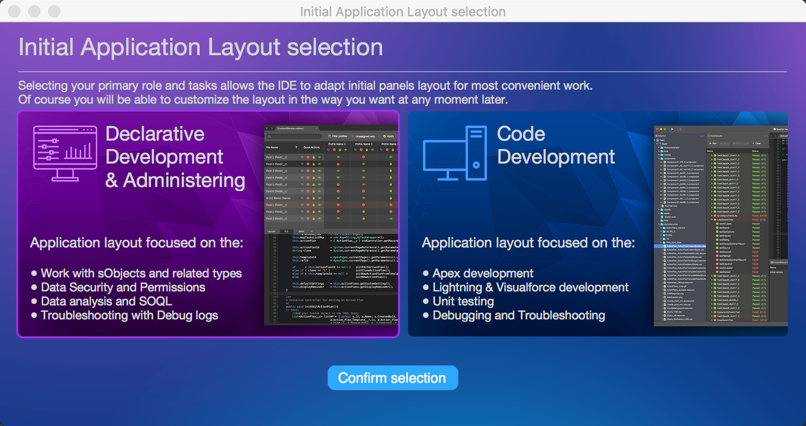
We are quite excited that from The Welkin Suite Blaze R3 for Mac, both Developers and Admins, can more easily work inside the same tool, as they can select which of the two predefined UI's will work best for them, and have it opened by default.
Also, we will tell you about a new great tool for Salesforce Admin - the Admin Panel with all the information about sObjects.

Use the layout that works best for your tasks, right from the start
We all know that Admins and Developers in Salesforce are working in the same world, but the challenge is that they get to see that world from two different views. This is why, The Welkin Suite knew that if we wanted Admins and Developers to be able to work comfortably in the same IDE, we had to make it so they both could have a comfortable and familiar UI.
So what that means for the Blaze R3 release is now you can set the UI, by default, to the most correct UI for your tasks and roles. And to give an added benefit to these specific User Interfaces, when creating a new project they will also download the most correct files of metadata, dependent on the role that you have selected. Also, as in past releases, you will always have the ability to custom select the set of metadata types for either of these roles, if you need that freedom, by using the ‘Use admin Preset’ and ‘Use developer preset’ buttons that are added to the ‘Download Salesforce Project’ wizard.
In the two different UI’s that we provide you with, this is what you will get. First in the Declarative Development & Administrating UI, you will quick access to the Admin panel with the list of all your sObjects from your Salesforce Organization, and the most pertinent information about them. Also many other pluses, such as it is now very easy to work with data security and permissions, or with the SOQL Executor where you can easily analysis your data. You can even quickly do some troubleshooting within the Debug Logs panel. We know you need to easily navigate, so we made it easy to find the Solution Explorer, as it is located in the same panel as the Admin panel, we just put it in a separate Tab. So now Second, in the Coded Development UI, you get the same UI that The Welkin Suite users have used before this version. You still have all the functionality that is related to debugging options, unit testing, you still can be focused on Lightning, Apex, Visualforce development, and all the needed metadata types are here for you: Apex Classes, Apex Components, Apex Pages, Apex Triggers, Aura Definition Bundles, Objects, and Static resources.
Plus if you would find that you need to flop from one role to another, for any reason, you can do this at any time by going to the 'Initial Application Layout selection' window in the menu View → Switch IDE Layout.
Also, in the menu View, you have the default layouts for the application like Solution and Debug. After you would select any from the role layouts provided by the IDE, it will be added to this menu and you would have quick access to it. We want to draw your attention that here a layout will be saved with all your changes such as resizing or adding/removing some additional panels. At the same time, using the 'Switch IDE Layout' option will back you to the default view of the Developer or Admin layout.
Have all your data about Salesforce objects right in front of your nose, and at your fingertips in the Admin Panel
In The Welkin Suite Blaze R3 we really wanted to make your Declarative development work faster in relation to Objects, Layouts, Fields, Workflows Rules, and Validation Rules, so what we did was give you your own command and control center, the Admin Panel, to accomplish this. It is very easy to find this by just going to the menu View → Show Admin Panel, or you will get it by setting the 'Declarative Development & Administrating' application UI layout as a default one, and it will always be automatically opened for you.
Diving in a bit deeper here, you are going to save a lot of time here because the standard Objects are highlighted in blue and custom ones are shown in violet, for your convenience, and information about all sObjects is retrieved from your Organization upon opening of the Admin panel. All of this works much like the Schema Explorer, but just more for an Admin role. To top that off, by expanding on any Object, you will see the nested Fields and Layouts that they have, and what Validation Rules and Workflow Rules are applied to them. Then you can get information about any item's parameters, just by clicking on that item, and this data will be shown in the right side of the Admin Panel. For Example:
-
click on any object in the list, and its properties are divided into:
-
Access that has the attributes about the characteristics of this object on your Org;
-
Misc - an ID Prefix for the object;
-
Labels which are the names of the objects that are visible to some user;
-
URLs which help you to generate URLs for the work with this object.
This view can be changed by using the sorting option, that is above the list of properties, to change the view that is above the list of properties, so you can get a display according to a 'Categories' or 'Alphabetical' view.
One step deeper, for your sObjects, you even have a few more options to navigate to any Object's data, and its related files with the following options Open Field Level Security in sObject Inspector and Refresh selected object, by just right clicking on any field, or from the toolbar of the Properties part of the Admin panel.
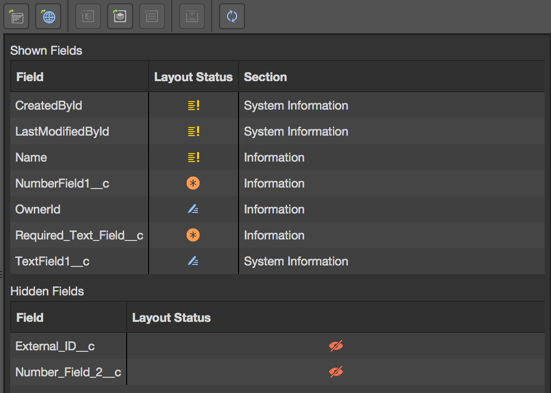
Some other things that you should keep in mind when working with the Fields of Objects, is that there is also an option, that displays the list of the fields that are in your Objects according to their API names or labels, and this is found in the toolbar of the Admin Panel, with the buttons of Field Name view or Field Label view. When you click on any field item you can find its properties on the right part of the Admin panel, where you will see the following set of information:
- Access: all the available characteristics of the field;
- Label: this is the name of a field that is visible for the users on your Organization;
- Type Data: the specification of the possible data in a field.

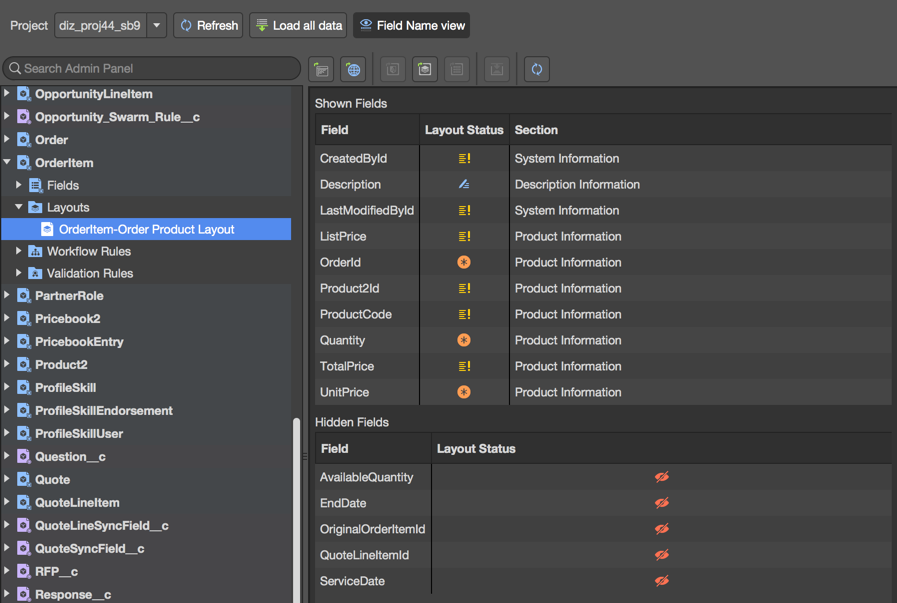
Now we need to clue you in on the Layouts, as we have done a few special things here to make your work easier, by giving you all information about a Layout for your targeted Object. First, you can play with the Layout of a file by opening it in a browser, opening it in the editor, opening layouts in the sObject Inspector, or just refreshing a selected object that is related to this Layout. Second, you can easily search for in the 'Field' and 'Sections' columns, so you can quickly find the information that you need. Third, is that the list of Fields is divided into two tables depending on if it is visible or hidden. By doing it this way, we have given you the ability to have two separated lists that have the Fields with either Required, Edit, or Read-only status, or hidden Fields. Fourth, is that you can click on any Layout name and see, which Object fields are available on this layout, what is the status of each Field on this Layout, or in what section of the Layout a Field is located.

There are rules in life, no matter where you go, so it is no surprise that in Salesforce, there was room to make work with rules related to each of your sObject much more easy.
We decided to get to work with the stuff related to Validation rules and Workflow rules. You can very easily see a list of both of these rules sets that are related to an Object, or one that is selected by you. Also, so you do not need to check the properties of some Object separately, as the Workflow rules which are active for the parent object, are highlighted in bold, so tracking of this information is easy, by just expanding the Workflow Rules section under any object. This is also similar to the Validation Rules that are active, where you can get the needed information a glance because of the bold highlighting.
A few other great things are:
-
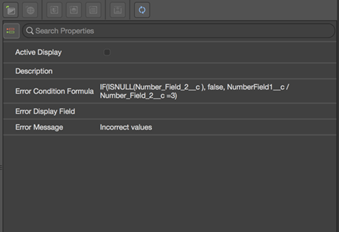
For Validation Rules, when you click on a rule, you get the following:
-
if it is an active display;
-
its description;
-
its error condition formula;
-
an error display field;
-
its error message.
-
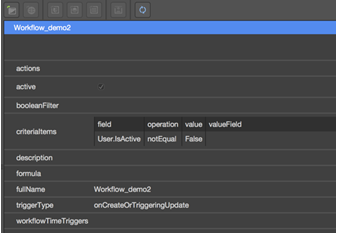
For Workflow Rules, when you click on a rule, you see the properties and details about it such as:
-
A table view of parameters such as a list of actions, status, and criterias.
-
in the upper part of the properties panel there are the Workflow actions (such as field updates, outbound messages, etc.).
Also there is easy navigation related to both sets of rules. For Workflows rules, you can open an xml file that has the Workflow rules for the Object in the editor, or to refresh a related Object data in the Admin panel. You can get to this in the context menu of a file, and at the toolbar above THE properties and parameters. Then for Validation rules, you can easily open the Validation rule file in the code editor by using the context menu of this file, or the button in the toolbar. You can also track this item, or refresh a parent Object's data in the Admin panel.
The Admin panel toolbar
We want to bring your attention to the toolbar that is in the right part of the Admin panel, above all the data. You will see this when you have selected any item in the list. Actually, you should be already pretty familiar with the options which are present here as we have already mentioned most of them in the descriptions above.
We placed them here to help you easily open any necessary files that are related to some opened item. In this toolbar, you will find the following commands for your workflow:
- Open in Editor: we know, this is kind of "captain obvious", that this will will open the selected item in the code editor, which is beside the Admin panel; if you are working with an Object - you will also have the sObject Inspector opened, with the focus being on the XML Object file;
- Open in Browser: this option will redirect you to your browser, and open your Salesforce organization on the correct page with the necessary Object or Layout;
- Open Field Level Security in sObject Inspector: with this command, we will open the sObject Inspector, with the FLS tab being activated, so the information from your Org will be being downloaded;
- Open Layouts in sObject Inspector: quick access to the Layout settings for parent Objects in the sObject Inspector;
- Open Fields in sObject Inspector: the list of Fields in the sObject Inspector will be active in your object file;
- Generate SOQL query: when you click on this button, the IDE will automatically create a SOQL query, with the same name as it has for the selected Object, and open it in the SOQL Query Builder; there will also be a predefined template for a query, that has the selected Id parameter from the Object that you were working with in the Admin panel.
- Refresh selected object: when you are working on some Object, and make some changes in its XML file, or in the files which are related to this Object, to get all these changes to the Admin panel without refreshing all the data (since that can take more time), you can just use this option, to get the updates for just the one Object which is selected in the list, or if any of its nested items is selected you will have them too.
All these options are available, with just a right click, on any selected item in the list of available sObjects in the Admin panel.
You always will see the same set of possible operations in the toolbar above properties and parametters, if you are working on different items in the Admin panel list (Objects, Felds, Layouts, etc.), however, some of them will be active for usage according to the selected item in the list in the left part of the Admin panel, and some will be disabled.
Keep in Mind this behavior
There ARE some important, but very simple behavoirs that we need to make sure that you are aware of, when you are woking in the Admin panel.
- If you would have several projects in your solution, you can select any one of them that is is necessary in the Project field, in the Admin panel's toolbar, and just click 'Refresh';
- If changes are made in some xml files, or in the sObject Inspector, it is necessary to click the 'Refresh' button to get these changes in the Admin panel;
- Find any needed Object quickly by using the search field option in the toolbar of the Admin Panel. For this, please keep this in mind that the search will only include the fields, layouts, workflows, and validation rules from the Objects, which you have expanded, as the search will go through only the Objects and nested items which were previously loaded. Due to this, if you need to search through all items, please click on the 'Load all data' button, and this way, all the information about them will be downloaded into the Admin Panel for you;
- All data in the Admin panel is available for you in the read-only mode.
Updating Mono framework to the 5.0.1.1 version
You already might know that The Welkin Suite for Mac, requires the Mono Framework, for the availability of its functionalities and processes.
Until today, the IDE used the custom 4.9.0 version of the Mono Framework. This version wasn't the most stable, and there were some issues in the IDE, in frame of using this exact framework version. In addition, since there are new updates and improvements in stability of the framework, we have updated this component for using The Welkin Suite IDE.
We are moving to the 5.0.1 version of the Mono Framework. This will help us to solve some issues, improve existing functionality, and open new abilities in development, also it will allow us to avoid some conflicts with other IDEs like Visual Studio, Xamarin Studio, Unity.
If you install The Welkin Suite Blaze R3, or any further version, updating of the framework won't affect you - the appropriate prerequisite will be installed automatically during TWS installation. Also, if you already have Mono Framework 5.0.1 or higher version, you can skip this part ![]()
If you have worked with any previous version of the IDE, you will get a next version of The Welkin Suite, however, for further updates, it would be necessary to update the Mono Framework.
Let's go through some details of this.
The Welkin Suite IDE checks for the presence of an updated version, once per day in the background. If there is a new update available for your copy of TWS - it will be downloaded and installed. Also, at this time, the updated version of Mono Framework will be downloaded, however, we won't install it without your agreement.
If you have got the latest version of the IDE automatically, you will see the following icon in the status bar when you launch it:

This means that there are some additional updates for The Welkin Suite IDE. In this case, as you guess, this is about the Mono Framework.
When you click on the icon, you will have 'The Welkin Suite Update' wizard opened.
In cases when you have forced the manual checking for updates, directly from the IDE, using the menu The Welkin Suite → Check for updates, the first step in the wizard would be the downloading of Mono Framework 5.0.1. This step will be skipped if the framework was downloaded for you in the background, and you got the notification icon in the status bar.
We want to draw your attention, that the downloading process can take some time, and you will be able to see the progress of downloading. In addition, there are two options in the wizard:
- Cancel: if you will cancel downloading of the Mono Framework, it will be stopped and during any further checks for updates, the process will start from the same stage where it was aborted;
- Close: if you click on it, the wizard will be closed, but the downloading process won't be stopped - it will be in progress in the background; when it is finished, you will get an appropriate notification in TWS status bar - the same icon is displayed on the screen above.
Now the required version of the framework is downloaded on your computer, no matter if it was automatically, or you went through this in 'The Welkin Suite Update' wizard, and you will receive a message that you can start the updating process. Also, you will get the same message when you click on the mentioned icon in TWS status bar:
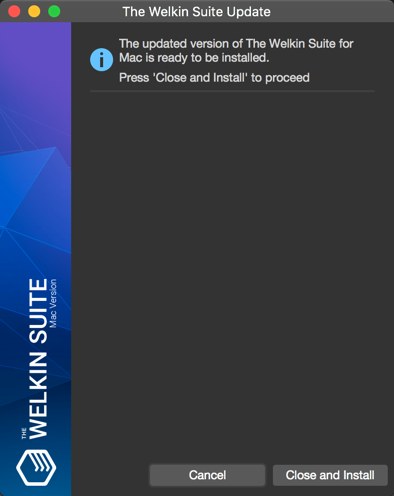
When you click the 'Close and Install' button, the IDE will be closed, and TWS Updated will launch the regular Mono Framework installer. You just follow the steps to updated the framework.
We want to draw your attention to that the previous version of Mono would stay present on your computer, and it will be available for configuration of the Mono Framework, or you can delete it yourself.
Other changes
While you are exploring the new functionality in The Welkin Suite Blaze R3, you can also see that we have solved several issues.
When you edited your Component or Controller files and updated them on your Organization, in some cases, the pull was required. It was applied to each build operations and files could be updated on Salesforce. We want to explain the reason for this issue: when you edit Visualforce page files, the IDE detects the necessary dependent files and sends them to update on Salesforce Organization also. In the case, when you edited a Component file, TWS didn't update a related page which used this component, however, at the same time, Salesforce refreshed the Last Modification date value and a content of this page. As a result, the last modification date value for the page file was different in the IDE and on your Organization, and pull was required when you were going to build this file the next time. Our developers have changed this mechanism and now you won't be faced with the required pull in such cases.
The next solved issue is related to the error about illegal characters that appeared when you created a new project. Also, the same reason was applied to pulling files with some specific symbols in their path/names when you didn't get these files in your TWS project after the succeded pull process. Beginning from The Welkin Suite Blaze R3 you can be sure that no symbols will affect your TWS project and will get all the necessary files for the work in the IDE.
One more reason for the failed pulling of your files when you didn't get them to your project was duplicated names. This was applied for the folder metadata type files. We made some changes that will affect this behavior, so if you would be faced with the issue again, please contact us.
There are some more changes that will help you to make your working process in The Welkin Suite for Mac even more convenient and productive, you can find the list of all of them below.
Full list of changes
Features
- Implemented an ability to select the default application layout
- Implemented an Admin panel for sObjects
Improvements
- Updated the version of the Mono Framework to the 5.0.1.1 version
Fixes
- Fixed the failed project creation due to the illegal characters in the path
- Fixed the failed pull from Salesforce for the files with specific symbols in their names or path
- Fixed inappropriate 'Please pull first' error during the build when working with Visualforce pages and components
- Fixed the failed opening of a Lightning Bundle in the Lightning Components and Application Previewer in a project with incorrect\expired credentials
- Fixed rare cases of TWS crash when reordering tabs in the tab well in specific conditions


Is Blaze r3 available. IF I check for updates it say there are no updates available but when I check I check About it says I have version r2 installed.
Can you explain?
Hi Marshall,
Thank you for contacting us with this.
I kindly ask you to check if the newly implemented features, for example, the Admin panel, are available for you.
We have a small issue with the displayed number of the version of the IDE on TWS UI.
Another way, you can send us a bug report directly from the IDE and we will inform you which version of TWS Blaze you have.
Best Regards.
if Blaze R3 have support for visual force in the code or not yet?, and I have the some problem when I click to update de version it say there are no updates available, and in my blaze version said that is R2, how can I get the update version or how to check if I have the newest one
Thank you
Hi,
We're planning to release enhanced Javascript, Lightning and Visualforce code completion in Blaze R5 version for now - it should go live in about 5 weeks.
Regarding the update from R2 to R3 - according to the bugreport you've sent you're already on the latest version of the IDE, however we are aware that we have an issue in the About window that says that you're still on R2 version, please sorry for that.
Thank you,
Vladimir