


More abilities in the sObject Editor in Nova R3: Fields and Layouts
Since one of our goals is to make The Welkin Suite IDE a universal tool for Salesforce development, we are doing our best to provide the technological coverage that lets you handle all sorts of tasks - along with different approaches to handle them. For this matter, in The Welkin Suite Nova, we have lately been focused on providing the extended range of the declarative development possibilities. So starting from Nova R3, you will have Fields and Layouts in the sObjects Editor within reach whenever needed!

In the current article dedicated to The Welkin Suite Nova R3, we will show you how to work with the newly added functionality in a frame of your work with the objects from your Salesforce Organization.
Let's see, when you open any object file, you will get the split editor with the xml file itself, and the additional sObject Inspectors: the FLS that should already be familiar to you, and also the newly added Layouts and Fields tabs. You always have an ability to configure all the necessary changes in xml format, but as of now, you can also manage the settings for layouts and fields, and create fields using the appropriate editors.
Layouts in sObject Inspector
In the previous version of The Welkin Suite for Mac, we have began summiting the mountains of Salesforce declarative development - by adding the support of the FLS functionality. In this release, we have not fallen by the wayside, so get ready to meet the Layouts tab in our sObjects Inspector!
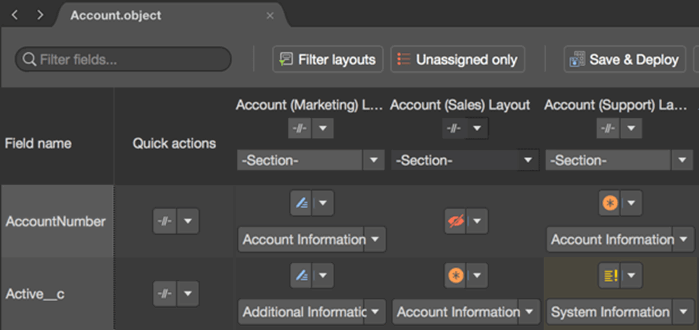
The sObject Layout Inspector presents you the table, in which the rows are the fields of the opened object, and the columns contain the list of available layouts for this object. On the intersections, you can conveniently see where exactly each field is visible, and which options it has there. Also, you can immediately get the information in which layout section some field is located.
This means that for each field, you will see one of the possible display options:
- Hidden - not shown on the layout
- Edit - shown and editable on the layout
- Required - shown, editable, and required on the layout
- Read-only - shown, and is read-only on the layout
Under the status, you will see an intersection cell for a field-layout pair. The appropriate section for each field will be displayed if it has Read-only, Required, or Edit status, and of course, if the status is Hidden - the sections field will be absent. In the latter case, when you change the Hidden status to any other one for the field on the layout - the section drop-down will appear, allowing you to select the necessary value for it.
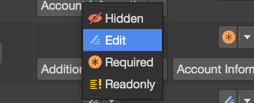
To change the field visibility settings on a layout, please navigate to the appropriate cell in the Layouts editor, and click on the status of the field-layout pair. You will get the drop-down list, in which you can select the necessary status.
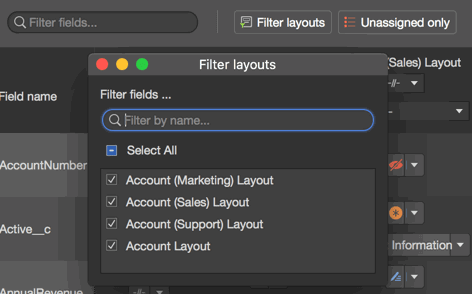
When you have several dozens of fields in an object or available layouts, and you only need to change some of them (which is a very common case in your regular Salesforce development process), you can use the convenient filtering options, which The Welkin Suite provides in order to reduce the scope of items shown in the table:
- Filter fields input is available for you at the top left corner of the Layouts Inspector - just start typing, and the fields list will immediately show you the filtered results;
- Filter Layouts is the next button to the right, in the upper panel of the editor; after clicking on it, you will get the pop-up with the list of the accessible layouts for the opened object. Here you can use the search field for entering a name, or part of the name of a required layout. You will also see the list of layouts, in which you can select the necessary items by enabling their checkboxes;
- Unassigned only option will show you the fields that have 'Hidden' status for all the available layouts. In other words, this way you can get the list of fields, which are not present on any layout, assign them to the needed ones, and select a section.
Also, you can easily navigate in the Layouts Inspector thanks to highlighting: you will get the yellow cells after you change the status values for the related fields for some layouts, and the red cells will draw your attention to the fields that have 'Hidden' status for all the available layouts. If you revert your changes to the original ones - the highlighting will disappear.
The additional abilities that The Welkin Suite IDE provides you with in terms of the work with layouts settings for your objects, and which we would like to highlight, are Bulk modifying options:
- Quick actions: the selected value will be applied to all the fields/layouts in the appropriate row/column;
- for fields, the quick actions are located in the separate column next to the field name. When you use it, the field will get the same visibility configuration for all layouts for one field. At the same time, as these actions are dealing with multiple different layouts, they won't allow you to select a layout section in a "bulkified" manner, so you will need to modify it on per-layout basis.
- for layouts, this is right under the name of each layout, and here you can see two options for changes - you can apply the same visibility status for all the fields, and you can also select to display all the fields in the same layout section.
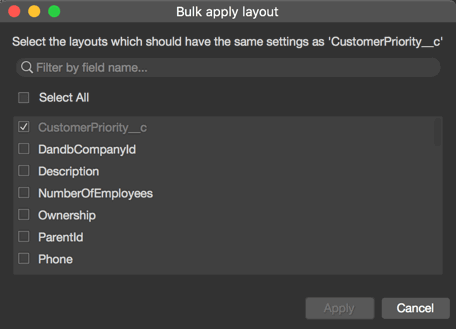
- Bulk apply to... : this powerful option is available to you from the context menu of a cell with the fields or column name. It allows you to apply the settings, which the selected item has, to any other fields or layout, so you can carefully configure the settings for one item, and then use the 'Bulk apply to...' to apply them to other ones:
- when you use the 'Bulk apply to... ' for fields, you will get the pop-up window with the list of all the fields, which are present in the opened object. Here you can use filtering to get the necessary one(s), or enable checkbox(es) for one or several of them. When done, please click 'Apply' to replicate the same configuration as the 'source' field has for others;
- using the 'Bulk apply to... ' option for layouts gives you an ability to get the list of all the available layouts, in which the fields from the opened object are present, and set the same visibility configuration (like that in the selected item) for some other layout(s). We would like to draw your attention to the fact that the settings applied include both - the visibility status, and the layout section. Applying the same section will be set if it exists on the selected layouts, if not - it's value will remain the same.
You always have an possibility to revert all your changes, which you have made in the Layouts editor, in one click, before sending them to Salesforce. Please click 'Reset', and TWS will roll the settings back to the original ones - i.e. to the last saved state.
Also, we would like draw your attention to the following rules of modifying layout configuration for your objects, and applying your changes to Salesforce. Here they are:
- It is important to keep in mind that when deploying changes for Layouts - the conflicts check is not performed, so if someone has changed Layouts in the Org, and these changes were not pulled - they will be overridden. This will be implemented in one of the upcoming versions.
- The Layouts editor in sObjects Inspector works only with the fields and layout in your project, so if something is present in the Org, but was not pulled to the project - it won't be available in the Layouts editor. This is why, when you see the message indicating that there is no data to display - and yet you know that layouts settings for some object should be present, please check if you have downloaded the layouts files to TWS project from your Salesforce Organization.
- As Layouts editor is working with different files (it does not change anything in the opened .object file, but modifies .layout files) - the regular 'Save' option in the editor won't save the changes in the layouts. To save them, you need to use the 'Save & Deploy' button in the tab's toolbar.
- 'Save & Deploy' button in the tab's toolbar will save and deploy only those changes in the layouts that were made by you, ignoring any other changes in other metadata types
And that's not it! We have two more options for making your working process in terms of declarative development easier. Both of them are useful when you need to change something in the layout file itself, for example, to reorder fields in sections, or move them across columns, etc. The additional abilities are as follows:
- Edit XML File option allows you to switch to the layout xml file in the IDE, for example, to make the necessary changes and checks. This option is available from the Layout's context menu. If you want to have the most actual information with your latest changes from the Layouts Inspector in this file, please save these changes or use the 'Save & Deploy' option;
- Edit layout in the org is also available for you in the context menu from the Layout's menu, as well as in the context menu in each field-layout pair cell. By using this option, you can switch to the web editor of a layout.
If you have any questions about the working process in the sObjects Layouts Inspector, of course, you are welcomed to contact us. However, all the details about it are described in our Documentation, and you can easily get the access to this information using the Help icon in the top left corner of the editor.
Fields in sObject Inspector
The enhanced declarative development possibilities in The Welkin Suite for Mac are also presented by sObject Fields Inspector. You can get all the information about all of your object's fields and their properties, modify each of them, create new fields, and save them to your Salesforce Organization directly from the IDE, using the favourable UI of the newly implemented Inspector. This means that starting from Nova R3 version of the Welkin Suite IDE, you can combine the configuration of sObject in XML files and Salesforce's Setup options in the same window.
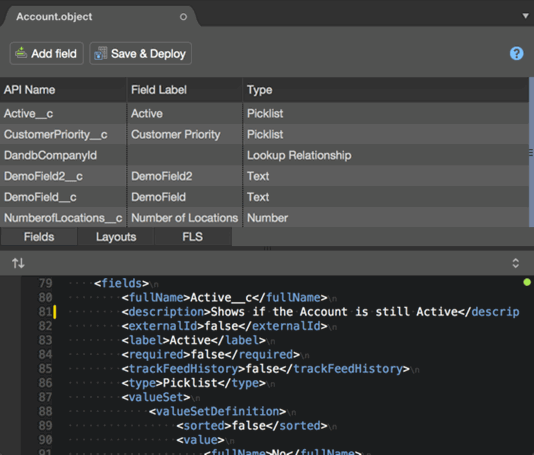
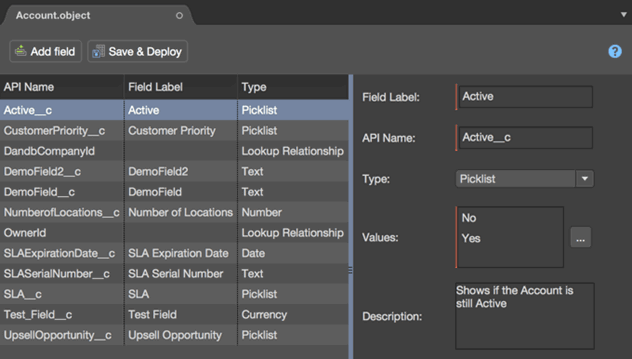
The Fields editor is available for you among the other tabs of the sObject Inspector, in your opened object file. You will immediately see all the object's fields and the basic information about them, like a Label, API Name, and Field Type values.
Also, you can see more detailed information about each of the available fields by clicking on it. As a result of this action, the Fields Inspector will be split, and you will get the list of the field's properties in the right part of the window. This list contains the general properties - Label, API Name, and Type, as well the specific ones, according to the field's type. For example, a default value for Checkboxes, decimal places for Location, length for Currency, default values for the fields with 'number' type, etc.
The Welkin Suite IDE gets all this information from the local files of your TWS project, so if some changes were made on your Organization, in order to work on them, you should pull from Salesforce to get the updates.
When you navigate across the list of fields in the sObject Fields Inspector, you can track the selected fields in the object's XML file - the caret position in the file will automatically be moved to the beginning of the field's definition.
Now let's analyze the most interesting part of the working process related to objects' fields management - creating and modifying fields. All of this is available for you in the same TWS window without switching anywhere.
You already know that you can get the access to fields properties by clicking on the necessary field - they will appear to the right. There you have an option to change any value, or add the needed data in any of the available fields. All the changes, or the new data that you enter for the field's properties, appears dynamically in the Fields Inspector, and in the object's XML file.
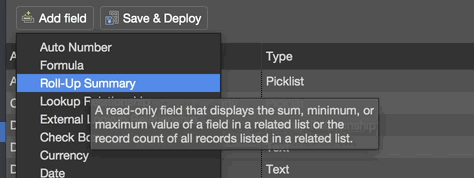
The field creation process is implemented in the 'Add field' option, in the toolbar of this window. When you click on it, you can select the type for the newly created field, and after this, the empty field will appear in the Fields Inspector, and in the related XML file. Then you can specify the information for the field in its properties. Please pay attention that some of the fields are required - they are marked with the red line. If you would deploy an object with the newly created fields with any of the required properties being empty - you will get the corresponding error.
In addition, when you change the "API Name" property for the field - the new field will be created with the new API Name, and the same configuration as the "initial" one, so please consider this, and remove the first field if necessary, using the Salesforce UI. In one of the next releases, we will add a separate function for renaming fields without any additional actions.
Once all the necessary changes are made, The Welkin Suite provides you with two ways to save these changes to your Salesforce Organization:
- you can use the 'Save & Deploy' option directly from the toolbar of the sObject Fields Inspector. In this case, the IDE saves the opened file locally, and deploys the updates to your Org only for this object;
- alternately, you can save the XML file, and then use the 'Deploy objects' functionality. The changes from the opened object file and those, which were made in other files in your TWS project, will be sent to your Organization.
Please note that the conflicts check will not be performed, so if anyone has changed sObject's fields in the Org, and you have not pulled those changes - they will be overridden by yours.
Overall, you can get all the information about object's fields, modify them, and create new ones - the only thing our IDE does not support so far is fields deletion. In case you remove a field from the XML part of the editor, and deploy the changes to the org - the field won't be deleted because such changes are handled separately as "destructive changes". We have this in our development plans, and our developers will implement this in one of the future versions of The Welkin Suite for Mac.
Also, all the information related to the sObject Fields Inspector is available for you in TWS documentation via Help icon, which is available for you in the window.
Other changes
Nova R3 version of The Welkin Suite for Mac is also full of changes related to the already existing functionality. Our developers have worked really hard to improve your working process in the IDE, and solve the issues that you were faced with.
The increased CPU after several builds of your TWS project, and freezing the IDE when saving your project after the build process, were both caused by the issue related to configuring the Local History data. We have changed the mechanism, so you won't get this problem in the updated version.
The next set of changes is related to the Salesforce changes deployment functionality:
- We have removed an ability to select the 'No test run' option when you are deploying to a Production Organization.
- If you have selected some local tests for deployment to another Org, then enabled the 'Run specific tests' option for the test level setting - as a result, the IDE couldn't load the tests from your remote Organization due to some reason. For example, the time-out, or the selected local tests were also absent in the list of available tests for running. Now you will be able to run the selected local tests in terms of deploying them to the remote Org.
- When you used filtering in the list of available files for the deployment to another Org, it may have happened that, after enabling the 'Deep comparison' option, the list of files was broken - and displaying of files was incorrect.
Our developers have solved these issues, and now you have more abilities for transferring your data to another Salesforce Organization.
When you were working with Salesforce log files in The Welkin Suite Nova, and using the local value for the 'Start time' data, it was automatically changed to the UTC time after you downloaded new logs. At the same time, the button itself stayed at the previous format. This is now fixed, and all the data about the time for your logs is correct, so it will no longer confuse you.
Also, we have fixed the issue related to your custom folder, which you could create in a frame of managing your own project structure, becoming hidden after you delete the last existing file in this folder. Now this won't happen anymore, and you can see the most actual state of your TWS project structure.
The IDE didn't properly handle the case when the SOQL query, which you were working with, included more than two levels, and one of them was null. You could get an incorrect result after SOQL execution. Now you are not limited in terms of getting the proper data for your queries. Also, as for the SOQL Query executor, we have fixed the UI issue that was present in the table with the query results - the 'Child relationship' button was not aligned with the appropriate test result row. The reason for this was related to the incorrect calculation of the height of the button position.
Also, 'Compare' and 'Show Details' buttons on the Local History pad were not positioned correctly, and this is fixed in The Welkin Suite Nova R3.
We have found the way to solve the issue with the "Field name" and "Quick Actions" columns in the FLS Inspector being scrolled separately from the FLS settings table. This occurred when you used the touchpad for the navigation.
As for the other UI changes in the FLS Inspector, we have fixed such shortcomings as the incorrect allocation of the buttons in the Quick Actions column, displaying icons over one another after the set of actions, incorrect hints or status icons displaying, etc.
Also, we have released a fix for the 'Report a bug' and 'Send feedback' functionality. The case was that you couldn't use these options for the second time, after you have already contacted us this way once. Now you can send bug reports or feedback directly from The Welkin Suite IDE anytime you need without any issues. Please feel free to use this way to help us make the IDE better, and share your thoughts with us. In addition, you can use the Forum, info@welkinsuite email, or contact us through social media (you can find the links below this post).
Full list of changes
Features
- Implemented the sObject Layout Inspector
- Implemented the sObject Fields Inspector
Fixes
- Fixed the issue related to CPU increasing and TWS freezing after several builds
- Fixed the inability to use the 'Report a bug' and 'Send feedback' options after using them once
- Fixed the issue when the local tests selected for deploy to another Org were absent in the list of the available test for the 'Run specific tests' option, if the tests from a remote Org were not loaded
- Removed an ability to select the 'No test run' option for the Test level settings during the deployment to Production Org
- Fixed the incorrect displaying of the list of available files for the deploy to another Org, if the 'Deep comparison' option was used after filtering the list
- Fixed the issue when the local 'Start Time' value in the Logs panel was reset to the UTC time after downloading the new log files
- Fixed the issue when the custom folder became hidden after deleting the last file from this folder
- Fixed the issue when TWS incorrectly handled the SOQL query with several levels, with one of the levels being null
- Fixed the issue when The "Field name" and "Quick Actions" columns in the FLS Inspector could be scrolled separately from the FLS settings table when the touchpad is used
- Fixed the UI issue when the 'Child relationship' button was located incorrectly in relation to the test result row in SOQL query results
- Fixed the incorrect position of the 'Compare' and 'Show Details' buttons in the Local History pad
- Fixed the rare UI issues, and changed some UI elements in the FLS sObject inspector
- Fixed the UI issue when the brightness of the coloring of the Code Coverage increased each time after clicking 'Refresh'
- Fixed the rare cases of TWS crashing when a log file was closed


Your comment may be the first