


Managing Salesforce Permission Sets in Spire R13
As we are moving closer to the Big Spring Release, we are crossing more and more items off our checklist - as with each release, more features that we've planned to implement are coming to life. In The Welkin Suite Spire R13, we have implemented the possibility to edit the permission sets and assign them to the users, which considerably extends the scope of actions that can be performed in terms of permissions management. That being said, this version is also packed with some improvements and bugfixes that level your workflow.

Editing of your Salesforce Permissions Sets
Permission sets are an extremely powerful tool in the hands of Salesforce developers and administrators - as by using permission sets, we can build very complex and flexible security model in Salesforce, and in many cases, it will be very clean and easy to maintain. However, if we are talking about organizations with hundreds (or even thousands?!) users, with lots of managed packages installed, or additional feature licenses purchased from Salesforce, making any changes in permission sets configuration might become our small personal hell.
Salesforce UI provides an option to modify permission sets. However, we feel that there can - and should - be better ways to perform all of these configurations. This is why in Spire R13, we are releasing the first iteration of our Permission Sets Inspector. The primary and the most obvious benefit of having such an inspector in your IDE, is that you have one reason less to switch to your browser. Instead, you can simply navigate to any permission set in the Solution Explorer, open it and enjoy the graphical UI, in which you can do almost everything in terms of permission set modifications. The main complexity of permission sets is hidden in the fact that it encapsulates a lot of different types of permissions and configurations - object permissions, system permissions, app permissions, and many others. All of these different types of settings require different approaches to make your work with them easier and faster. Let's take a closer look on what we have built for you, and how it works.
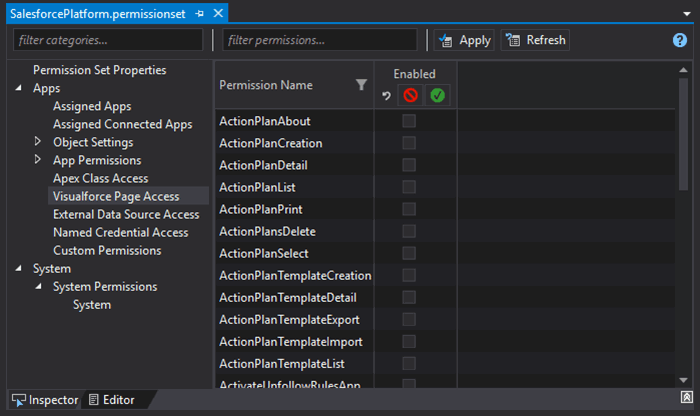
Once you open any permission set in The Welkin Suite, you will get a split editor. In the upper part of this editor you will see graphical Inspector - we will focus on this part for now. Please take into account that Permission Sets editor is working with your Organization information directly - the same way as FLS editor does. This means that the information displayed in the Permission Sets inspector is fetched from the organization and can be saved to the Organization only from the Inspector itself, and this data isn't required to be present in your TWS project.
On the left side of this inspector, you will see the 'Categories' of permissions in a tree-like view with subcategories, while on the right side you can configure permissions once you select any category. In the categories list, you will see only those categories, which are available for the license that is assigned to the current permission set. Please note that there are a lot of different licenses available in Salesforce, and we may not be aware of some of them. In such cases, all of the categories will be shown, but some of them might be empty.
Once you go deeper into the categories list (for example - when you expand 'App Permissions' or 'Object Settings'), The Welkin Suite might send additional requests to Salesforce to get only relevant sub-items for you. This usually takes just a couple seconds, and is much faster than doing the same via the standard Salesforce setup UI.
Due to the complex nature of permission sets, when selecting the different categories of permissions, you might get a different representation of settings in the right part of the inspector.
- For most categories, such as Apex Class Access, Visualforce Access, etc., you will see the standardized list of available items with an option to enable or disable the access to them - both individually, or using the quick actions in the header of the table. You can this example of such category on the screenshot above.
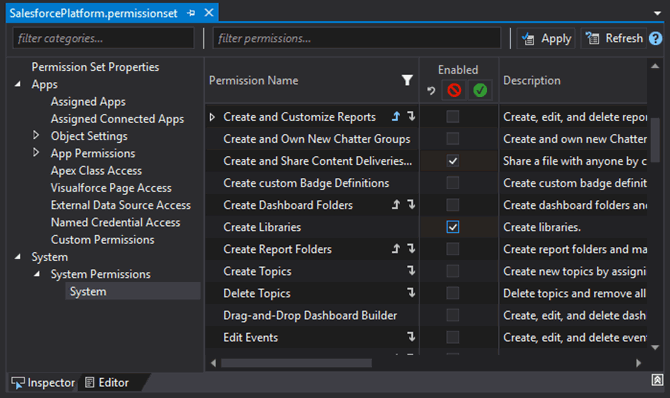
- For some other categories with specific permissions, like System Permissions or App Permissions, you will see a table with the list of permissions, followed by a detailed description and an option to enable or disable any of the permissions.
As you might know, a lot of permissions require some other ones, and Permission Sets Inspector provides this information in a very convenient way, so you don't need to waste your time trying to understand all the dependencies. If some permission is required by another, or if some permission requires any other - you will see the corresponding buttons next to its name. Once you click on them, all the related permissions will be displayed below with all the details. This way, you can analyze which effects enabling or disabling the permission will have. In the example below, it will only take you 2 clicks to find out that enable 'Mass Email' permission will enable 'Edit Tasks' permission.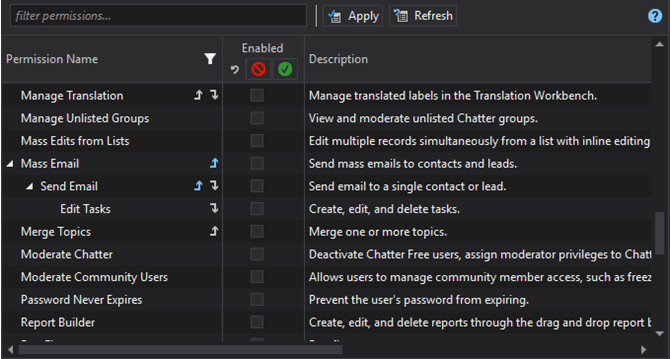
- The last type of permissions, which is different from the previous ones, is Field Permissions. Once you select any object and choose 'Field Permissions' sub-category, you will get the same UI as we have for configuring the FLS settings in our sObjects Inspector, with the same options to modify them. Here you can set access to any of the fields to one of the following options - 'Hidden', 'Read-only' and 'Visible'.
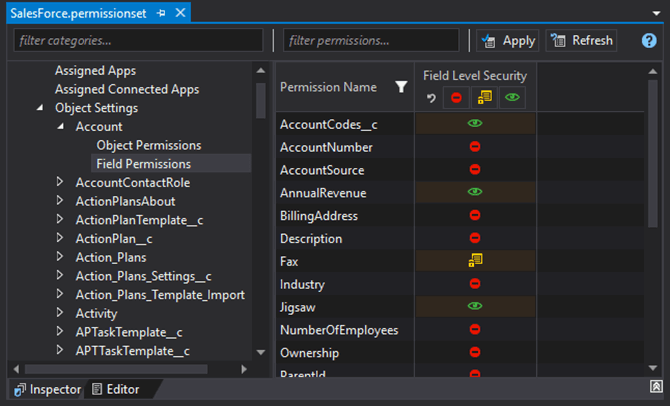
Of course, for both categories and permissions configuration, you have corresponding filters in the toolbar of the Inspector - using this filtering options you can speed up the process of finding and changing needed permissions.

In addition to filters in this toolbar you can find the following options:
- Apply - this button will apply all changes you have done in the permission set in all categories. Please take into account that you cannot apply your permission sets changes in any other way (like deploy or build) in The Welkin Suite.
- Refresh - this button will reset your changes about for all permissions and will fetch information about current settings from your Salesforce Organization.
- Help icon will allow you to refresh your knowledge about the Permission Sets Inspector using our documentation.
Assigning Permissions Sets to Users
Now that everything is ready in your permissions sets in terms of proper access to the different parts of your Salesforce Organization, you can easily assign the necessary rights to users. Likewise, you can edit the existing permissions sets assignments for one or more users in as many as a few clicks. This will save you tons of time, especially when you are working with the newly added users, or when you've just created or imported the permission sets.
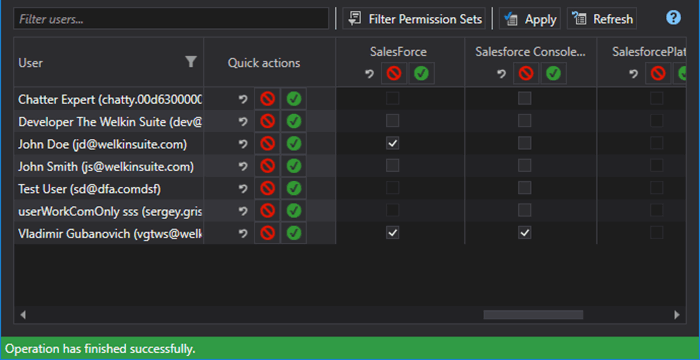
We have created the separate tool for managing this, and its UI resembles our FLS Inspector:
You can get the access to this window from the menu 'Tools → Permission Sets Assignments'.
When you open the window, The Welkin Suite IDE sends the request to Salesforce and gets all the up-to-date information about the available permission sets and the list of users from your Organization for your further working process.
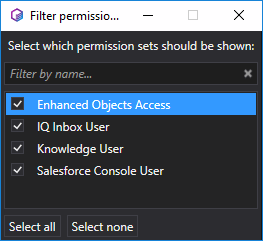
As you can see in the screenshot above, the rows are showing users from your Salesforce Org, and the columns are dedicated to the available permission sets. At the intersection cells, you will see if the permission set is accessible for a user, or not - you will get this from the appropriate status of the checkbox. As usually in The Welkin Suite you have different filtering options for both users and permission sets so you can reduce the amount of information on the screen to show only needed records.
In addition to simply configuring assignments one-by-one, you can also use Quick Actions which are available in the columns header or near the username. At the same time, some of the checkboxes could be disabled because of incompatibility of user's and permission set's license.
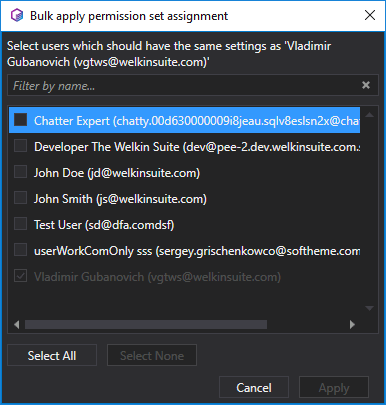
For even further time-saving in the complex situations you can use the 'Bulk apply to...' option which is available in the context menu of the column header or in the cell with the username. For example, Once you select 'Bulk apply to...' for a user you will see a window which will allow you to select other users who should have the same permission sets assigned.
In the Permission Sets Assignment toolbar in addition to filters, mentioned before, you have 2 buttons:
- Apply, which will apply your settings to the organization
- and Refresh which will reset all your changes and query the most actual information from the Organization
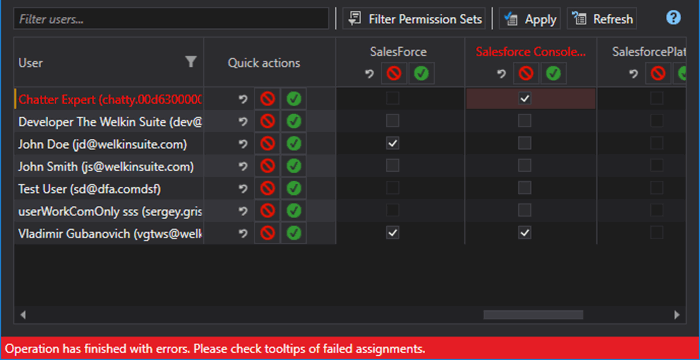
In case if any errors would occur when applying your changes the following will happen:
- the status bar of the window will be changed to the red one
- cells, that have failed to apply will be highlighted with the red background
- a tooltip for the checkbox(es) that have failed to apply will contain all the error information provided by Salesforce
- headers of the corresponding row and column will be as well highlighted with red
We hope that the Permission Sets Assignment tool in The Welkin Suite will help you saving your time in your daily tasks, however, we have even more plans to improve this functionality. Please let us know if you have any suggestions that you'd like us to implement!
Other changes
Beginning from the Spire R13 version of The Welkin Suite for Windows, you have an option to delete multiple selected files in one operation. After you have selected the needed files and clicked 'Delete' in the context menu in the Solution Explorer, you will get the appropriate window in the wizard. At the first stage, you will see the list of files, which will be deleted from your TWS project. You can check this list, and after clicking the 'Next' button, the process will fire. At the end, you will get the list of the same files with their deletion statuses, so if it was impossible to delete some of the files, you will see the 'failed' status, and the reason behind this.
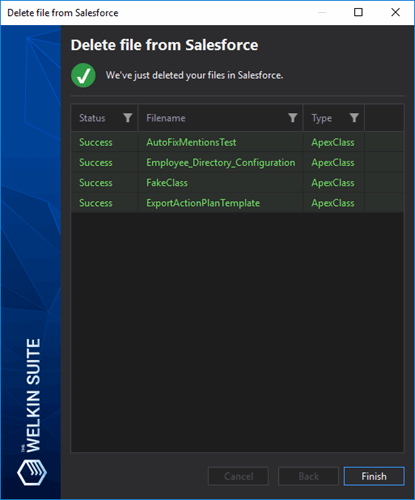
We would like to draw your attention to the fact that the deletion of several items works with files from your Salesforce Organization, and doesn't include local files, such as Anonymous Apex files and SOQL queries.
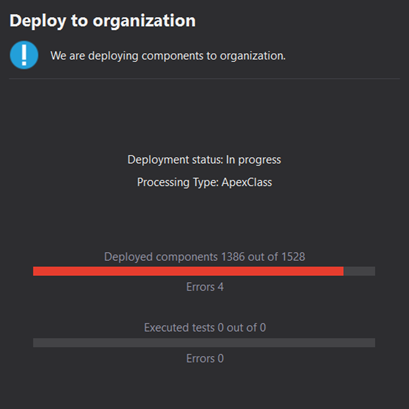
A great part of the additional changes is related to Salesforce changes deployment, which was improved in the previous version of The Welkin Suite Spire. We have changed the colors of progress bars for deployment - now they've become more intuitive and visible, and you will immediately see, for instance, if there are some errors:
As of now, you can select the necessary files for your deployment process without enabling their checkboxes, but also by clicking on the appropriate row in the table of the available files from your TWS project and remote Org.
Also, our developers have worked on the issues that were found in Salesforce changes deployment functionality. You may have gotten the error if some test classes selected for the deployment (or on your remote Org) had the same names but different namespaces on your Organization - and now we have fixed this. Another issue was related to the case when the tests from your remote Organization were not loaded, for example, due to the time-out. In this case, the list of tests which can be run in a frame of the 'Run specific tests' options in The Welkin Suite IDE didn't include even the local tests that were selected for the deployment. In the updated TWS version you have an ability to run local tests in any case.
We have made the additional improvements for the Deployment wizard in the Blue and Light TWS themes, so you will now see an eye-pleasing window with all the options and texts clear and readable.
Our developers have made the important fix for the build process. After you updated a component file or Visualforce controller on your Organization, you've received a message that the pull from Salesforce was required. In general, the IDE includes the changed files as well as the dependent ones into the build process. However, the IDE didn't include the Visualforce page, which uses a Component, to the build process after editing this Component. In such a case, the modification date for the page was changed on the Org, but TWS was not aware of this. This is why the IDE required pulling the latest version from your Organization. From now on, this behavior is handled properly.
The next fix is related to the SOQL query executor, and solves the issue when TWS worked incorrectly with the queries which had more than two levels, and one of the levels was null.
Also, you could have been faced with the failed object deployment after creating a new field via the sObject Field Inspector. You could create the picklist field and leave the required properties empty. This is what led to the failed operation.
Our developers have started the work on the solving issues related to the failed debugging process. In the Spire R13 version of The Welkin Suite ID, they have fixed one of the reasons, and they will continue to work on this in the next version of the IDE.
We hope that these updates will come in handy in your daily workflow, and we would love to hear what you think about them! We would also be glad to know which exact updates you look forward to the most - so please share your thoughts with our team. If you believe some of the updates that we have planned are more urgent than the other - do not hesitate to bring this topic to our attention, and we will move them up in priority.
Full list of changes
Features
- Implemented an ability to manage Permissions Sets assignments
- Implemented the visual Permissions Sets Editor
Improvements
- Added an ability to delete multiple selected files
- Added an ability to select a file for the deployment by clicking on its row in the list in addition to enabling the checkbox only
- Changed the colors of the progress bars during the deployment process to make them more intuitive and visible
Fixes
- Fixed the issue when the pull was required after building a component file to Salesforce
- Fixed the issue when the local tests selected for the deploy to another Org were not displayed in the list of available for the 'Run specific tests' option if tests from a remote Organization were not loaded
- Fixed the issue related to the failed deploy to another Org if there were tests with the same names but had different namespaces
- Fixed the issue when TWS handled incorrectly the SOQL query with more than two levels if one of the levels was null
- Fixed the UI issues in the 'Deploy to another Org' wizard for the Blue and Light color themes
- Fixed the issue when there was an ability to deploy the object with the newly created picklist field which had empty required properties
- Fixed the rare issues of the failed pull from Salesforce when the files related to the folder metadata types were included to this pull
- Fixed the rare issues related to the failed debug process
Known issues
- Custom settings are present in the list of the Object settings in the Permission Sets Editor

Your comment may be the first