


App Development with Salesforce DX and The Welkin Suite . Part 1 - Get Ready to Create an App

Hi Trailblazers!
We are starting a small series related to the App Development with Salesforce DX Trailhead module and want to show you how to easily pass it using The Welkin Suite IDE.
If you haven't yet completed this module, this is a great chance for you to get inspired by the awesomeness of the Salesforce DX, earn a badge on Trailhead and get to know how to work with SFDX in The Welkin Suite.
In this article that is the first part of our journey, we will complete all preparations and will go through the 'Get Ready to Create an App' unit and will spend about 20 minutes thus saving time even here ![]()
Preparations
In our case, preparations for the Trailhead module are not as complex and we'll need just a couple things:
- Basic knowledge about Salesforce DX - Salesforce DX Development Model Trailhead module could be a great start and won't take more than 40-50 minutes to complete
- DevHub organization
- The Welkin Suite IDE Bloom R6 (or higher)
DevHub organization is one of the main components of the SFDX approach as it allows you to create and manage your Scratch organizations. For now there are 2 options to get DevHub organization:
- Enable DevHub on any paid production organization - documentation;
- Request a free trial DevHub-enabled organization - a no-brainer for practicing.
Once you're done with DevHub, we'll need to have a tool for the work on your code and with SalesforceDX itself. Of course, we can install Salesforce DX CLI and any editor separately, but in this case, we'll have to work with the command-line and switch between several tools all the time. Instead of this, we will just install The Welkin Suite Bloom R6 (or higher) version for Windows. If you haven't yet registered on our website - this won't take more than 2 minutes to sign-up, start a trial, and start the installation. The cool thing here is that the IDE installs SFDX CLI as well, so you don't need to do anything additional.
Just in the case if needed you can find a step-by-step installation guide in the documentation.
Adding DevHub to The Welkin Suite
Once you install and open The Welkin Suite you will see the IDE with some of the informational panels opened by default. The most important one for us now is the 'Organizations Manager' - navigate to the main menu, select the 'View → Organizations Manager' and change a position of the panel in the way you like. If you haven't tried SFDX before, the panel will be almost empty, so, first of all, we will need to add a DevHub org to the list.
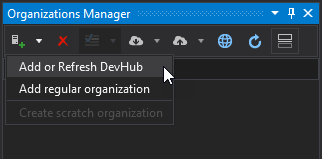
To do this click on the 'Add' button in the toolbar and select 'Add or Refresh DevHub'. In the window that will appear after this you need to specify an alias for an organization - you will use it as an org identifier almost everywhere, so in our case we'll call it simply 'DevHub' . Also you need to select an option to make this org default.
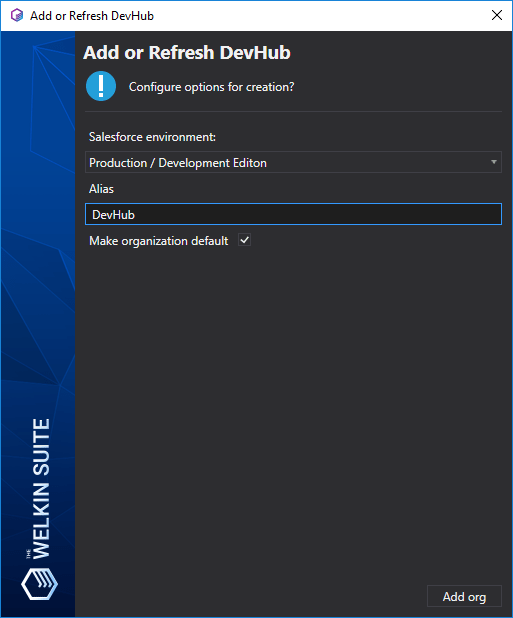
Once you click the 'Add org' button, your browser will be opened - enter the credentials of the DevHub you've created during the previous step and allow access to this org. After these steps are done you will see your first dev hub in the Organizations Manager (if no - just click on the 'Refresh' button in the toolbar), so we can start doing interesting stuff 
So this way we have added our first Dev Hub org to the SFDX CLI's list of organizations.
CLI Reference: you can use the 'sfdx force:auth:web:login -d -a DevHub' command in the CLI to achieve the same.
Create a Salesforce DX Project
In the new development approach with SFDX your organization is no more a source of truth for a project and all customizations. Your sources (read - project, repository) are the source of truth. This means that you need to create a local project which you will use to start developing. The same project can be (and, ideally, should be) added to a version control system of your choice (Git, SVN, TFS, etc.).
To start a new SFDX project, navigate to the main menu, select the 'File → New → Project...' to open the 'New Project' window:
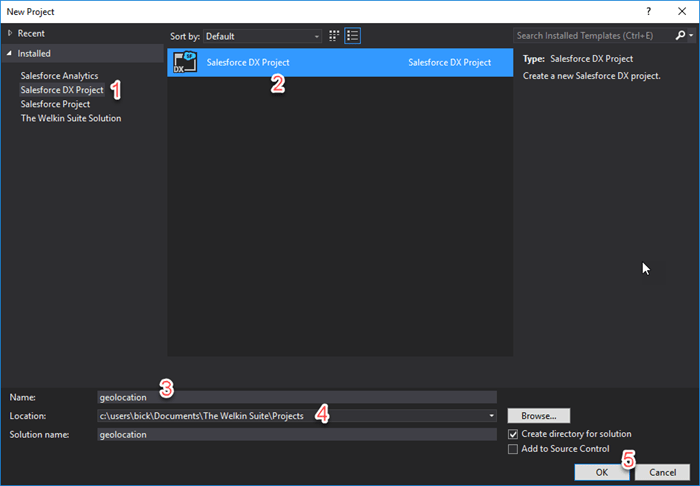
- Select 'Salesforce DX Project' on the left part of the window.
- Select 'Salesforce DX Project' in the central part of the window (however, it'll be selected by default).
- Name the project - in our case, it will be the 'geolocation' to be consistent with the Trailhead.
- Change the location of your project, or leave the default one.
- Press the 'OK' button.
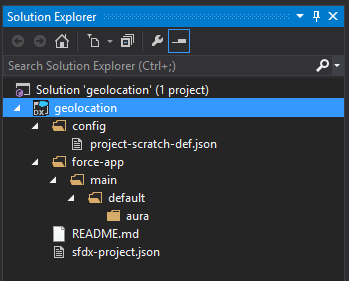
In the 'Create SFDX project' wizard that will appear afterward, leave the default values, and press 'Next' - as a result you will get a new SFDX project with the default settings. The IDE will open it, so you'll see the project content in the 'Solution Explorer' panel.
CLI Reference: You can do the same using the command line and the sfdx force:project:create -n geolocation command.
Some handy information from Salesforce about the project content:
- sfdx-project.json - Configures the source that this local project manages. Within this file you specify:
- The paths to your source code, classes, and metadata, as located in one or more package directories, in this case, force-app.
- The namespace, if needed.
- The API version of your source.
- config/project-scratch-def.json - Determines the configuration of a scratch org, including which features and preferences define its org shape. You can create a configuration file that your whole dev team can share.
- force-app - The folder that contains the source for your project.
Create a Scratch Org
In Salesforce DX the development is shifted from the org-centric to the source-centric (or artifact-based) paradigm - this is why on the previous step we haven't tied up our project with any organization, however we still need an org to test our customizations.
According to Salesforce the general workflow for the source-based paradigm is to:
- Push the source and metadata to a scratch org.
- Pull any changes you make in the scratch org back to your local project.
- Sync this project with your VCS repo.
So we will create a new Scratch Organization: right click on your DevHub in the 'Organizations Manager' panel and select the 'Create Scratch organization' item to start the wizard.
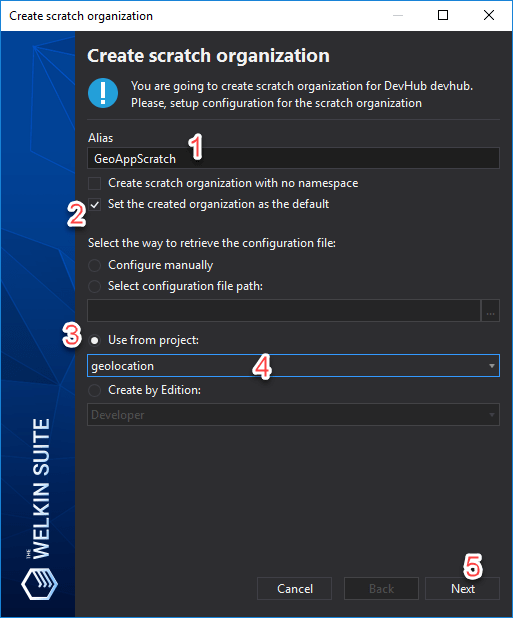
The simplest way to create a Scratch org will take less than 30 seconds, to do this:
- Enter an alias for your org - 'GeoAppScratch'.
- Set the checkbox to make the Scratch org the default one.
- Instead of configuring the Scratch org manually, select the 'Use from project' option to use 'project-scratch-def.json' configuration from one of your opened projects.
- Select the 'geolocation' project.
- Press Next.
As a result, the IDE will call the Salesforce DX CLI to create the org and it will appear in the Organizations manager.
CLI Reference: You can create a Scratch org from the CLI using the following command sfdx force:org:create -s -f config/project-scratch-def.json -a GeoAppScratch
Create a Custom Field
Finally, we're starting to customize something instead of just clicking here and there To build the nice application from the Trailhead we'll need to create an object first. To do this we need to follow these steps:
-
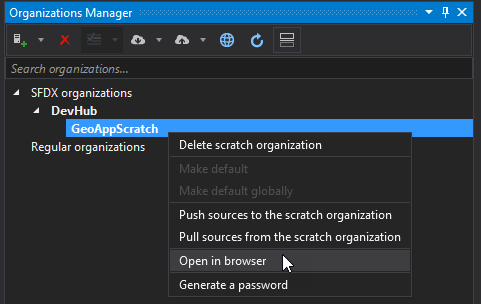
Open the scratch org in your browser - right click on the 'GeoAppScratch' in the 'Organizations Manager' panel and select 'Open in browser':
- From Setup, enter Object Manager in the Quick Find box, then select Object Manager.
- Click Account.
- In the Fields & Relationships section, click New.
- For the Data Type, select Geolocation, then click Next.
- Enter these details, then click Next:
- Field Label: Location
- Latitude and Longitude Display Notation: Decimal
- Decimal Places: 7
- Field Name: Location
- Click Visible to select all field-level security profiles, then click it again to deselect them all.
- In the Visible column, select Standard User.
- Click Next, then Save.
Next, define a permission set to control field level access to the newly created location field.
- From Setup, enter Permission in the Quick Find box, then select Permission Sets.
- Click New.
- For Label, enter: Geolocation
- Click Save.
- Under Apps, click Object Settings.
- Click Accounts.
- Click Edit.
- For Location, select Read Access and Edit Access.
- Click Save.
Now we need to assign this permission set to our current user. To do this we'll use another panel in the IDE - 'View → Command Line'.
You just need to execute one sfdx command: enter sfdx force:user:permset:assign -n Geolocation and hit 'Enter'.

Metadata Magic: Pull Changes into Your Project
The great point about Salesforce DX is that you can absolutely easy and in a familiar way customize an organization. Then just in 2 clicks or one CLI command get those changes as artifacts or source code to your project. So, let's do this!
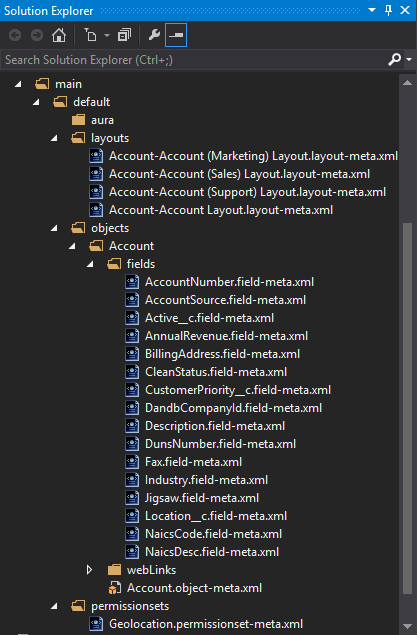
In the 'Organizations Manager' panel right-click on the 'GeoAppScratch' org and select 'Pull sources from the scratch organization'. In just a couple seconds your project will be updated with the customizations you've done on the org:
Nice, isn't it? As the next step, it makes sense to commit your changes to your version control system. We won't cover this part, but you can do this using the command line from the corresponding panel or you can have your favorite Git client application to do this for you 
CLI Reference: You can pull a metadata from a default scratch org using the sfdx force:source:pull command in the command-line.
Also, there's another very cool benefit of Salesforce DX - once you've modified a data structure or added some code, we believe that you'd like to be able not only to test these changes with unit tests, but also you'd like to see them in real on the org itself. Creating 'dummy' records every time? No, not anymore!
Create Sample Data
SalesforceDX allows you to export data from any organization and save it as files (and commit to the VCS, of course) so you can import this sample data set to an org in less than a minute when this is necessary. Wondering how? Let's see, but first we need to create this data - sorry, still need to do this manually:
- Back in the scratch org, click App Launcher, select Accounts, then click New.
- Go ahead and create these three Account records:
- Name: Marriott Marquis | Latitude: 37.785143 | Longitude: -122.403405
- Name: Hilton Union Square | Latitude: 37.786164 | Longitude: -122.410137
- Name: Hyatt | Latitude: 37.794157 | Longitude: -122.396311
- Return to your project in The Welkin Suite, right-click on it in the Solution Explorer, in the menu select 'Add → New Folder' and name it 'data'.
- Instead of manually typing in the SOQL query to retrieve the data we'll make it easier. Right-click on the 'data' folder, select 'Add → New Item', select 'Query' in the list, and give the query some name, for example, 'AccountGeolocation.soql'.
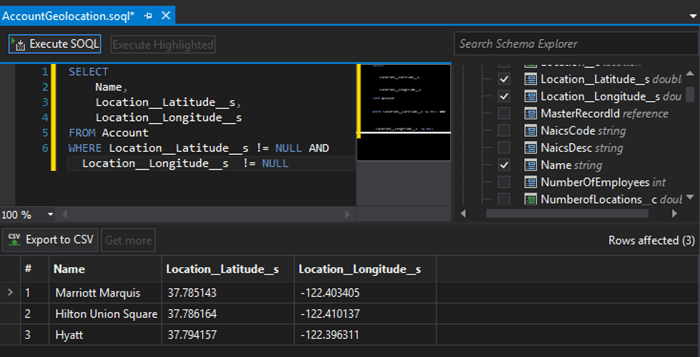
- Open the created 'AccountGeolocation.soql' file.
- In the right part of the Query Builder select Name, Location__Latitude__s, and Location__Longitude__s fields for the Account object - this will generate you a plain query.
- Append the query with the following line 'WHERE Location__Latitude__s != NULL AND Location__Longitude__s != NULL' and press 'CTRL+S' to save the query. Optionally you can execute it beforehand to check what data will be executed.
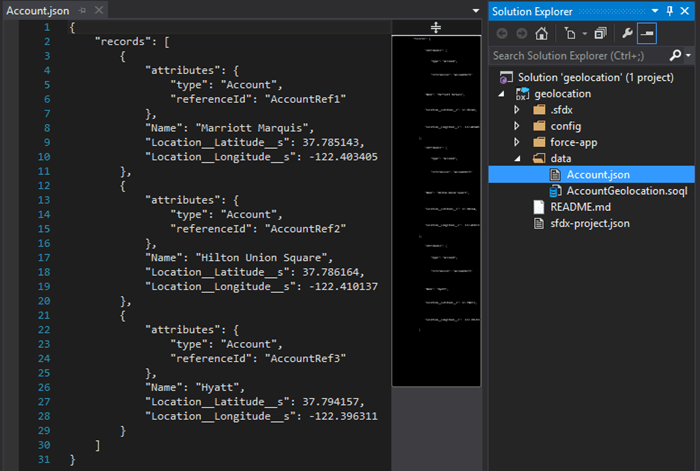
As the last step, let's add this data to the project itself, so when someone will work on another Scratch org they'll be able to use the same sample data. To do this - right-click on your 'AccountGeolocation.soql' file in the Solution Explorer and select 'Export data as a SObject Tree' - this will generate you a json file called 'Account.json' in the same folder - with the same 3 records you've just created!
CLI Reference: you can import and export sample data from the SFDX CLI using such commands:
- To export sample data (as in our example) - sfdx force:data:tree:export -q "SELECT Name, Location__Latitude__s, Location__Longitude__s FROM Account WHERE Location__Latitude__s != NULL AND Location__Longitude__s != NULL" -d ./data
- To import sample data - sfdx force:data:tree:import --sobjecttreefiles data/Account.json
So now we've prepared the data structure and some sample records to start writing actual code. Did you notice that we almost haven't used the command line and have done everything in GUI for Salesforce DX? That's right, no need to remember all the commands with their arguments. Just focus on the important things - your project!
If you haven't yet completed this unit on Trailhead - answer the quiz to earn progress towards the badge.
And don't forget to commit the project to VCS!

Your comment may be the first