


Enhanced Declarative Development: sObjects Inspector in Spire R5
The Welkin Suite team continues to create the new possibilities for Declarative Development within the IDE. The Spire R5 version extends the ways you can save your time, and enjoy the work with objects using the sObject Editor.
In Spire R5 version of The Welkin Suite IDE, we would like to present to you the Fields and Layouts Inspectors, which allow you to manage the related settings in your object files in a few clicks using new abilities of the application.
The  sObject Fields and
  Layouts Inspectors are available for you as separate tabs next to the FLS one in the code editor for your objects. You always have the access to an xml file, however you can now also manage the fields, layouts, and FLS by switching between the appropriate editors when your object is opened. As usual, you can change the position of an xml file in these editors, or even hide the last ones if you don't need them in your working process.
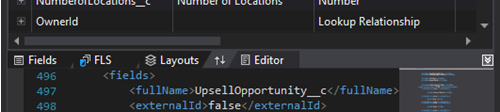
Please use the buttons in the splitter for this.
sObject's Fields Inspector
With our newest update to The Welkin Suite's sObjects Inspector, you can combine the ultimate speed of sObjects configuration via XML files together with the simplicity of Salesforce's Setup options - all in one tool! And even more power is available for you, as you can create a skeleton of your new object using your mouse, and then fine-tune it's XML definition in the same window!
Displaying Fields
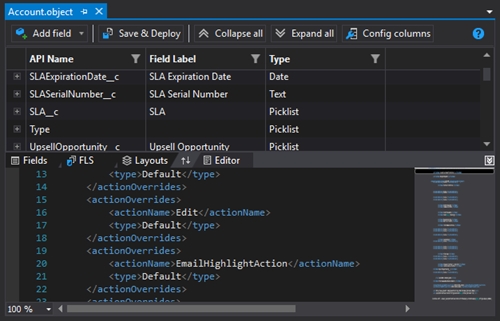
In the Fields tab, you will see the list of all the fields in the object, with some basic information about them - Label, API Name, Field Type, if the field is required, and if it has an external ID. As any other editor (except Field-Level Security tab), the new Fields editor is operating the local files only. So in order to see the most accurate version from the org, you will have to Pull from Salesforce first. However, all your local edits and updates would be shown in the Fields tab immediately.
To filter the separate fields that should be shown in the list, you can use the same advanced filters that are available for most of The Welkin Suite's tables. In order to use the filter, please click on the filter icon in the header row for the Label column, and a window with filtering options will be displayed.
Once you find a field that you are interested in, you can expand the corresponding row for more details. In addition, you can use the ' Expand all' and '
 Collapse all' buttons in the toolbar at the top of the editor.
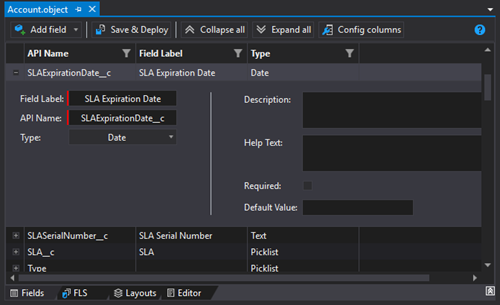
In the details section on the left, you will see the field's general properties, such as Label, API Name, and Type. At the same time, to the right of the details section you will see the specific properties for the given type of a field, for example length, decimal places, and default value for the fields with 'number' type, and so on. Using the 'details' section, you can also edit the field definition. However this will be described in the section below.
For those who prefer to be in full control, there is an option to quickly navigate to the field's definition in the XML file by simply clicking on its corresponding row - caret position in the XML editor will be moved to the beginning of the field definition.
Creating and modifying fields
Of course, the most productive workflow concerning the object's fields includes the ability to modify them in the same window instead of going through a series of different windows or web-pages. That is why The Welkin Suite provides you with the way to edit them right here, in the Fields tab.

In order to edit the fields, all you need to do is to expand the field details in the main table, and modify any of the available properties in the 'details' section. All the changes that you are making in the "Fields" tab are immediately traced in the XML editor part of the sObjects Inspector. This way, in a case you are not happy with the last changes you made, you can always use Undo (or Redo) commands.
Naturally, The Welkin Suite also allows you to create new fields in the object - just click " Add field", and the new row will be added to the list, so you will only need to fill the necessary values for properties. Additionally, when you change the "API Name" property for the field - the new field will be created with the new API Name and the same configuration as the "initial" one, so please take this into account and if needed remove the first field using the Salesforce UI. In one of the next releases we will add a separate function for renaming fields without any additional actions.
To have your changes appear on your Salesforce Org, you have 2 different options:
- Click "
 Save & Deploy" button in the tab's toolbar and your changes will be saved locally, as well as will be deployed to the org. Please note that this button starts the deployment process only for the given object, and ignores all other changes in your project.
 - Save the XML file and use "Deploy objects" command for your project
Please note, that conflicts check is not performed, so if anyone has changed sObject's fields in the Org and you have not pulled that changes - they will be overridden with yours.
The last case of modification - deletion of the fields, is not yet supported by The Welkin Suite's sObjects Inspector. In case if you would remove a field from the XML part of the editor and deploy changes to the org - the field won't be deleted, because such changes are handled separately as "destructive changes". This option as well will be implemented in one of the next releases of TWS.
Learn more
In our documentation you can find all the details about using our new sObjects Fields Inspector. You can access this information from the tab itself by clicking on the  icon in the toolbar.
sObject's Layouts Inspector
In The Welkin Suite, we would like to provide you with the best development and configuration experience possible. At the same time, we want you to feel comfortable with the tools you are working with. This is why, when creating the Layouts editor in the sObjects Inspector, we have used virtually the same approach, as in the recently introduced Field-Level Security Editor. This way, once you master one tool, you will be comfortable with other ones.

Displaying
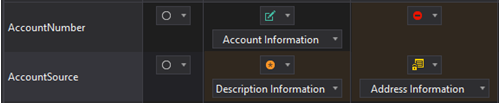
When you open the sObject Layout Editor, you will see the table for the object fields and layouts relations that are available in your TWS project. The rows in this table stand for the fields from the opened file, while the columns are layouts (from the local layout files from your project). At the intersections, you will se the actual statuses for each field-layout pair. These statuses are as follows:
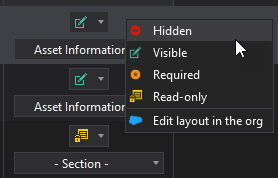
 Hidden - not shown on the layout
 Edit - shown and editable on the layout
 Required - shown, editable and required on the layout
 Read-only - shown, and is read-only on the layout
If a field has Visible, Required, or Read-only status, you can see in which section of the layout this field is shown. Similarly, if the field is hidden on some layout, there no information about the section will be displayed for this field.
The regular development flow when working with object fields often implies modifying a set of parameters for several fields/layouts relations. Despite what is so special for each of such sets, you can use the multiple filtering options to reduce the scope of items shown in the table:
- By specifying the Filter Fields right above the "Fields" column, you can quickly reduce the list to only those rows which contain the entered filter term
- At the same time, the Advanced Filter for Fields option allows you to have even more control over the fields that should be shown - just click on the filter icon in the column header, and you will be able to define the complex filtering criteria for the field name
- After you click on the
 Filter Layouts button in the toolbar, you will see the windows with the list of all the available layouts, where you will be able to select the ones you need
 - The
 Unassigned only button leaves only those fields that are hidden on all layouts, so you can carefully investigate each of them, and correct the situation if needed

If you'd like to see which values were changed, this can also be done very easily. All of the changed cells are highlighted with the yellow background, and if you return the initial value - the highlighting will disappear.
Modifying
The Welkin Suite IDE provides you with several ways to change fields settings for layouts that are available in your project, so you can select the method that works best for you:
- In the layout-field intersection cells, you will see a picklist, in which you can select if the field should be hidden/shown/read-only or required
- Alternately, you can right-click on any intersection cell, and select the visibility status from the context menu
- For the fields that are shown in the layout, you will also notice the second picklist, in which you will be able to select the layout section where the field should be displayed
Please pay attention to the following things when modifying layouts configuration:
- It is important to keep in mind that when deploying changes for Layouts - conflicts check is not performed, so if someone has changed Layouts n the Org but this changes were not pulled - they will be overriden. This will be implemented in one of the next versions.
- The Layouts editor in sObjects Inspector works only with the fields and layout in your project, so if something is present in the Org, but was not pulled to the project - it won't be available in the Layouts editor
- As Layouts editor is working with different files (it does not change anything in the opened .object file, but modifies .layout files) - regular 'Save' option in the editor won't save the changes in the layouts. To save them, you need to use the '
 Save' button in the tab's toolbar
 - ' Save & Deploy' button in the tab's toolbar will save and deploy only those changes in the layouts that were made by you, ignoring any other changes in other metadata types
Bulk modifying
In Salesforce development, everything should be bulkified. The development and configuration process itself is not an exception, especially as The Welkin Suite is all about your comfort and productivity. Thus, we provide you with a set of different tools to "bulkify" the configuration of the fields that you want to be visible on different layouts. Using the options below will allow you to save your time, so you can proceed with other tasks of yours, or let yourself rest a bit:
- Quick actions column - the second column in the layouts tab, Quick Actions, gives you an option to easily set the same visibility configuration for all layouts for one field. However, as these actions are dealing with multiple different layouts at the same time, they won't allow you to select a layout section in a "bulkified" manner, so you will need to modify it on per-layout basis.
- Quick actions for Layout - almost the same option is available for each of the layouts in the header cell. Here you will find an option to set the visibility for all fields in just two clicks, as well as a way to display all fields in the same layout section. It is also very important that the visibility settings, along with the settings for the sections, can be applied independently of the Quick Actions
- '
 Bulk Apply to...' for Fields - a more powerful option is available to you from the context menu, if you right-click on the cell with the fields's name. Using this tool, you can carefully configure the display options for the field, and then apply them to any other field, or a set of fields, in just a couple of clicks. Once you select 'Bulk Apply to...' for Fields, you will see a window with the list of other fields in the object, and a filter to quickly get to the needed fields. The only thing you will need to do after that is to select which fields should have the same configuration as the 'source' one, and press 'Apply' button
 - ' Bulk Apply to...' Layouts - allows you to replicate the settings from one layout to other layout(s). In order to do this. you need to right click on the heading of the layout's column, select 'Bulk Apply to...', in the opened window check the box in front of the layouts that should have the same settings as the 'source' one and press the 'Apply' button
If you have not found an option that fits your workflow just let us know, and we will do our best to deliver it to you!
Other options
Even though The Welkin Suite allows you to define a section in which the field will be displayed in the layout, it is very common that you may need to reorder fields in sections, as well as to move them across columns. To do this, we provide you 2 options:
- Modify the XML file without leaving the IDE with the "
 Edit XML file" option from the layout's context menu. Please note that you need to "Save" or "Save & Deploy" your changes in the Layouts tab to have them appear in the corresponding Layout file in the project.
 - Use the drag&drop options in the Salesforce's Layout editor, with the "
 Edit in the org" context menu option for the layout header cell, or " Edit layout in the org" context menu option for the cell. Please note that you need to "Save & Deploy", or separately "Save" and then "Deploy objects" in order for your changes to appear in the org.
Learn more
In our documentation you can find all the details about using our new sObjects Layouts Inspector. You can access this information from the tab itself by clicking on the icon in the toolbar.
Onboarding Tips
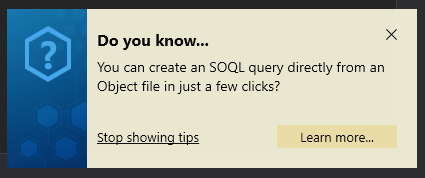
As our team is working on The Welkin Suite - new great features and options are making their way into our tool with each release. Sometimes it may be hard to keep in mind all the features that you can use. Especially if you are just starting your exciting journey with The Welkin Suite (as well as with IDE's in general, instead of a set of different tools). Taking this into account, we have added a couple of useful tips which will be shown when you start the application.
We know how annoying some notifications from applications can get, so we have done our best to bring only the useful information to you, as well as to stop showing you tips about the features that you are using.
We hope that these hints will help you master The Welkin Suite faster, and will save even more of your time!
Other changes
Working on these great features, we have found some time to solve one issue that you could be faced with during your pull from Salesforce. It occurred in case there were conflicts between your TWS file and the same file on a Salesforce Org. Previously, our IDE has always saved the file version from the server. Now this option works correctly, and you can chose the changes you would like to save.
As a part of the TWS for Mac Beta 5 work we have fixed a couple of different bugs related to the project structure synchronization - starting from a couple of smaller issues and up to rare cases of project structure data corruption.
On the way to providing a diverse set of various development patterns, in this release our team has focused on enriching the scope of tools for Salesfoce declarative development. As developers, we value the ways to bypass long workflows, and pursue the idea "why add several lines of code if you can just make a few clicks?". For this matter, we would love to hear what you think about our new direction in the development of The Welkin Suite. Please share your user stories with us - and feel free to submit the requests for the updates of the existing features, or the development of the new ones!
Full list of changes:
New Features
- Implemented sObject Fields Inspector
- Implemented sObject Layouts Inspector
- Added onboarding Tips about The Welkin Suite IDE
Fixes
- Fixed the incorrect saving of a file when merging conflicts in terms of the pull from Salesforce
- Fixed various cases of issues related to the Project Structure Sync


Your comment may be the first