New Apex Code Assistance, Lightning Previewer and PMD Apex in Bloom R1
With our new release of The Welkin Suite Bloom R1 for Windows, we are again pushing to empower you by boosting your overall productivity, and comfort by providing you with the tools and features that you need in one application. For this release, The Welkin Suite team spent a countless amount of energy going over feedback and reports, and investigating different approaches to deliver to you a totally rebuilt Code Completion, and we can't wait for you to start using it. We also are sure that the new Lightning Components and Applications Previewer, and built-in PMD support for TWS will help you get your work completed faster and help you maintain the highest qualities of work that the world is demanding of you. Another small but useful thing we have done is we have added a Getting Started window to the IDE, which at this time highlights over 50 features, so you have a fast and convenient way of getting up-to-speed on the full potential of the IDE.
We are very pleased to be able to have this release now out to you!
- New Apex Code Completion
- Lightning Components and Application previewer
- The built-in PMD support
- Getting Started guide
- Full list of changes
New Apex Code Completion
Today we are proud to release the result of a huge effort, which was done by the whole team - a new version of our Apex Code Completion. We investigated the best implementations of code completion across the IDE's for different platforms, listened to all your feedbacks, bug reports, and feature requests. And as a result of this, we have completely rewritten the Code Completion to provide you a great experience of Apex development, and to open ourselves to new opportunities to be able to implement new amazing features in the future. Below we will go through the most significant changes in this release, however many smaller improvements and behavior changes won't be described, as it would be almost impossible to talk about them all in a reasonable amount of text.
First of all, we have implemented full Code Completion coverage for different types of files with Apex code - now Triggers and Anonymous Apex files will have the same level of support and Code Assistance features as regular classes. This means that now, with this proper Code Completion, you can use Anonymous Apex to experiment with different Apex solutions much easier than before.
As a part of this release preparation, we have completely rebuilt all the underlying components, that are used for Code Completion, starting from the Apex grammar, through the lexer and parser, and up to the logic and visual representation of completions list. With the new grammar, lexer, and parser, we have achieved the following improvements when comparing it to the previous implementation of Code Assistance in The Welkin Suite IDE:
- As we have covered all gaps that were known to us in the code analysis, TWS will respect your current context much more and it will provide you with more context-tailored completions, as well as it will remove all items that are irrelevant to the current context suggestions. This change may sound small, however it is one of the most important changes - it is building a developer's trust in the list of suggestions, so there's no need to recheck what's being suggested by the IDE, or wondering if your code will compile if you use this or that completion from the list. Included here are, first of all, loops and try..catch blocks, however, there are much more Apex constructions that we've started to analyze properly.

- Because of the gaps (described above) being covered, there will be a lot less (or no at all) situations when the Code Completion or some other dependent functionality (like results of test methods in the editor, for example) will suddenly stop working.
- From now on, we are properly identifying overloaded methods and providing you information about all of them in the completions list, so you can find suitable overloads faster.
- Some of the most important things for Salesforce developers are Lists and Maps, because we're always dealing with a lot of them when we are trying to optimize our interactions with a database. So from now on we have fully implemented support for generics in Apex - this means, that when you're looking for methods/properties of the list itself - we will show you them, but when you're looking for completions for the list items - we will show you completions for the generic types, but not for the List types.


- Nested types in Apex are also now processed, and they are properly taken into account when filling the list of suggestions for Code Completion.
- Thanks to a whole lot of optimizations, the overall performance of the Apex editor is significantly improved, and those of you who are working with big files will definitely notice this change - even 20k lines of Apex code are not a problem, so you should not experience any issues with such files.
In its turn, the high-level part of the Code Completion functionality (building and filtering the list of suggestions, the visual representation of these suggestions, completions preselection, and completions insertion) was also changed a lot and has brought us the following changes:
- We have updated our database of completions with all the latest Apex changes and additions, plus we have filled some gaps in it, so from now on you should be able to find everything that's provided by Apex in your completion list.
- New Signature Helper will show you information about the method's parameters when you'll start typing them - it'll detect "," and it will highlight the current parameter that you're entering as well as the Apex Doc information for the given parameter. Additionally, you'll be able to see all the overloads of the method and you will be able to switch between them using the "Up" and "Down" keys or with a mouse. We are sure that this new feature will significantly improve your development speed, especially if you're using Apex Docs in your project:

- We have also implemented a one-time retrieval of the Organization data about the standard objects that are available for you, and their fields once you first open the project - this ensures that we won't miss important sObjects and we will be providing you all of them as you develop.
- We Included documentation for most of the standard Apex namespaces, classes, and their members into the suggestions list. This should be very helpful for both newcomers and seasoned Salesforce developers, as in this way you won't need to open Apex documentation to refresh something in your memory.
- The preselection logic for the Code Completion list was changed in two ways - first, it is less aggressive in cases where we can't find a proper match for you, so there'll be much less annoying insertions by mistake. The second change is that we will take into account your most recent selected completion - this will be handy in many situations, for example, when filling object's properties one by one.
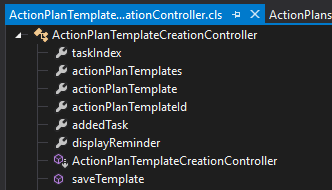
- Code Map (or Class outline) on the left side of the Apex Editor was also changed a bit - when you open a file (with enabled Code Map) the code map is expanded by default, so you don't need to waste your time for additional clicks. And this became possible because the performance of class outline was significantly improved and there will be no negative effect on the editor's performance:
As we mentioned previously, all the changes that we made under the hood of our Apex Code Completion implementation make it almost impossible for us to highlight all behavior or functionality changes, but we believe that the list above sheds some light on the overall scale of changes. Please try the new completion yourself and let us know - is it working good for you? Or maybe it's even great? ![]() Anyway, we will be happy to hear back from you!
Anyway, we will be happy to hear back from you!
Lightning Components and Application previewer
The Lightning framework is getting better with each Salesforce release, so more and more existing Organizations are moving their Visualforce solutions over to Lightning, and of course, any new projects, most likely, will start being implemented immediately with Lightning. This means that both developers and their tools should adapt to this, and be getting better and better every day :)
In the Bloom R1 version of The Welkin Suite IDE, we are happy to present you a Lightning Components and Applications Previewer, which has a great possibility to save your time when compared to the old way when you were switching between different windows. It gives you a convenient way to check all your Lightning changes directly in the IDE.
This is available for you on the projects which are associated with the Org that has a custom domain. However, in The Welkin Suite IDE, you can create this project without specifying the custom domain info - just select the Production/Development Edition or Sandbox environment for your project, and use your usual set of credentials.
Now you will see the Lightning Components and Application Previewer when you open any file from a Lightning bundle. And your other files which are included in the bundle are also present nearby, so you would not need to switch between different files to check the preview - it will stay opened for you. The previewer is located in the top part of the combined editor, and all the bundle's members are present lower part in the tabs. This means that you can switch between the tabs, and the Lightning previewer will be available for you always. When you make changes in any file in the bundle and build them to your Salesforce Organization, all the updates will be automatically displayed in the previewer in seconds, just after a change is saved on your Org.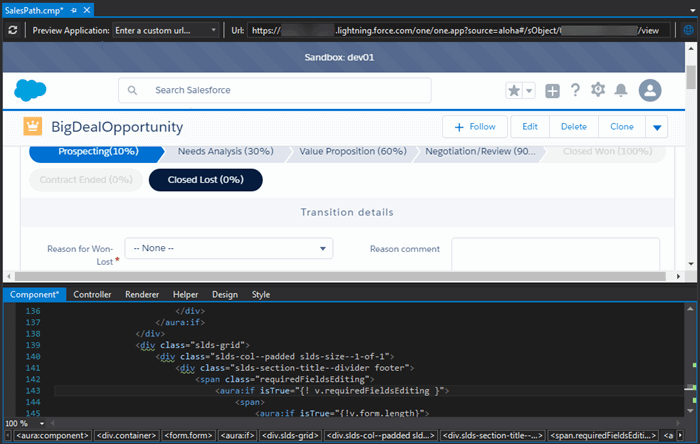
In the case, when you are working with a Component bundle, the IDE provides you with a possibility to specify which Lightning Application should be used for previewing the component. You can select the needed Application itself, and specify the appropriate URL parameters for it in the toolbar of the previewer. Also, you have a possibility to type/paste any URL for previewing your Lightning Component - for example to preview it using a detail view of any record in the Org.
When you are working with an Application bundle, of course, you shouldn't need to select an application for previewing it. So for this case, we provide you with the ability to just specify additional URL parameters. This setting is also present in the toolbar of the previewer.
The Refresh button, which is also present in the toolbar of the previewer, in its right top corner, will be helpful for your when you want to see the updates from your Salesforce Organization without having to edit or build files in your TWS project. For example, this is great when getting the updated information that is loaded to an Application on a Salesforce Org, or changes from other developers.
In the Bloom R1 version of the IDE, our developers have updated the web browser engine to the newer Chromium version. However, in addition, you can open a preview of your Lightning Application in your default browser directly from the IDE - use the appropriate button on the left of the previewer's toolbar.
The built-in PMD support
Salesforce development is very sensitive to code quality - projects are running for years, and the easier the maintenance is, the happier the developers and users are. As well as that, there are very strict performance-related requirements which are very important to follow when working with Apex. This why using a code analysis tool adds a very significant improvement to the development process - once you define what are the “must-follow” rules for your team, you won't be allowed to break them from now on - in The Welkin Suite! Isn't this cool?
The built-in support for PMD in The Welkin Suite allows you to use different rules for automatically checking your code before you update your Apex files on your Salesforce Organization.
Select the necessary rulesets or create your own, and then configure the settings and priority; no more worries - the tool will help you to keep your Apex code clean and readable.
PMD Apex Rules and Ruleset Manager
PMD provides you with a list of rules, which you can use to analyze your Apex code. The most convenient way to get going is to use a ruleset that has the needed rules enabled and configured to check everything that is necessary in one clean operation. You can configure such rulesets directly in The Welkin Suite IDE without switching to anywhere else: no need to edit xml files or look for documentation, all the descriptions are present, a possibility to set up all the settings and priorities, and all the necessary documentation is linked also there. This stuff is available for your in the following way: Tools → PMD Apex Ruleset Configuration.
A really convenient jumpstart when using PMD in The Welkin Suite IDE is to create a ruleset based on available templates. We provide you with two such templates: A Code Climate template, and The Welkin Suite template. To find them you should navigate to the menu New → New From Template in the PMD Apex Ruleset Configuration window.
The Code Climate Template is provided by the development team at Code Climate service, and it is one of the most commonly-used rulesets for Salesforce development.
The Welkin Suite Template is provided by our team, and we set it up based on our experiences and also in the less obtrusive way, so it is a very good option for projects where PMD has not used before. Additionally, we have set priorities for different rules in such way that you can easily improve your codebase step-by-step, by adjusting only the 'Error threshold' in The Welkin Suite, which will be explained below.
Another possibility that the IDE provides you with is that you can create your custom ruleset with some selected PMD rules. To do this, open the menu New → New Empty Ruleset in the PMD Apex Ruleset Configuration. Here you can specify the ruleset properties, and select all the important options to analyze your code.
The 'Ruleset Properties' allows you to describe your new ruleset. We want to draw your attention that the Name and Description fields are required. Also, you can exclude or include files to your ruleset here.
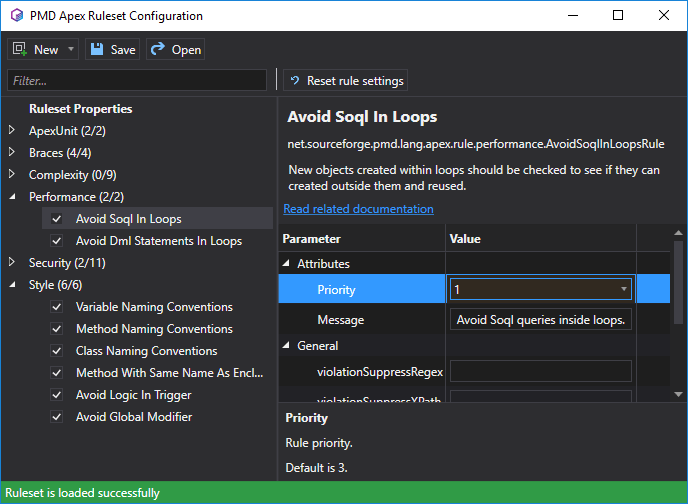
The next step in creating a ruleset is selecting the PMD rules for further checking your code. You can see that all the rules are combined by the following categories, according to the PMD specification:
- ApexUnit - rules, that are dealing with potential problems in Apex tests
- Braces - rules, that are related to correct usage and placement of braces
- Complexity - rules, that are checking against potential code size or complexity issues
- Performance - rules, that are checking for violations of good practices of performance-relations
- Security - rules, that are scanning for potential security violations in Apex
- Style - general styling and code naming rules
A convenient counter near each of the categories shows you the general number of the category rules that are included, and how many of them are already enabled for your ruleset.
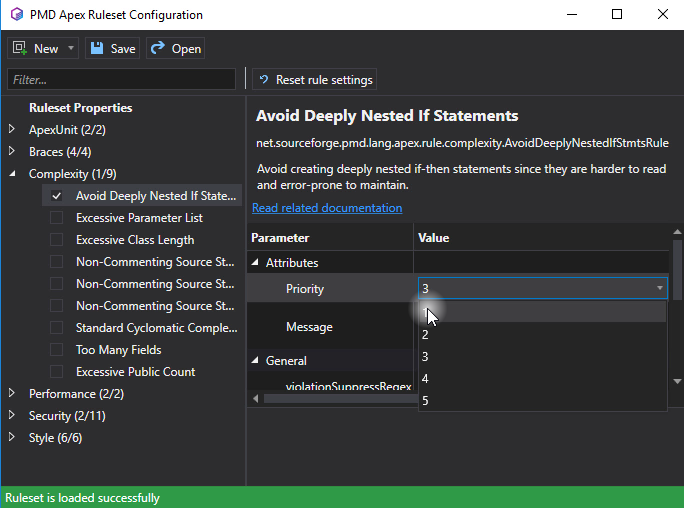
After you expand a category, you will be able to see the rules that are available, and after you click on any of these rules, you will get all information about them in the right part of the PMD Apex Ruleset Configuration. The extended information includes the following:
- the name of the PMD rule;
- PMD class that realizes the rule;
- the description of a PMD rule with the condition when it will be executed;
- the link to the related documentation;
- the list of rule's parameters.
The parameters for a PMD rule are combined into the following categories:
- Attributes:
- Name of the rule, which will be used in the PMD Report to show the results of your scan;
- Priority - we want to draw your attention to this attribute, as this parameter will exactly specify if the discrepancy to a rule is a warning that will just highlight minor issues for you, or if an error that will block the build process before the issue is fixed;
- General: the specific settings for each rule configuration;
- Code Climate: this set of parameters will be useful for you if you use a Code Climate Engine, otherwise you can ignore these settings as it does not affect anything, when running PMD on its own or from The Welkin Suite;
Regarding the Priority attribute, you can use the following descriptions for different priorities according to the PMD's guide:
- Change absolutely required. Behavior is critically broken/buggy.
- Change highly recommended. Behavior is quite likely to be broken/buggy.
- Change recommended. Behavior is confusing, perhaps buggy, and/or against standards/best practices.
- Change optional. Behavior is not likely to be buggy, but more just flies in the face of standards/style/good taste.
- Change highly optional. Nice to have, such as a consistent naming policy for package/class/fields...
Also, you can load your existing PMD rulesets and use them directly in The Welkin Suite IDE. This option is also available for you, if you need to modify such files, in the PMD Apex Ruleset Configuration window - just open it, click 'Load', and select the necessary xml file.
When you are configuring different rules, you always have an ability to go back to the default values for a rule using the 'Reset to defaults' button, available in the toolbar of the Ruleset Configurator.
No matter if you used a template for your ruleset creation, or if you configured your own ruleset, you can use the created xml file for other The Welkin Suite projects, for your CI, in other applications, or share it with your colleagues.
The Welkin Suite provides you with all the rules which are available in the most latest version of PMD - 5.6.1. Of course, we will update the list of these rules when it is changed or extended. Also, we are using all the same default values and available documentation, and we will update them also when this will be necessary.
PMD execution settings: global for TWS and for separate projects
You can use the built-in PMD support in The Welkin Suite for all your projects. You can set up the PMD globally, or you can select a separate project and enable PMD's analysis just for that one. Let's consider both these cases so you can find the necessary setting for each of them.
If you want to use PMD to always check your Apex code against some certain single PMD ruleset (for example your company's standards), you should enable this and specify the global settings for the execution of this analysis in The Welkin Suite. To do this, open the menu Tools → Options → External tools → PMD. All that is necessary to do is the following:
- Specify a path to the ruleset xml file;
- Check if you want to run the PMD analysis before each build; in any case, you always can execute it manually for some separate files/folder, and we will describe this in the next section;
- The 'Raise build errors on certain PMD issues' setting will set up the priority threshold for treating PMD rule violations as errors: if the rule discrepancy has this selected priority or higher - it will be marked as an error (thus blocking the build, if you've selected the appropriate option in the previous step), in other cases, this will be detected as a warning in your PMD report.
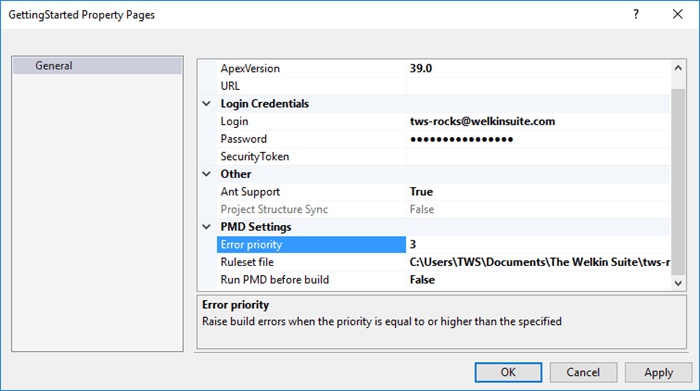
Also, you can configure PMD for some selected TWS project, and these setting won't be distributed for your other projects (for example some project-specific styling requirements). In this case, the PMD settings are available for you in the project properties - open the context menu of your project in the Solution Explorer and select the 'Properties' item or navigate to the menu Project → Properties. Here you can find a newly added section, 'PMD settings'. You should set up the same settings: ruleset xml file, mark if PMD should be run before building the project, and specify the priority threshold. When you click on each PMD setting, you will see the description for it, so it will be easy for you to see what does it mean.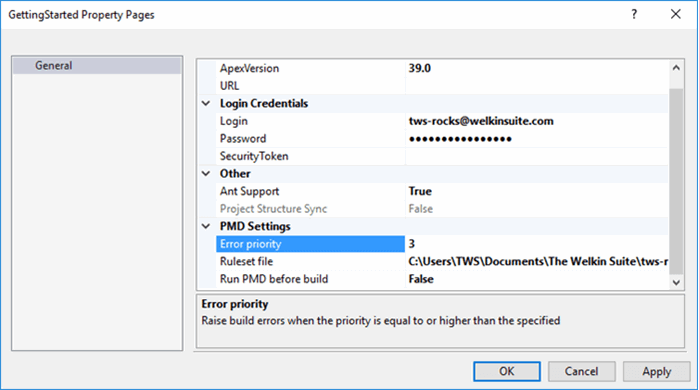
Of course, you can be faced with the case when you are using the global PMD settings, but some other projects need to be checked according to another ruleset, or you want to check just one TWS project and you don't want to do this for the others. In this case, you can set up different PMD settings for a specific project, and your global settings then won't affect this project anymore.We want to draw your attention that if you disable PMD for the project properties, this project won't use global settings anymore, however, we will work on this behavior in one of the future releases.
Also, we want to share one recommendation with you: if you are going to use a PMD ruleset xml file for your building on CI, it is necessary to configure PMD on the project level. The path to the ruleset file will be added to the project file, and this means that you will have all the necessary settings for CI.
PMD execution in The Welkin Suite
As we have already mentioned, you have a possibility to make the PMD analysis automatic for one or all your TWS projects - just enable the PMD execution before building and avoid the presence of the indecorous code on your Salesforce Organization. This setting is present for both cases: when you configure PMD for global usage in The Welkin Suite or you use it for a project.
In the case where you have enabled PMD execution before the build, all the issues above the priority threshold will be shown in both the standard Error List and in the new PMD Report panel. At the same time, the issues below the priority threshold (warnings) will be shown only in the PMD Report panel.
However, with such settings and also if you are working with an existing project that was developed without following some of the rules you've selected - you will be constantly blocked until you will fix everything in the particular classes or triggers which you are changing. This is a great approach to make the codebase better, however, there is a rare situation when we experience it taking a lot of time to refactor everything before any new changes are applied. For such cases, it will make much more sense to disable the automated PMD execution before the build, but still, perform periodical PMD scans against your project in order to smoothly fix existing issues.
TWS provides you with a possibility to run PMD manually for selected file(s), folder(s), or even for a whole project. In the context menu in the Solution Explorer, you can see a 'Scan with PMD' option for each item. Select a file(s)/folder(s)/project, open its context menu, and select the command - PMD will start to check your code. If some issues will be found, they will be displayed in the PMD Report panel.
PMD Results Report
In the frame of the implementation of the built-in PMD support, we have added a PMD Report panel. Here you will find all the issues that are found after scanning your Apex files with PMD. You can open this report using the main menu View → PMD Report.
All the results of the PMD analysis are displayed as warnings or errors, according to your global or project PMD settings (whichever are used). Each item in the list contains the following information:
- name of the rule which has failed to comply;
- a message which will help you to understand what should be changed; This message is configured as a part of the ruleset creation/configuration, however, if it is not specified - the default PMD one would be used;
- a link to the file which contains the issue;
- category of the failed rule.
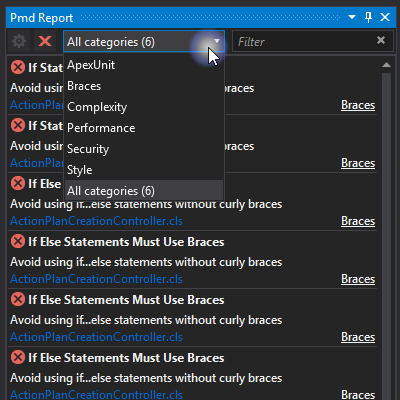
Also, in the PMD report, you have a convenient option to filter all the issues according to the rule's category. It is present in the toolbar and, by default, you will see 'All categories' selected. And just next to the right of this, is a text filter which will help you to find some needed rule.
An additional function is the 'Clear all results' to remove all the entries from your PMD report.
In cases, when you're investigating the PMD issues, you want to change the settings, for example, to raise the value for an error detection or make it lower, change the ruleset for PMD scanning, or enable/disable PMD check before building, you can navigate to the settings directly from the PMD report panel. Clicking on the settings icon in the left part of the toolbar will open the PMD settings in the Options menu if you are using PMD globally for the IDE or project's properties, and if you have set up PMD for the current project.
Getting Started guide
In the Bloom R1 version of The Welkin Suite for Windows, we have implemented the convenient guide with about 50 covered features, so you can easily squeeze everything out of the IDE for you. We want to show you all the possibilities of The Welkin Suite ![]()
The 'Getting Started' window contains a list of useful features, options, and tips on how to work in the IDE. You can scroll the right part where a list of available tips is present for you. Each tip has an additional short description - you can see it in the left part when you click on any tip in the list. However, the main information about each feature is presented in a short 10-20 seconds tutorial/overview video. You can click on the 'Read more' link to go to the TWS's documentation and there you can find some more detailed information about the functionality which can help you.
There are different ways to get to this guide - anyone can open it using the Main menu Help → Getting Started option, however for Trial users the guide will be shown automatically after opening any project in The Welkin Suite for the first time during a TWS session.
Our goal is to make your work with The Welkin Suite IDE productive and pleasurable, so we want to show you all the possibilities of the tool without annoying you with the tips about the features which you are already using. This why in the 'Getting Started' guide we will show you information about only those features which you haven't used starting from the Bloom R1 release. Be the first to send us a screenshot of the empty 'Getting Started' window - maybe there's some Easter Egg hidden for you? Or maybe no, who knows ![]()
Our developers have also worked on the issues related to TWS installation, and Fields sObject Inspector. Plus, we have increased the default time-out for TWS processes to avoid failing the operations when a Salesforce Organization doesn't return any response for a long time. We, as always, will continue to make The Welkin Suite IDE better, more useful and convenient, and for this we welcome any and all feedback and discussions that our users can offer to us. So please continue to communicate with us in anyway that is most convenient to you, our Social Media on Facebook, Twitter, LinkedIn, Google+, our email info@welkinsuit.com, or The Welkin Suite's Forum. Some of the best ideas come from our users themselves!!!
Full list of changes
Features
- Implemented new Lightning Components and Applications Previewer
- Implemented the built-in PMD support
- Implemented the Getting Started guide
- Added Apex Code Completion for Triggers
- Added Apex Code Completion for Anonymous apex
- Implemented full support for Apex's built-in Generic types in Code Completion
- New Signature Helper for Apex Code Completion suggestions with overloads, apexDoc data, and parameters tracking
- Implemented one-time dynamic retrieval of standard sObjects and fields for the Code Completion database from the Organization
- Added documentation for most of the standard Apex members to the Code Completion suggestion hints
Improvements
- Updated the Code Completion database with additional standard Apex members, according to the latest documentation
- Implemented full support for nested types in Apex code for Code Completion
- Improved Code Completion preselection logic to take the most recently selected item into account
- Significantly improved performance of the built-in Code Map (Class outline), and changed it to be expanded by default
- Improved local variables detection and handling in Apex Code Completion, especially for loops and try...catch blocks
- Significantly improved performance of the Apex editor, especially for big files with 5k+ lines of code
- Added parenthesis to the methods completion in Apex
- Added support for the Lightning Previewer in the project without having to specify the information about a custom domain
Fixes
- Fixed multiple various issues related to the Code Assistance functionality
- Fixed different cases of possible Code Completion absence
- Fixed TWS crashes caused by using the Code Assistance functionality
- Fixed multiple cases of incorrect completion preselections in Apex Code Completion
- Fixed the issue when the Fields tab in the sObject editor was empty when the opened object contained the Global Picklist Value Set fields
- Fixed the incorrect error message during TWS installation
- Fixed the failed installation when there was the space symbol in the name of a folder for installing





Your comment may be the first