


Speed-up yourself with External Tools in The Welkin Suite Nova
With a recently released The Welkin Suite Nova R1 version, we have added the support for the External Tools usage right from the IDE. In this small post, we will show you a couple of examples how you can unleash the power of such a "small" feature in your daily tasks. First of all, if you are not familiar with this feature - check out our documentation, so you will know how it works.

In our Salesforce development experience, we are using the External Tools mostly for such kinds of applications:
- Executing some Ant (Salesforce Migration Tool) tasks
- Automating the work with Git without any interactions with UI
- Minifying or beautifying CSS or Javascript files from our static resources.
Surely, this is not a complete list of possible usage scenarios - if you know bash well, you can build any scripts that are needed for your development flow.
Let's go through these examples in more detail, so you would want to start using External Tools if you haven't already.
Executing Ant tasks
Even having a great deployment tool in The Welkin Suite itself, you may sometimes need to work with Ant tasks to save some time, to complete some complex scripted actions, or to fill in the gaps which we do not yet cover in the IDE. One of the most common scenarios is very closely related to teamwork and Git.
Let's presume you are working as a team and using Git as your version control system. In your previous development tools, such as Force.com IDE, you were downloading all metadata types as a part of your project. This approach gives you an easy way to commit the full project directory to Git, and all metadata will be available there. As a downside of this approach, you were dealing with 30+ of the mostly unneeded metadata types in your project each and every time you was working with it. The Welkin Suite does not yet support all the metadata types, however, this is not a problem at all. With the properly configured Ant integration, you will do +90% of your work in TWS with the most common types that are supported, and when you will need to commit your changes to Git, you will just execute an Ant task from the IDE.
To implement this, you will need:
- Installed Java and Ant (see Salesforce's documentation)
- Installed Force.com Migration Tool (see Salesforce's documentation)
- Configured PATH variable to include a path to the Ant's bin folder
If you are not familiar with PATH variable modifications - you can simply modify the "~/.bash_profile" file to include the following line "export PATH=$PATH:/Users/TheWelkinSuite/ant/bin" (please replace the path with the path to your own file).
After this, you will need to configure the Force.com migration tool to use proper project credentials, and specify the retrieval target, as well as package.xml configuration for Force.com migration tool (see the documentation, or samples, bundled with Force.com migration tool). You will need to add both build.properties and build.xml files in the project's root folder. The main trick is to properly configure the retrieval task - this can take some time, however this needs to be done only once, and then you can enjoy a great IDE, and all your metadata in Git at the same time. Please note that when configuring the retrieval target, you don't need to include the metadata types that are handled by The Welkin Suite.
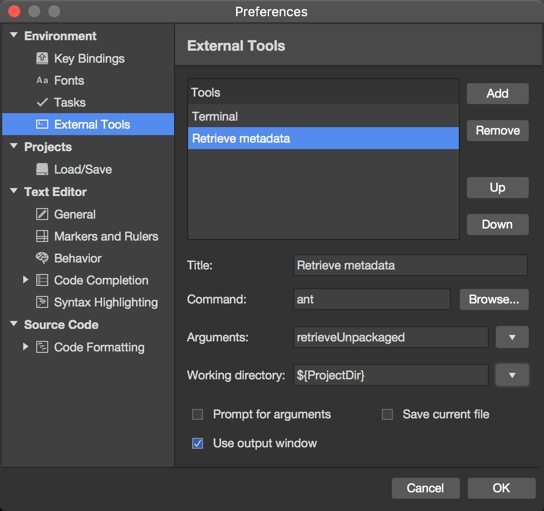
Finally, you need to configure the External Tool in TWS:
- Open The Welkin Suite menu -> Preferences -> Environment -> External Toos and click Add
- Fill in the Title (for example - "Retrieve metadata")
- Enter "ant" in the Command
- Enter "retrieveUnpackaged" (or if your Ant target is called another way - use it's name) in Arguments
- Click the arrow to the right of "Working directory" input, and select "Project Directory" to make sure that Ant is launched from the project directory

Ultimately, the "Retrieve metadata" action will be just 2 clicks away from you. Simply go to Main Menu -> Tools -> Retrieve metadata, and you can call it from the IDE whenever you want.
Committing to Git
If you want to use Git from The Welkin Suite itself, and don't want to wait until we will implement this functionality, you can easily add Git as an external tool. Naturally, first off you will need to have Git installed and properly configured - you can find the information on how to do this in the documentation.
A very simple example of how you can use such a kind of integration is a regular commit operation from the IDE, with an ability to specify the commit message. To do this in the most efficient way (for further usage), we will create a small bash script, which should receive the commit message, and call Git executable. In more advanced scenarios, you can build the additional complex logic in bash scripts, and call it right from TWS.
For our scenario you will need to:
- Create a simple bash script with the following content:
#!/bin/bash
git commit -m "$1"
- Save this file with ".sh" extension. For example, you save it in the "/Users/TheWelkinSuite/scripts/git-commit.sh" file.
- Make this script executable by calling "chmod u+x git-commit.sh" from the Terminal in the /Users/TheWelkinSuite/scripts folder.
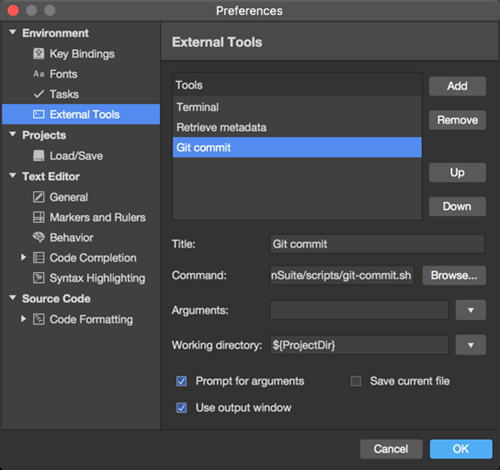
And configure the External Tool in TWS:
- Open The Welkin Suite menu -> Preferences -> Environment -> External Toos and click Add
- Fill in the Title (for example - "Git commit")
- Enter "/Users/TheWelkinSuite/scripts/git-commit.sh" (please use your own path) in the Command
- Leave Arguments empty
- Click the arrow to the right of "Working directory" input, and select "Project Directory", to have Git launched from the project directory
- Check the "Prompt for arguments" checkbox, and TWS will ask you what will the commit message be
Now you should have "Git commit" option under the Main Menu -> Tools. Once you click on it and enter a commit message - your changes would be committed to git.
Minifying Javascript and CSS in The Welkin Suite
It is very common to use minifiers for Javascript and CSS files in Static Resources to make them smaller, and again, there is a cool way to do this right from The Welkin Suite. In this post, we won't touch upon the topic of selecting the minifying tools - it is absolutely up to you. However, as an example, we will use the Minifier, which is available as npm package. Assuming that you have it up and running, setting up The Welkin Suite correctly will only take a few minutes.
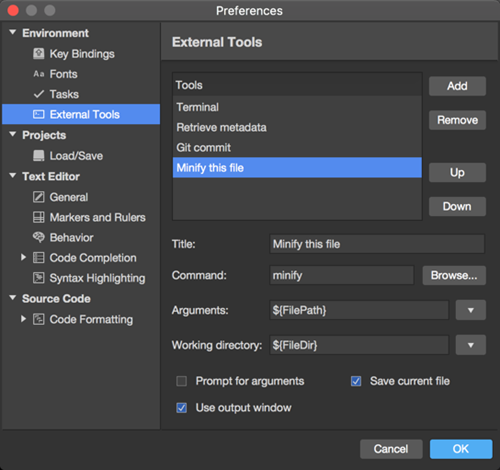
- Open The Welkin Suite menu -> Preferences -> Environment -> External Toos, and click 'Add'
- Fill in the Title (for example - "Minify this file")
- Enter "minify" in the Command
- Click the arrow to the right of "Arguments" input, and select "File Path" so the currently active file will be minified
- Click the arrow to the right of "Working directory" input, and select "File Directory" so the minifier will be started in the directory where the selected file is located
- Check "Save current file" option, to make sure that if you've made any changes, they will be saved before calling a minifier
Now if you open any CSS or Javascript file from your static resources and modify it - you can consequently minify it with Tools->Minify this file option, before deploying to Salesforce. Of course, it makes sense to add another command to beautify Javascript and CSS files, but we will leave this for you.
We have covered just a couple of examples of how the External Tools support can benefit your Salesforce development tasks, and we hope that this post will inspire you to customize the IDE for your personal needs and for your own working process.
Please let us know which tools are you using from The Welkin Suite, and share your performance recipes with the whole Salesforce Developer community!

Your comment may be the first