


Salesforce changes deployment, Immediate Apex and more in Nova R1
After several months of hard and thoughtful work, and endless effort we have been investing into the development, we are proud to present you the production version of The Welkin Suite for Mac - Nova R1! This version features fundamental updates to the functionality, thus bringing about the features that you may already be familiar with through our Windows version, as well as introducing some features that are only present in the Mac version so far. The latter primarily include Salesforce changes deployment, Immediate Apex execution, and Task lists. All of these will challenge your development speed limit - proving that there is still a way to reach even more impressive velocity!
The production version of The Welkin Suite for Mac - Nova R1 - will require an active license linked to your account to log in to the IDE. You can check out the available license plans, and activate the selected one on the GET IT NOW page. To begin using the application, you can start with the free Trial period for 30 days. If you already know which subscription plan will work best for you, you can activate it immediately, and enjoy developing with The Welkin Suite. In case you already have an active license that you are using to work with TWS on Windows, you do not need to do anything - just log in to The Welkin Suite Nova using your email and password, and vice versa - your license for The Welkin Suite Nova allows you to use The Welkin Suite Spire without any limitations.
- Salesforce changes deployment to another Organization
- Immediate Apex execution
- External Tools Support
- Tasks List with Comments and User's Tasks
- Bookmarks
- Apex Code Snippets
- Apex Code Formatting
- ApexDoc Generator
- Code Assistance Improvements
- Other changes
- Full list of changes
Salesforce changes deployment to another Organization
Managing the content of your Salesforce production Organization, comparing metadata on different Orgs, moving the changes between different sandboxes or development environments - all of this is now possible with the new 'Deploy to organization' wizard in The Welkin Suite Nova R1. This wizard will allow you to do this, and other deployments in a very straightforward and convenient way.
Starting deployment
The 'Deploy to organization' option is available in the project's context menu, in the 'Solution' pad, as well as from the Main Menu -> Project -> Deploy to organization. Once you start the wizard, you will be asked to enter the credentials of the organization to which you would like to deploy your current project - target or destination organization. The step with entering the credentials is the same as that in the project creation wizard - you just need to select the environment (production/development org, sandbox, or use a custom domain), enter a username, password and security token, if needed.
Configuring the deployment plan
Once your credentials are validated, The Welkin Suite will retrieve the metadata information from the target Org, and will display a high-level comparison of the organizations content with your local project in a table below with the following columns:
- Checkbox to select if the item should be deployed to the target organization
- Action - deployment action that will be applied to the item
- Type - metadata type of the item
- Name - API Name of the item
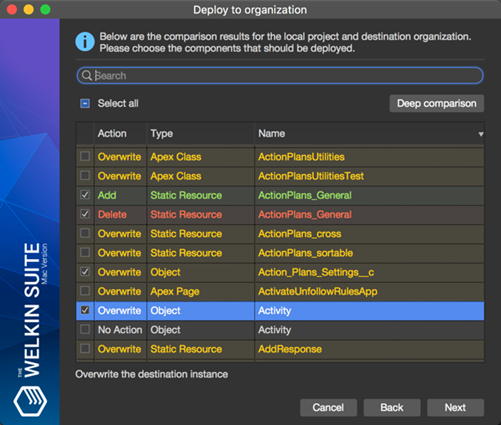
The initial comparison is performed in the high-level mode, which means that The Welkin Suite only considers the existence of different items in the local project, as well as on the target organization.
In the high-level comparison mode, the 'Action' can have one of the following values:
- Add - the local item in the project does not exist in the target org, and will be created
- Overwrite - the target organization contains an element with the same name, and it will be overwritten with your local version
- Delete - the local project does not include an item that is present in the target organization, and this item will be deleted on deployment
- No Action - the item that cannot be modified by The Welkin Suite's deployment (for example - standard object can't be removed, etc.)
To improve readability of the comparison results, the items with different Actions will be highlighted in different colors - Add, Overwrite, Delete, No Action.
In case you need more precise information on the differences between your project and destination Salesforce organization, you can switch to the 'Deep comparison' mode by clicking on the corresponding button. In this mode, The Welkin Suite will additionally compare the metadata content, and will provide you with more details. This type of comparison way will require a considerably larger amount of time because the IDE will need to download all metadata from the organization. However, it mostly depends on the size of your organization.
Deep content comparison introduces one more value to the 'Action' column - 'No Differences', which, obviously, means that both local and target items are identical. Such elements would be displayed in the same color as 'No Action' ones, and will be listed right below the 'Delete' items in the table.

Given all the information provided, you should be able to select the components that should be deployed to the target Organization.
Additional deployment settings
At the next stage of the process, you will be able to set the following deployment options:
- 'Validate only' - with this checkbox selected, your changes won't be deployed to the target organization, and will only be validated against it. Checking this option will disable 'Rollback on error' and 'Purge on delete' options.
- 'Ignore warnings' - if checked, warnings will not cause deployment failures, whereas otherwise, warnings will be treated as errors and would lead to deployment failures.
- 'Rollback on error' - indicates whether any failure causes a deployment rollback. Always checked for deployment to production organizations.
- 'Purge on delete' - if this option is checked, the deleted components won't be stored in the Salesforce's Recycle Bin.
- 'Apply destructive changes at the end of the deployment process' - if this checkbox is checked, the destructive changes will be performed at the end of the deployment. Otherwise, they will be executed before the other parts of the deployment.
- 'Test level' - specifies which tests are run as part of the deployment. More details about this option will be provided in the next section.
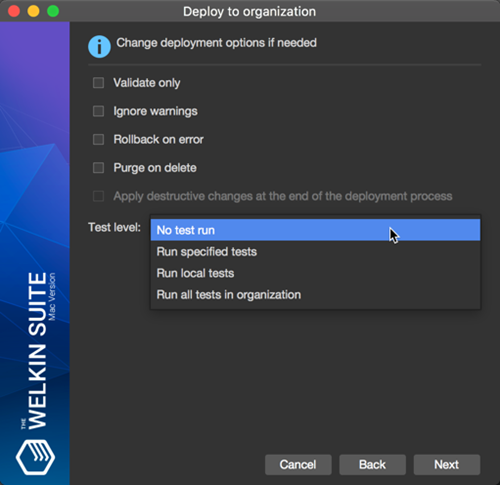
Deployment test level
In the 'Test level' configuration, you can select one of the following options (the descriptions are provided according to Salesforce documentation):
- 'No test run' - No tests are run. This test level applies only to the deployments to development environments, such as sandbox, Developer Edition, or trial organizations.
- 'Run specified tests' - Only the tests that you select during the next step are executed. Code coverage requirements differ from the default coverage requirements when using this test level. Each class and trigger in the deployment package must be covered by the executed tests for a minimum of 75% code coverage. This coverage is computed for each class and trigger individually, and is different than the overall coverage percentage.
- 'Run local tests' - All tests in your org are run, except the ones that originate from installed managed packages.
- 'Run all tests in organization' - All tests are run. The tests include all tests in your org, including tests of managed packages.
If you choose any option other than 'Run specified tests', you will proceed directly to the deployment itself and its results. However, if you select 'Run specified tests', then after pressing 'Next' you will have an option to select the unit tests you would like to execute.

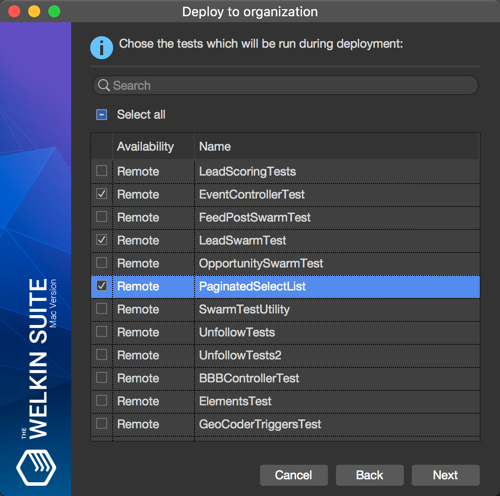
Selecting unit tests to run during the deployment is implemented in almost the same way as general deployment components configuration - through the table with the following columns:
- Checkbox to select a unit test class to execute during the deployment
- 'Availability' -specifieswherethisunittests originates from. This column can have one of the following values:
- 'Local' - the given unit test is currently not present in the target organization, and will be deployed as a part of the deployment process
- 'Remote' - the given unit test is present in the target organization, and won't be changed in the current deployment
- 'Both' - the given unit test currently exists in the target organization, however, it will be overwritten with the current deployment. This means that the new version of the unit test will be executed
- 'Name' - API Name of the Apex class with unit tests
Once you select the necessary unit tests to be executed, you can proceed to the deployment process status and results.
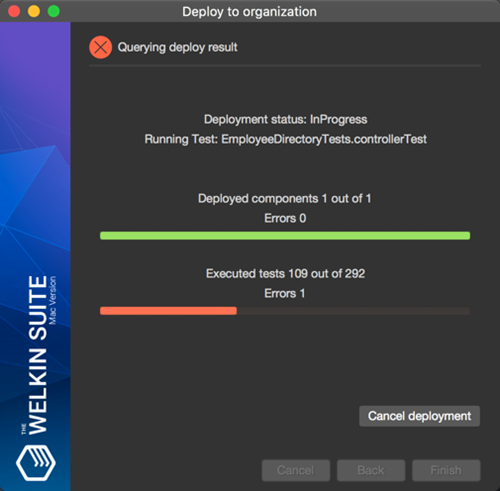
Deployment progress and results
The deployment status is shown as 2 separate progress bars - for components deployment itself, and for unit tests execution. As you may notice, these are regular linear progress bars, so you won't see Salesforce's famous deployment fish in The Welkin Suite. Your organization will be polled each 10 seconds for status updates, and you will see all the updates on this screen. Also if any error appears during the deployment or tests execution - the corresponding progress bar will change it's color to red, so you won't miss this!
If, during the deployment, you decide to cancel it – you can always do this with the 'Cancel Deployment' button. This way, The Welkin Suite will send a request to Salesforce to cancel the deployment and rollback all the changes.
In case any deployment errors occur, you will see a detailed results report with the following tabs available:
- 'Deployment results' - all issues related to the deployment itself, including the failures triggered by the missing dependencies or any other reasons
- 'Deployment test results' - all unit tests results, both succeeded and failed. Will be shown if at least one Apex unit test is executed. In addition to the general information for the failed test methods, such as class and method name, you will also get the stacktrace, and the failure message.
- 'Deployment code coverage' - the information about any code coverage-related deployment issue. Will be shown if at least one such error is present.
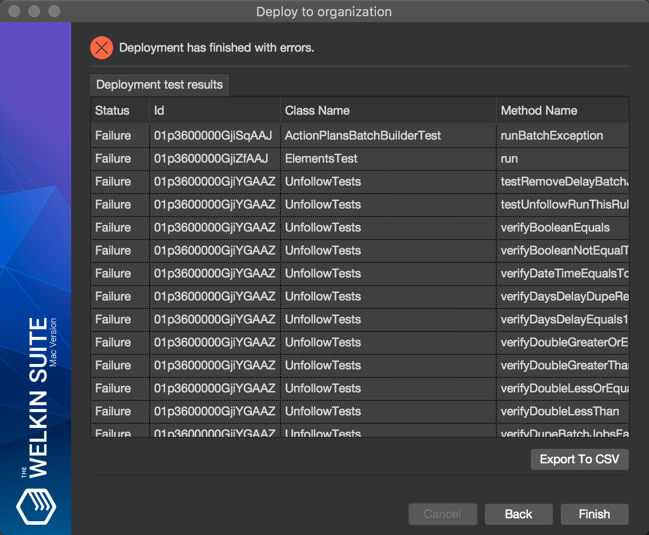
Each of the tabs described above provides 2 options to save the results:
- Click on the 'Export to CSV' button to save the currently opened table as a .csv file
- Select 'Copy' from the context menu for any row in the results table, and the formatted data from that row will be placed in the clipboard
Usually, there are lots of different reasons behind the failure of your deployment, but one of the most common cases, based on our experience, is related to the missing or extra components. You can forget to add some important class to the deployment plan for some reason, or you can accidentally include an unused trigger without unit tests for it. Such an insignificant reason should not lead to your starting the entire process over again, so you can always use the 'Back' button to return to the previous steps, and quickly resolve the issues.
Immediate Apex execution
While Anonymous Apex is a great tool for quickly prototyping and testing the Apex solutions in your project, sometimes you need an even quicker way to execute them. In The Welkin Suite Nova R1, we have added Immediate Apex - a pad that you can place in any part of the IDE's UI for quick and easy access. In this pad, you can type any code you need, and immediately execute it - without creating, opening or saving any files. This is a great way to quickly check if your SOQL query returns proper results, to see a log file or method execution, or even start a scheduled job in just a couple of seconds!
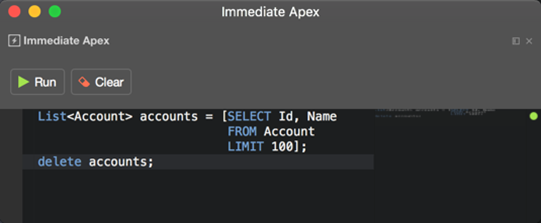
You can enable the Immediate Apex pad in 'View -> Pads -> Immediate Apex'.
External Tools Support
Beginning from Nova R1, The Welkin Suite for Mac provides you with an option to add third-party tools to the IDE's menu. This way, you can now forget about switching between the different applications, and integrate all the necessary instruments into The Welkin Suite. For example, you can add the support of:
- different Ant tasks;
- minimizers or beautifiers for Javascript / CSS files;
- your own custom tools and scripts.
You can find the necessary settings for this option in The Welkin Suite's Menu -> Preferences... -> Environment -> External Tools.
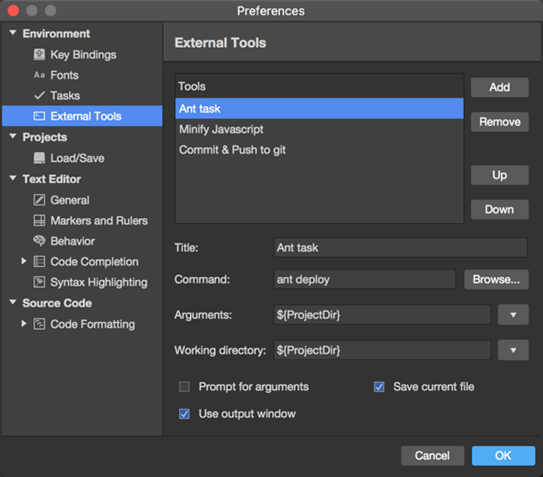
Just click 'Add', and specify the information in the following fields:
- Title - the name of the tool that will appear in the 'Tools' menu;
- Command - an operation or tool that will be executed;
- Arguments - here you can specify the necessary information for your tool, such as some file, solution, some text, or the position of your cursor in the code. The list of all the possible dynamic arguments will be available for you in the drop-down menu related to this field;
- Working directory - the folder that your tool will be launched from.
In addition, an embedded tool can use TWS Output panel, which is particularly convenient if you get some messages after executing a tool's operation.
Tasks List with Comments and User's Tasks
Parsing Tasks from comments
When developing for Salesforce, it is very common to leave some interesting notes to "future us". These notes often include an explanation of something. Or maybe it can be a reminder to refactor some code that does not match the expectations, or to implement the additional checks and parts of the logic, or even to fix bugs. The larger your codebase is, the more such "messages in the bottle" are hidden in it, and the higher is the chance to miss them or forget about them... which will no longer be a problem with the new The Welkin Suite's Tasks pad!
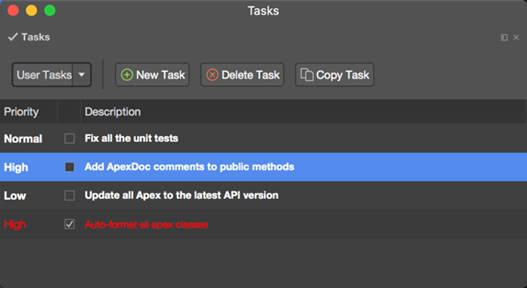
The Tasks list pad is a great way to track all of the important comments in the project. This pad provides a clear interface to see all of these comments. Just go to the Main Menu -> View -> Pads -> Tasks to enable it. In the pad, you will see a list of tasks from your code with the following details about each of them:
- Line - the line in the source file in which the task is located
- Description - comment text in the line with a token (read more about tokens below)
- File - the file in which the task is located
- Path - the path to the file in your project structure
By double-clicking on any of the tasks, you will be immediately moved to the corresponding line in the code, so that you can complete the task without any delays.
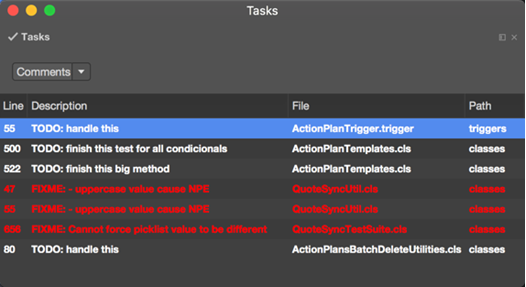
By default, the Tasks List will scan your Apex and Javascript codebase for the following tokens in comments, which will be treated as tasks:
- FIXME - the high priority tasks
- TODO and HACK - the normal priority tasks
- UNDONE - the low priority tasks
Configuring Tasks
If you are using, or would like to use any other token in your comments to highlight the important tasks, you can easily configure this in The Welkin Suite menu -> Preferences -> Environment -> Tasks.
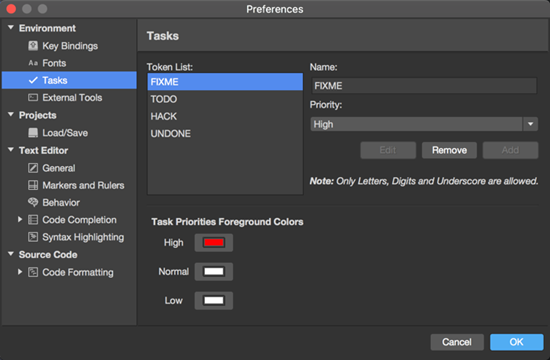
To add a new token in the 'Name' text box, simply type the text which you would like to use to identify the task, select the priority, and press 'Add' button. You can modify any existing tokens in the similar way - just select the token in the 'Token List', edit it's name, and press 'Edit', or press 'Remove' if you no longer need it.
Of course, different tasks can have different priorities, so you can make certain tasks stand out within the list by highligting them in a different color. In the lower part of the configuration window, you can assign any color to the priority of the task, and it will be highlighted in the list with the given color.
User's Tasks
Another option to add some tasks to the IDE implies switching to the 'User Tasks' in the Tasks pad, using a dropdown in the upper part of the pad. Here you can manually create a task with the custom text and priority. However, such tasks won't be linked to the certain line in the code - just to the project itself. Once you complete a task, you can check it in the list, and it will remain there with the 'completed' status. If you need, you can delete it afterwards, using a 'Delete Task' button.
User tasks are stored in the project folder, in the file with the name that matches your project, and with the '.usertasks' extension. Please take this into account if you would like to store your project in Git, or other repositories.
Bookmarks
Using Bookmarks provides an additional way to navigate in your Apex, Visualforce, or any other code more efficiently. As of now, this option is available in The Welkin Suite for Mac.
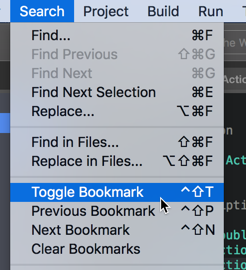

You can find the functionality for managing bookmarks in the Search menu:
- Toggle Bookmark: this option allows you to bookmark the line in which your cursor is currently located in the code editor; the repeated toggle of the bookmark on the line that already includes some bookmark will remove it;
- Previous Bookmark: this option helps you navigate between your bookmarks; it will move you to the previous bookmark in the file;
- Next Bookmark: similar to the above, this navigation option also allows you to move across your bookmarks, this time moving you to the next stored position in the file;
- Clear: using this option, you can remove all of your saved bookmarks in the entire project.
Apex Code Snippets
At The Welkin Suite, our goal has always been to provide you with lots of time-saving shortcuts. The next one has to do with your coding process. We have implemented Code Snippets for Apex files, so you no longer need to type the code that is often used in your classes. The Welkin Suite provides you with the list of the predefined snippets, such as:
- assertEquals - System.assertEquals call
- assertNotEquals - System.assertNotEquals call
- class - class definition
- classHeader - ApexDoc class header
- const - constant definition
- do - do...while loop
- else - else block
- enum - enum definition
- for - "classical" for loop
- forr - "classical" reverse for loop
- if - if block
- interface - interface definition
- methodHeader - ApexDoc method header
- newList - new List<T1> initialization
- newMap - new Map<T1,T2> initialization
- newSet - new Set<T> initialization
- propfull - full property definition
- while - while loop
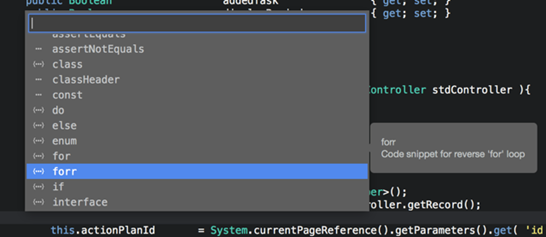
To insert a Code Snippet, you can use the context menu inside an opened Apex class, and there are two ways to do it:
- 'Insert Template...' - this option is available for you when you open the context menu anywhere in the file; in this case, the complete list of built-in snippets appears in the drop-down menu, with hints for each item in the list. After you have selected the necessary one, and it is inserted to your code, and you can easily edit the parameters;
- 'Surround With...' - this option is available when you have selected some code. In this case, you will get the list of the snippets that would surround your code with the necessary blocks.
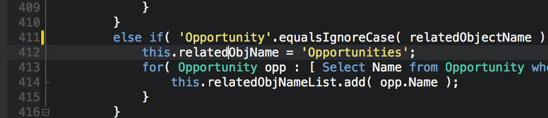
Apex Code Formatting
To make your Apex code more readable and clean, and to avoid spending time on properly identifying all the rules or deleting and adding spaces, you can use the Code formatting option that is added in the updated version of The Welkin Suite for Mac. Any of your Apex files can be modified automatically in just a second once you click '⌃I' or execute the command 'Format Document' from the menu 'Edit -> Format'. This option works on indenting, using the tabs or spaces according to your test style settings, and specifying the correct spaces around the arithmetical and boolean operators, braces, SOQL queries, etc.
After you use Apex Code Formatting, all the formatted lines will be marked as changed. All you need to do is simply save the file, and continue your working process.
ApexDoc Generator
Quite often Salesforce developers work on complex projects, and it helps a lot when at least some documentation inside these projects is available. This way, the development, and codebase maintenance becomes easier, and the navigation across your code gets a lot clearer. The Welkin Suite Nova R1 provides you with the useful option for limited documentation in your code - ApexDoc. Now you can add descriptive header comments to you Apex files. These comments will bring logic to describing your classes, methods, properties, and overall, will help you greatly. When using ApexDoc in your project, you don't need to setup and resort to any external documentation systems - should it be any wiki-based tool, shared documents, or any other system.
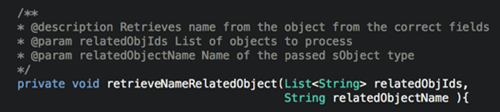
The 'Generate ApeDoc' option is available in the context menu of an opened Apex file for classes, methods, and properties:
- for classes, interfaces, and enums, The Welkin Suite will insert the ApexDoc header with @author, and @description items
- for methods, the IDE will insert the ApexDoc header with @description, @param for each of the parameters (if any), and @return in case a method is not void
- for properties and fields, you will get an ApexDoc with only a @description in it.
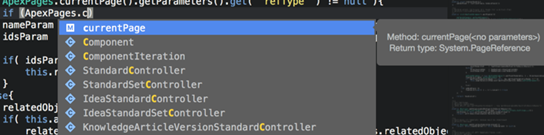
Code Assistance Improvements
The Welkin Suite Nova R1 is with great improvements related to Code Assistance functionality. We will show these updates to you in two lists: the list of Code Completion functionality changes, and Code Assitance improvements in general.
- Code Completion improvements:
- We have separated Code Completion for static and objects members, so now you will get the appropriate items in suggestions according to the context. This means that you won't get the static members in the code completion list (for instance, variables), as well as you won't get instance members in the completion suggestions for a static class.
- The support of Code Completion for SOQL queries becomes better in your Apex files. The most common SOQL keywords are added to the list, so among the suggestions, you will find such keywords as SELECT, FROM, ORDER BY, etc. For example, they will appear if you type the '[' symbol when coding in a class.
- The additional improvements related to keywords are associated with the DML operations: for example, 'true', 'false', 'null', 'this', and some other ones will appear exactly where you need them.
- Our developers have improved the list of code completion suggestions for optional keywords and modifiers. This means that when coding, you will get only the possible and necessary suggestions.
- In addition to these improvements, we have solved the issue related to the missed members in base objects. Also, we have fixed the rare cases of the incorrect search in hierarchical members.
- Code Assistance improvements:
- A lot of options and features depend on code analysis, which is highly important when you are coding. We have worked on its performance, so the speed of typing and editing classes has increased.
- The next improvement of the performance is related to code re-parsing. While this is the background process, the result of its work are highly important for the entire Code Assistance functionality. We have ensured that the changes in you files are analyzed much faster, and you get all the additional options and information immediately.
- As of now, our Code Assitance has become more stable. This was achieved through the work on the issues with Code Outlining, 'Go to definition' option, unit tests detections, and other related functionality disappearing in valid classes after editing. This was triggered by the failed work of the Apex parser on some specific code blocks. We have handled all of the known reasons behind this.
- In addition, Code Assistance functionality is used to create a list of project unit tests in the 'Run tests' dialog. This applies in case Salesforce doesn't return this list to The Welkin Suite when refreshing it. Previously, the rare cases could have occurred with the empty list of tests being displayed, due to the failure to gather the necessary information about test methods locally.
Our developers continue working on solving the known issues, and improving this functionality in general. Please share your feedback with us, and let's make Code Assistance in The Welkin Suite excellent together.
Other changes
In The Welkin Suite Nova R1, our developers have implemented an option to adjust the default settings for loading and saving your TWS project. You can find them in The Welkin Suite menu -> Preferences... -> Projects -> Load/Save. In these settings, the following options are available:
- Default Solution Location
- Load options:
- Load user-specific settings with the document - this links your pads' layout configuration to the project, and loads the configuration when you open a project. This means that you can configure different layouts for different projects, for example - more testing and debugging-specific layouts for the development organizations.
- Load previous solution on startup - after enabling this option, the solution that was active when you closed the IDE will be launched automatically next time you start TWS.
- Save option:
- Always create backup copy - the copy of any file will be created each time you save it. The backup file will be located in the same folder the original file is located in, with the extension appended with '~'.
In addition, the following settings were enabled by default, to improve your coding process:
- Highlight the current line;
- Visualize the changed lines.

Both of these options will help you to navigate you in your code, and you won't need to enable them separately. As a side note, these settings are located in The Welkin Suite menu -> Preferences... -> Text Editor -> Markers and Rules.
Another useful improvement in The Welkin Suite for Mac is related to debugging process. This applies in case you are going to debug a Salesforce log file, and the required debug log levels were not set before the execution. Hence, TWS won't get all the necessary information to start debugging, and you get the appropriate message. We have extended the message with the list of the required log levels, so you won't have to look for this information separately.
As of now, you can open any TWS project in the IDE and work on it offline, even if your internet connection is not stable, or absent at all. Of course, you will not be able to pull the changes from your Organization, or deploy your updates to Salesforce until you go online, and yet, this will help you save your work locally at any time, and sync it with your org later.
Our developers have worked on the issue with memory consumption increasing considerably after the successful build of your project. They have detected the reason and fixed the issue, so now this memory leak won't cause a high value of your CPU anymore.
The Welkin Suite IDE provides you with an option to open a test class/method directly from the results of the test run job that contains this test in the Test Result panel. Previously, there were some issues related to this redirection: it didn't work for the newly created tests, and it always redirected to the first line of a file, unless it was opened in the code editor. We have solved this, so now you can navigate to your test and methods in the correct way.
As for the newly created classes, the Code Completion functionality didn't work for them as well. We have fixed it in a frame of improving the work of TWS parser. The same applies to the issue that occurred when the IDE continued loading and parsing project files even after the solution was closed. Beginning with this version, all the processes related to the project will be stopped.
In addition, in terms of improving the Code Assistance functionality, our developers have solved the issue with some Code Completion description tooltips not being displayed. Starting from The Welkin Suite Nova R1, the tooltips will help you find the necessary suggestion for your current code.
If you use Anonymous Apex, now you can run it directly from the context menu in the Solution Explorer. This comes in handy when you have the saved files - you do need to open any of them for the execution.
After merging the conflicts during the pull from Salesforce, you could have been faced with the issue with the file not being reloaded when you select the remote changes to be saved. The changes from your Organization were applied to the file only after you re-open it. Now it will be reloaded automatically, and you will get the relevant code immediately.
The next set of changes is dedicated to the build process. For example, if you tried to build a modified *-meta.xml file, you received an error. The case is, these files were processed as separate metadata, which is completely wrong. The same error appeared when you tried to build the class that was renamed in TWS. We have fixed both cases, so the error will no longer appear.
The pending changes panel allows you to see the list of the changed files, which will be included to your build to Salesforce. In the previous version of our IDE, the files that can be updated on the server using the 'Deploy objects' option instead of the build process (namely, objects, profiles, layouts, and labels), were present in this list as well, even though they were not built. Now the correct list of files for building will be displayed in the Pending Changes panel. Also, the buttons 'Compare' and 'Discard' were missing for the latest file that was modified in this list, and we have fixed this.
When you have executed your SOQL query that contains a lot of results, and you needed to use the 'Get more' option to load all of them, TWS returned the error. Now the IDE handles this case correctly, and you will get all the results without that error.
Also, we have fixed some of the UI mistakes, such as typos or incorrect spaces in the menus.
We have also changed the icon for the aborted tests/methods in the Test Result panel, so now it will be yellow, and thus will match the color of the appropriate status. In addition, our developers have solved the known reasons for the 'Value can not be null' error that could have appeared when running tests.
In The Welkin Suite, you can subscribe for the new metadata files from your Salesforce Organization. The state of this option could have been displayed incorrectly after enabling/disabling all files inside some metadata type, or the entire metadata type itself. This is also solved in The welkin Suite Nova R1.
In the previous versions of The Welkin Suite for Mac, there were some issues related to the Local History functionality, which our developers have solved in the updated version of the IDE. Namely, this applies to the rare cases of TWS crashing when updating the Local History, or the application freezing after pressing the 'Compare with previous version' button. In the second case, CPU could have increased significantly.
The full list of changes, as usual, is present below the current post, so you can read the short version of release notes for The Welkin Suite Nova R1.
The documentation for The Welkin Suite for Mac is already completed and ready to be used, and all the functionality is described step by step.
While we believe that The Welkin Suite Nova will make Salesforce development job a lot easier for you, we already know a few more ways in which we can improve your TWS experience. The version we have just released is but the first step on the way to our ultimate goal, and we would love for you to participate in making it real! Share your thoughts, ideas and suggestions, submit reports if anything does not go as expected, and we will do our best to sculpt the upcoming versions of TWS Nova to reflect your contribution!
Full list of changes
Features
- Implemented the 'Salesforce changes deployment to another organization' functionality
- Implemented the option for the Immediate Apex execution
- Added the automated Code Formatting for Apex code
- Added an ability to use Apex Code Snippets
- Added the ApexDoc generation for classes, methods, interfaces, enums, properties, and fields
- Added the support for the External Tools in the main menu
- Implemented the Task List with automated Comments scanning and User's Tasks
- Added an ability to use Bookmarks
Improvements
- The 'Highlight current line' and 'Highlight changed lines' options are now enabled by default
- Added the options to configure the default projects load, and to save the behavior
- Extended the error message about the insufficient debug log levels for debugging a Salesforce log file
- Added the basic support for SOQL queries in the Code Completion functionality
- Improved the support for keyword suggestions in the Code Completion list
- Improved the support for optional modifiers (keywords)
- Removed static members from the suggestions for objects in the Code Completion list
- Implemented showing only static members in the list of suggestions in the Code Completion for class
- Increased the speed of typing and editing Apex classes
- Increased the speed of Apex Code analysis
Fixes
- Fixed the issue with Apex Code Assistance functionality disappearing in a class after some changes
- Fixed the failed retrieval of the local test classes and methods for the 'Run tests' dialog
- Fixed the issue related to the missed or incorrect suggestions of the methods in the Code Completion list
- Fixed the issue related to the missed members in some base class objects in the Code Completion list
- Fixed the issue related to the failed project opening without the active network connection
- Fixed the issue with the memory consumption being increased after every build due to the memory leak
- Fixed the issue with redirection from the Test Results pad to a newly created test classes failing to work
- Fixed the incorrect redirection from the Test Results pad to test classes, which were not opened in the editor
- Fixed the issue with Code Completion failing to work for the newly created Apex classes and interfaces
- Fixed the rare cases when a Code Completion tooltip for suggestions was absent
- Fixed the issue with the excessive CPU load by TWS, which was caused by continued parsing of project files after it was closed
- Fixed the issue when the 'Execute Anonymous Apex' option didn't work when it was called from the file's context menu in the Solution Explorer
- Fixed the issue when the file wasn't reloaded in the editor after successfully resolving conflicts during the pull
- Fixed the failed build of the changes in a *-meta.xml file
- Fixed the failed build of a renamed class file
- Fixed the error caused when using the 'Get more' option in the SOQL results
- Changed the icon for the aborted test/methods in the Test Result panel
- Fixed the 'Value can not be null' error during the tests execution
- Fixed incorrect displaying of the state of the 'Subscribe' button after enabling/disabling all files inside a metadata type
- Removed modified objects, profiles, layouts, and labels from the Pending Changes list
- Fixed the issue related to the missed 'Compare' and 'Discard' options for the last modified file in the Pending Changes list
- Fixed the rare cases of TWS crashing when Local History was updating
- Fixed the issue with the IDE freezing after clicking the 'Compare with the previous version' button in the Local History Details panel
- Fixed the typo on the 'Download Salesforce Project' wizard
- Fixed the incorrect spaces in the menus
- Fixed the endless process of removing all the files from TWS project if the operation was executed the second time
- Fixed the error when Static Resources were disabled in the Project Metadata Components wizard
- Fixed the issue when the list of files was empty if there were spaces in file names


Your comment may be the first