


While The Welkin Suite IDE is already blooming with a multitude of handy features, we believe that there is no limit to automating your work and bringing the level of comfort in development to perfection. For this matter, here at The Welkin Suite, we are constantly brainstorming the new ways to make your life easier, and thus adding more and more functionality.

Hence, we pursued this tendency in the latest release too - and added a few handy features Salesforce developers will appreciate. One of these features is the Schema Explorer, which makes the work with your objects tons more convenient.
Overall, the Schema Explorer is a cool feature that allows you to access every object available in your Org on Salesforce. With this new feature, you can enjoy all the fields, relationships of an object and their properties in a single window. This way, you won’t have to go searching for the necessary data throughout the entire project. After all, keeping your data tidy and organized helps your working process run smoothly - and this feature is a great “brush”.
Opening the Schema Explorer is as easy as opening any other panel - all you have to do is follow this path: Main Menu -> View -> Show Schema Explorer. As a result, you will get a new panel , which will contain the Schema Explorer. This will be especially handy if you already have too many panels - you won’t have to go looking for another one.
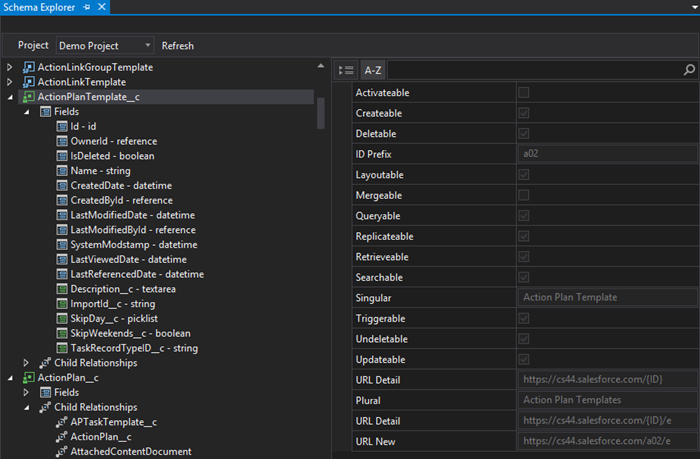
As you can see on the screenshot above, the Schema Explorer can be schematically divided into two parts. The left section displays the full list of all the objects you have in your project. To help you tell them apart better, we included the differentiation by the color. Thus, the standard objects in your Org are highlighted in blue, while the custom ones that are created on your org are highlighted in green. As always, we help you navigate in your code faster, and even such small things as color differentiation will save you some time.
Since the Schema Explorer is meant for the data analysis in the first place, all the information is read-only, so you will not be able to change the properties of an object when working within our IDE. All the necessary changes can only be made on your org.
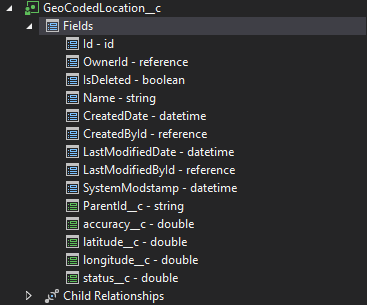
Since each object may have a separate list of child relationships and fields, we could not have left them out of our attention in the Schema Explorer. Thus, you can expand the necessary object and check out all the data that pertains to this object. Similar to the objects, the fields are also differentiated by the color for your convenience - the standard fields are highlighted in blue and the custom ones are green. In addition, you will find each field’s type right next to its name in the list.
Properties
Each object from the list of objects (in the left section) has a set of properties, which are displayed in the right section of the panel. Once you select the necessary object, you can immediately examine its properties, which are divided into the following categories:
- Access: includes the set of attributes, which indicate the characteristics of an object on your org
- Misc: displays an ID Prefix for the object
- Labels: the name of the object in the way it is displayed in your org for users to see
- URLs: the set of fields used for generating the URLs necessary to work with the selected object.
Likewise, each of the fields we discussed above has a list of related properties. To access these properties, simply click on the necessary field, and you will receive the following data:
- Access: displays the field’s characteristics, which can be adjusted in your Salesforce org
- Label: shows the name of the field in the exact same way the user sees it in our org
- Type Data: all the possible data related to the selected field will be specified in this very section.
All in all, as you can see, we have structured the objects’ data in a very comprehensible and logical manner, so finding the necessary piece of information will not require much time from your side.
In addition, we have added child relationship fields to the objects. These fields demonstrate the way the records in a certain object are related to the records that pertain to another object. Please note that if your object does not have related records, the list of child relationships will be unavailable.
Once you expand child relationships for some object, the list of all objects linked to the selected one will be displayed in our Schema Explorer. This is where you come looking for the information on the relationship between the chosen object and other objects. To help you identify these objects better, we added the 'Relationship Name' and 'Relationship Field' data that indicates the linked object. Simple and elegant as that!
Adjust the Interface
As always, we have your comfort in mind, as this is one of our main areas of concern. For this matter, our Schema Explorer provides several viewing options to simplify your work with the list of the properties for objects/fields/child relationships. You can either choose to organize the properties by the Name or by Category. While the default view suggests sorting by Category, you are free to adjust it to the other type at any time you may deem it necessary.
That being said, we also added a handy Search field, which allows you to look for the certain properties on the list, or filter the necessary ones. You can find this feature in the right part of the Schema Explorer.
In case your solution has multiple projects in it, we did everything to help you avoid the mixup in the Schema Explorer data. To make this real, we added the filer to the top of the Schema Explorer window, which lets you change the list of object for the needed project. After switching to another project, you need to click the ‘Refresh’ button, and the list of objects will be reloaded.
Finally, our new Schema Explorer provides an option to navigate from any object to its xml file. To do so, all you have to do is right-click (or open the context menu of an object), and select the 'Open in the editor' option - or use the ‘Child relationships’ list beneath the containing object to immediately go to the xml file of the linked object. Naturally, the latter only works if the linked object is present in your TWS project - otherwise you will get a notification that the file is absent.
That wraps it up with The Welkin Suite’s Schema Explorer. If you have any questions, or in case you have something to suggest in terms of the updates to this feature - do not hesitate to let us know! We will be looking forward to your feedback.

Your comment may be the first