


Version Control in The Welkin Suite
How often were you getting lost in the enormous amount of previous versions of files you were trying to maintain? Naming files like ‘code_ver1’, ‘code_ver2’, …, ‘code_ver45’ is workable solution, but not for large software projects. You need to have an ability to easily get back to a previous working version without digging through what changes were made and why. Add to this collaboration with other developers on a project, and you normally end up with an absolute mess.
The best solution, in this case, is a Version control system. This allows you to keep all the previous versions of your files as well as roll back to any of them, compare changes over time, define who and when made changes, and much more.
For all these issues The Welkin Suite has a built-in Git support, so you can work with a Git repository right from The Welkin Suite without switching to any other applications. You have an ability to commit your changes, work with different branches or create your own separate branches, merge changes and resolve conflicts, dig through the logs and many other options—everything is on hand and does not require you to use additional tools.
How to start working with a Git repository from TWS
Access to the Git functionality is in only 2 clicks away from you: open the Version Control panel from the Main Menu: View ⇒ Show Version Control. 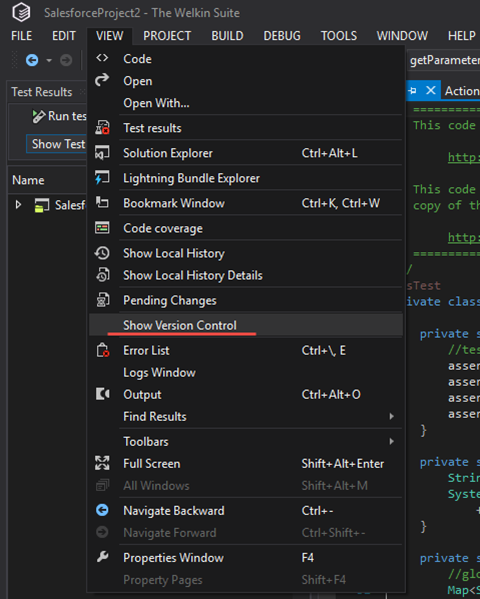
If Version Control isn't enabled for your project, The Welkin Suite will ask you to create a Git repository: 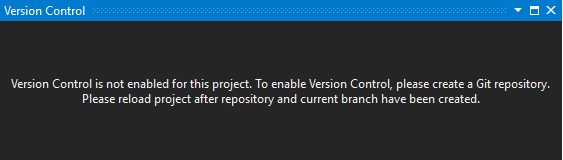
Follow the next steps:
- Install one of the Git clients (SourceTree, GitExtensions, TortoiseGit, or etc.). You can find the whole list of the GUI Git clients at Git website. Most applications offer you to set your username and email address during the installation process. This information is used for your commits to identify you as their author.
- Select the project folder in the Git client and execute the creation of the Git repository. This creates a new subdirectory named .git that contains all of your necessary repository files.
- Create a new branch by the Git client or make an initial commit to the master branch. This action makes the first 'snapshot' of your files—it takes your working directory and turns it into a new Git repository.
Now, when the integration is successfully finished, let’s reopen a project and the Version Control panel. 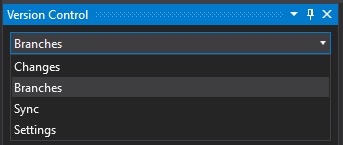
So, what views (or tabs) can we see here:
- Changes—a list of all changed files; options to commit, compare or discard changes,
- Branches—a list of all local branches; options to create new ones, switch and merge branches, view branch history,
- Sync—a list of local commits, which are not present on the remote; and options to push or pull changes to / from the remote,
- Settings—options to change the username and email address, an ability to modify the .gitignore file with TWS-specific entries.
During your working process, you can be faced with 2 additional views:
- Commit details with information about the commit author, date, and changes in the commit,
- Conflict resolving view where you are able to resolve all conflicts during the merge process.
With all these options you have full control over the changes directly from the IDE.
Limitations
However, there are some limitations at the moment, which we will work on in the future. As for now, such options that are not supported:
- repository initialization or cloning,
- SSH connection to the repositories,
- stash functionality,
- branch tags,
- deleting branches,
- opening projects from other IDEs in The Welkin Suite and vice-versa. For this purpose, you should create a project from The Welkin Suite (this will download all selected metadata as well as will create required service files). After that, you are free to initialize a Git repository in that folder or move a project to a Git repository.
Specifying username and email address
Usually, you specify your username and email address while you are installing Git. If you skipped this step, or if you want to change the user info, you can do this in the tab Settings, which is available from the drop-down list of the Version Control panel. 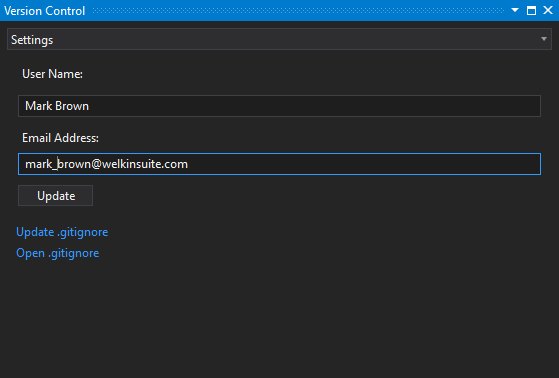
Enter the username and email address, which you want to set as a signature of the author of the commits, in the appropriate text inputs, and click the Update button.
Singularity of the using remote Git repositories (like Github)
Some cases of the using Github and similar remotes can cause the failed build process in the IDE. The reason for it is that some files may have Windows line-endings while the standard format is Unix line-endings. So, when you pull somebody's project from Git repository, you can have all the files marked as changed and included into a Pending Changes list, and build fails because of reaching the record limit into a call.
To avoid this please follow the next instructions.
- After each creation and / or initialization of Git repository you should add or modify autocrl property to input value (autocrlf=“input”) in .git/config file ([core] section). You can pull from Git only after this action.
- If some files on SF have Windows line-endings after Git pull, you will have pending changes of these files. You should build them and after succeed build commit the updated .sfproj file.
Example of .git/config file
[core]
bare = false
filemode = false
symlinks = false
ignorecase = true
logallrefupdates = true
autocrlf = input
Commits
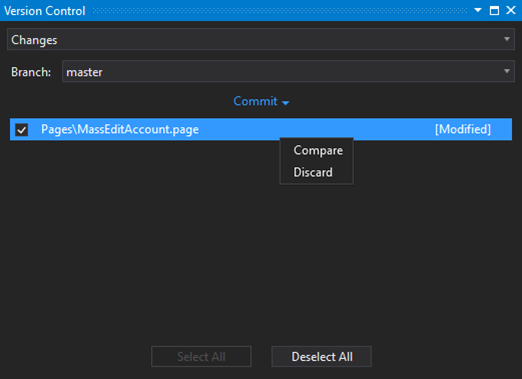
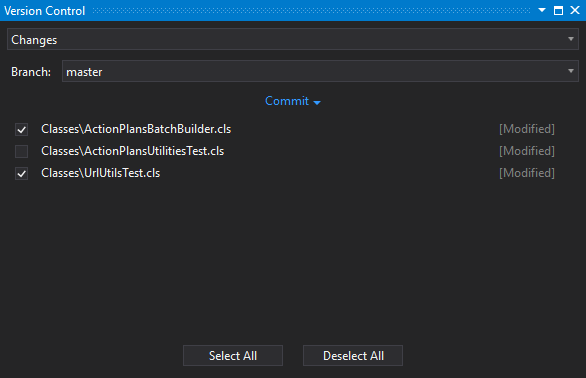
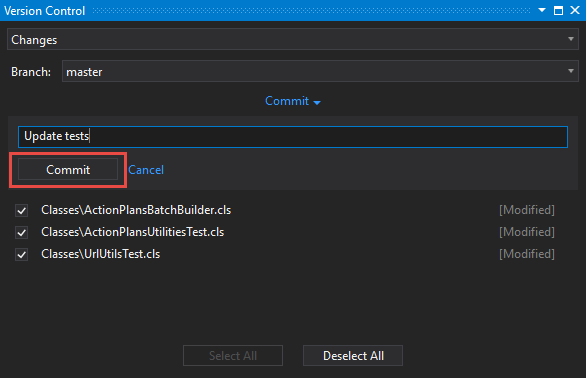
Suppose you’ve made changes, and now you want to save them into your repository. In order to do this, you need to commit the snapshots of the changes into your repository. You should do this action each time the project reaches a state in which you want to record. All the functionality related to the commits you can find in the Changes tab of the Version Control panel. 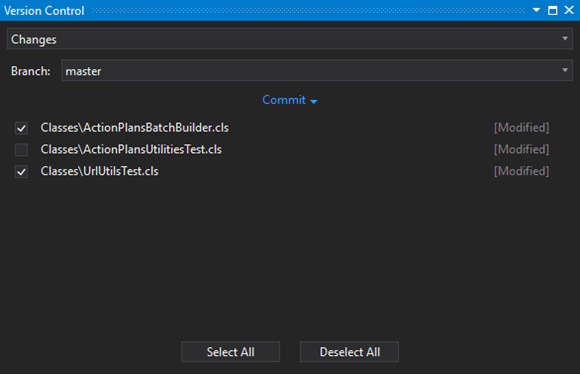
In this window, you can see the branch, where you are going to commit, along with a list of changed files with the status of the change: added, modified, renamed, deleted. You have an ability to select or deselect all the files using the buttons in the bottom of the window.
NB: You are not able to switch branches until you commit changes.
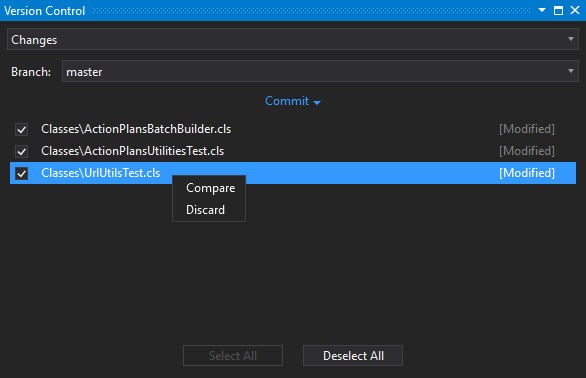
Comparing or discarding changes
A right-click on any file in the list of changes offers you 2 options for working with changes—you can discard these changes or compare them.
Com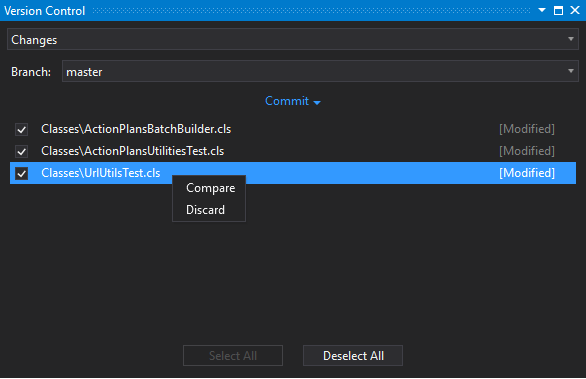
Clicking on the Compare item will open a built-in diff viewer for visualization of all the changes. We will cover this view later in this article. Discard item will discard all the changes in this file and remove this file from the list for commit.
Commit changes
To commit your changes, expand the Commit item. Enter a commit message and click the Commit button. All technical information, such as your username, email address, commit time and hash is added automatically. If you want to go back click on Cancel. 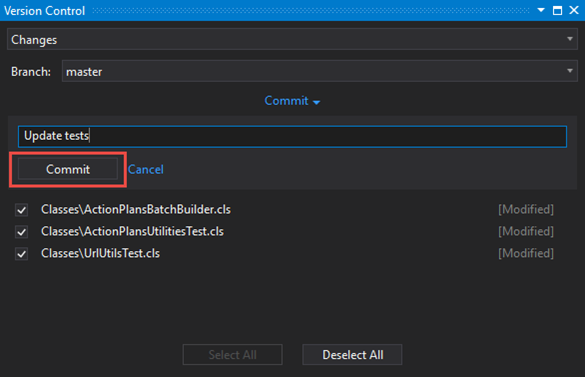
NB: A commit message is required for commit. Also please note that you need to select at least one file for commit.
After the commit is successfully created, you will see the message with its hash, and the list of changes will be empty: 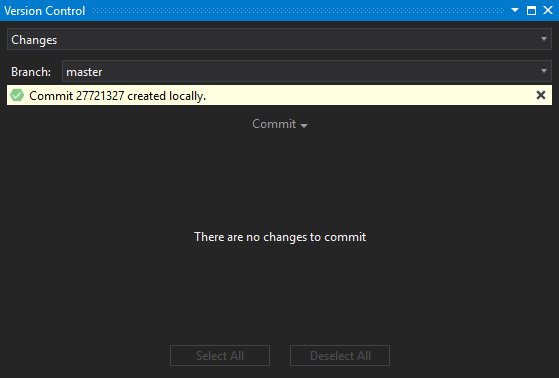
In case, if the commit is failed, you will get a service message with an error's description.
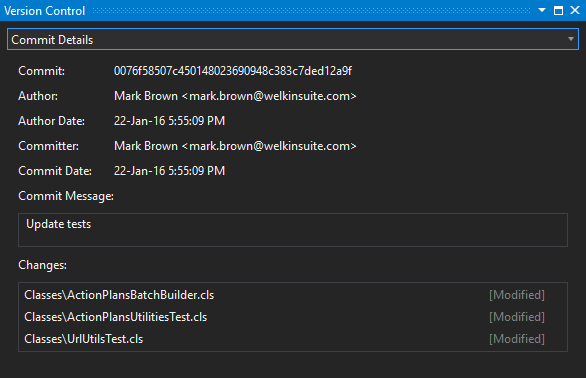
Commit details
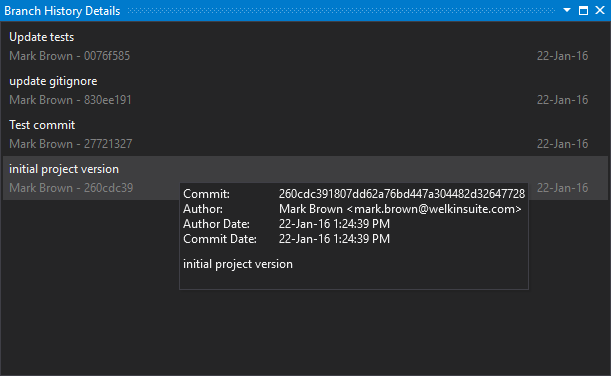
Sometimes you need to get the details of previous commits in order to find, what went wrong, or just remember why you made these changes. You can easily go through the details of any previous commit. The quickest way is to hover over one of the previous commits in the Branch History Details window. 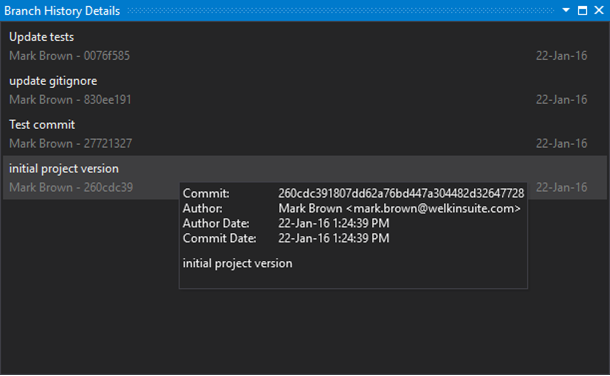
Here you can find the main information about the commit: who made it and when, hash, and a commit message. How to open the Branch History Details window will be covered below.
You can go deeper and explore the details of the commit history. Select Show details… in the context menu of the commit you want to see, and you will see all the details about this commit. 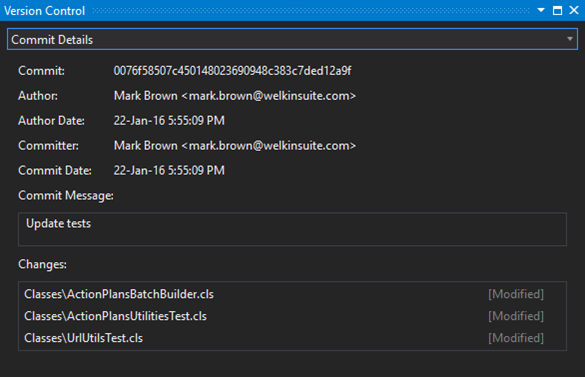
Double-click on any file in the list of changes and a diff view will open for comparing the versions.
Branches
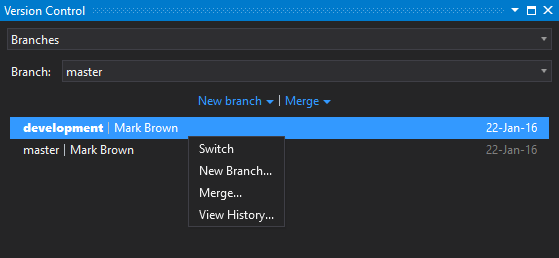
Branching means you diverge from the main line of development and continue to work without messing with that main line. You can see all branches that are present in your Git repository in the Branches tab of the Version Control panel. 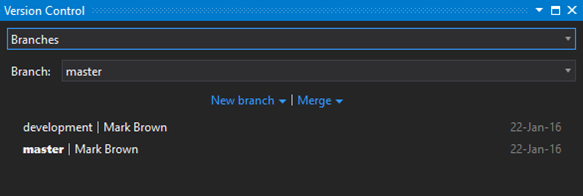
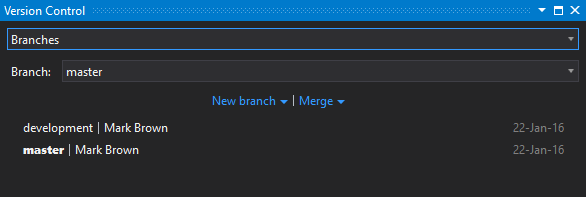
Here you can see the current branch, where you are developing, a list of branches with their date of last modification, and quick access to the option Create branch and Merge. These options are also available from the context menu. In addition, you can switch branches or view a branch's history from the context menu. The current branch is marked with bold text. 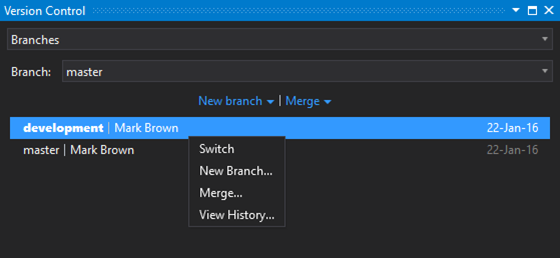
Create a new branch
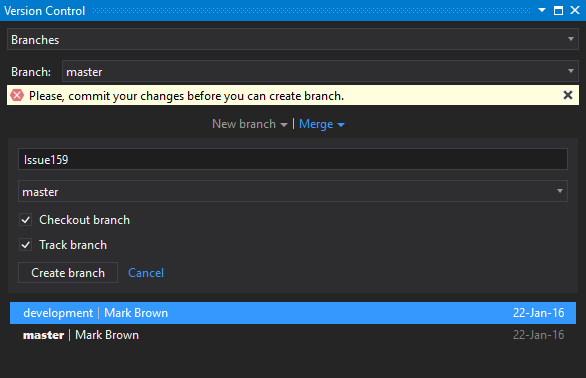
In order to create a new branch you should expand the New branch item (or use the context menu). Enter the name of the branch and select the parent branch from the drop-down list below. There are also additional options here:
- Checkout branch—this item allows switching to the new branch right after creating,
- Track branch—this item allows tracking the new branch, so your pull and push command will refer to it.
These options are checked by default, but you can deselect these if you don't need.
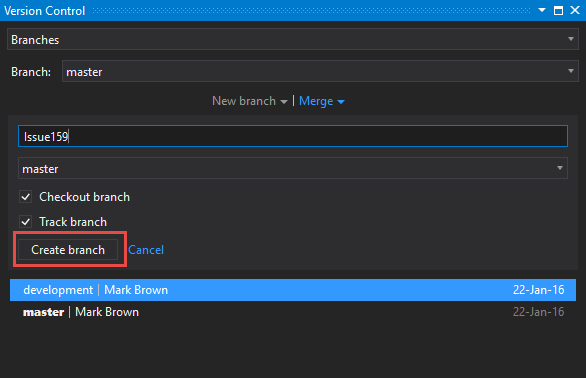
When you set up all the options, click the Create branch button. If you want to go back, click on Cancel.
Let’s create a branch related to one of the large issues. 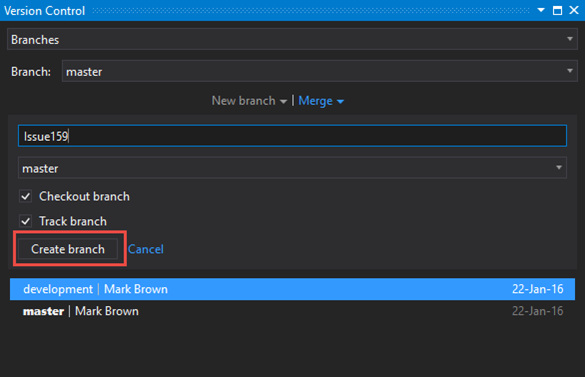
NB: If you have changes that you haven't committed yet, you won't be able to create the branch. 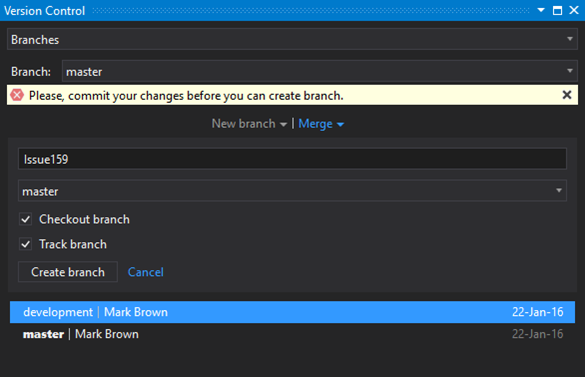
When the branch is created successfully, you will see alist of branches with the new branch. Also, if you checked the Checkout branch item, you will get the message that the repository head was switched to this branch: 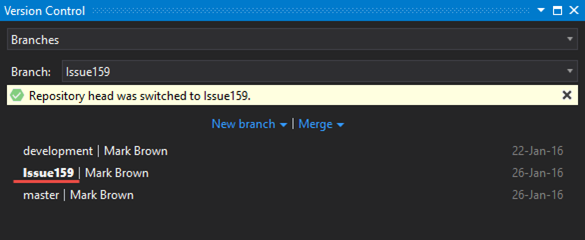
Switch branches
Here are 2 ways to switch branches:
- select a branch from the drop-down list on the Branches tab,
- select Switch from the context menu of the branch you need.
NB: You are not able to switch branches if you have changes that you haven't committed yet. You should go to the Changes tab and commit your changes. 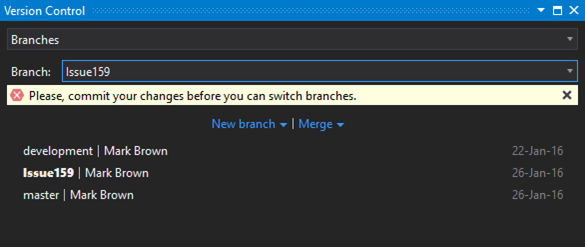
If you use some files in several branches, and these files were changed in one of them, during switching branches, The Welkin Suite offers to reload them: 
Merge branches
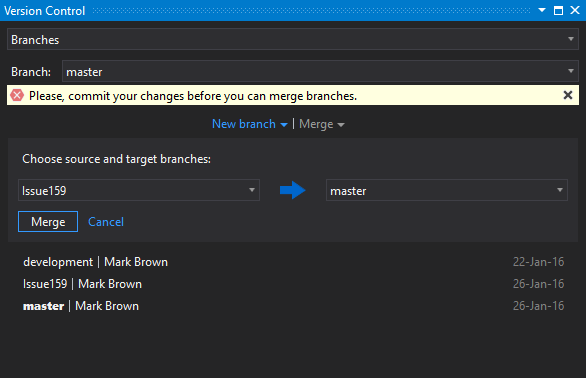
When the separate feature is finally done and tested, it's time to merge its branch into the master branch. In order to do that, expand the Merge item (or use the context menu). Choose the source and target branches from the drop-down lists and click the Merge button. By default, your current branch is set as a target branch. If you want to go back, click on Cancel. 
If your source branch doesn't have any changes, you will see the message that you have nothing to merge: 
NB: If you have changes that you haven't committed yet, you won't be able to merge the branches. 
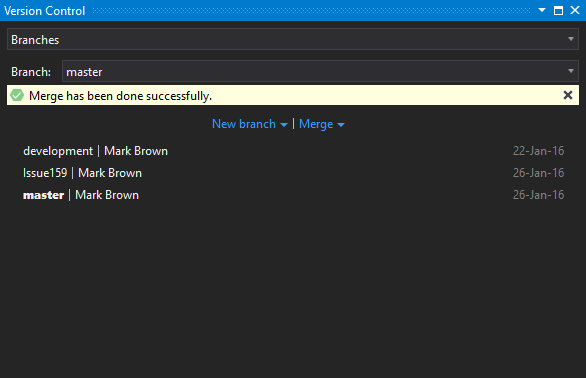
After you have successfully merged the branches, you will see the following message: 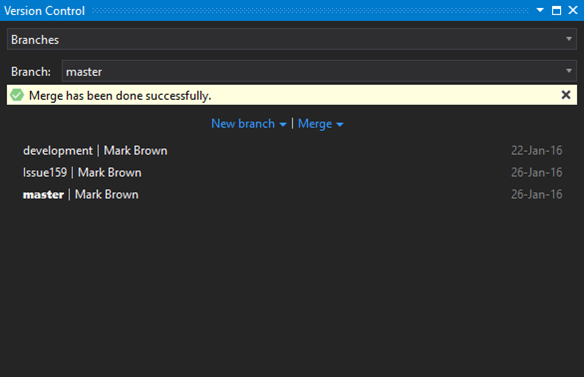
And the repository head will be switched to master branch: 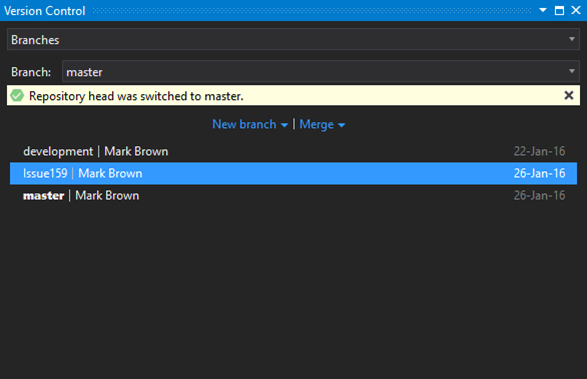
Branch history
You can go through the history of every branch and see, which commits it includes. To do that, right-click on the branch you want to explore and select View history…. You will get a new window with the whole history of this branch.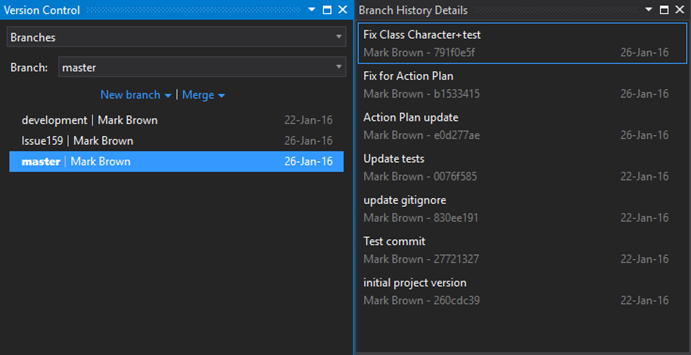
Here you can see all the commits of this branch with some short information: author, hash, and date. To see the commit details, hover over it or right-click on it and select Show details…. This feature was covered above in the ‘Commit details’ subsection.
How to pull and push
To be able to collaborate on your project, you need to have remote repositories. Remote repositories are versions of your project that are hosted on an internal or external server. Collaboration means you manage these remote repositories; you push and pull data to and from them when you need to share your working progress. The Welkin Suite offers you all the features for managing remotes. You can find them on the Sync tab of the Version Control panel.
Create a new remote
If you didn't have any remote repository in your project, The Welkin Suite will help you to configure one. Expand the Push item, enter the remote URL and your credentials, and click Submit. If you want to go back, click Cancel.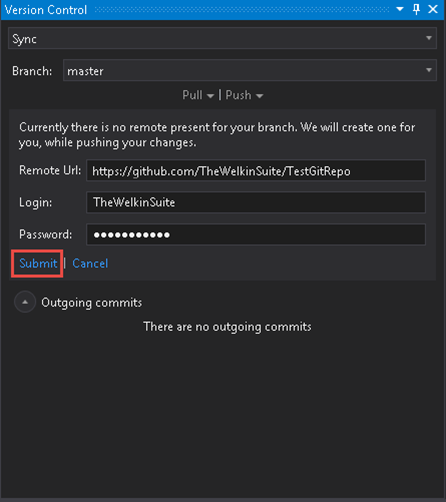
If your credentials are incorrect, you will see a message that the authorization has failed: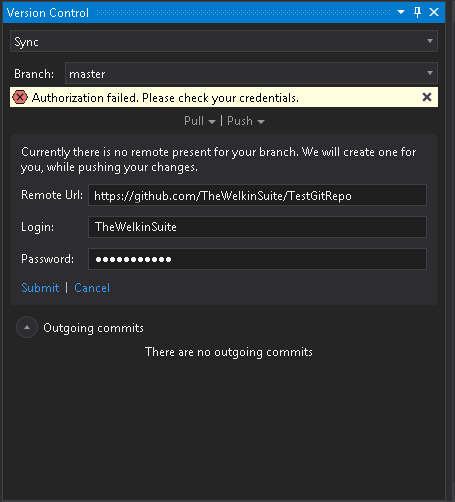
When the configuration is successfully finished, you will get the following message: 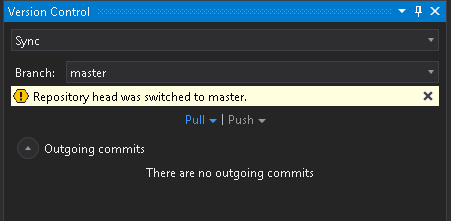
Now you can pull changes from the remote repository to update your project, and you are able to push your changes to the remote.
How to pull
Once you set the remote, you can pull the latest changes. Expand the Pull item, enter your credentials, and click Submit. If you want to go back, click Cancel.
If your repository is up-to-date, you will see the message that there is nothing to pull. 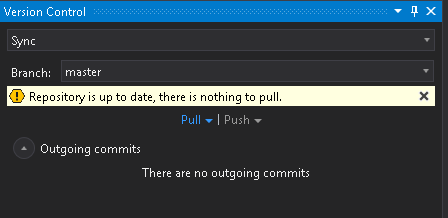
If there are changes on remote, that are not present in your repository, the files will be updated in The Welkin Suite, and the repository head will be switched to master. 
How to push
When you have your project at a point that you want to share it, you will have to push it upstream. Before pushing, you need to commit your changes locally, and then you can push to the remote repository.
You may try to push changes to the files that were changed on the remote by somebody else. In such a case, The Welkin Suite warns you about any merge conflicts. This will be covered below in this article.
NB: Please note that you're not able to push if you have outgoing commits. You need to finish them first.
After this issue is resolved, you will get the message that you can push now. 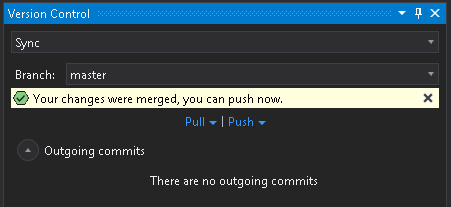
When push is successfully finished, you will see the following message: 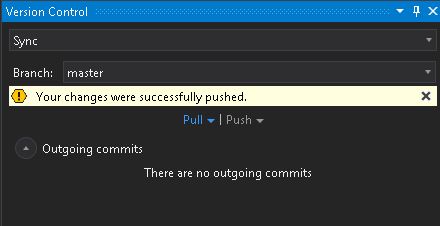
Resolve merge conflicts
The Welkin Suite helps you to resolve all merge conflicts that usually occur when you are working on the same functionality as your colleagues are working. 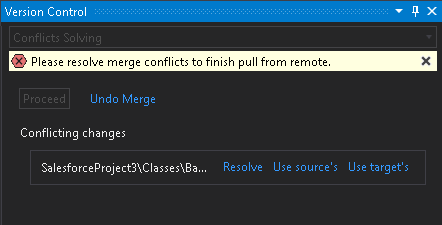
In the Conflict resolving tab of the Version Control panel, you can find which files have conflicts that you need to resolve. If you are sure what piece of code is causing the conflict, you can select the source file by clicking on Use source's or the target file by clicking on Use target's. Also, you are able to undo the merge and come back to it later by clicking on Undo Merge.
Clicking on Resolve will open a Diff view for comparing the two versions. This feature will be covered below in this article.
After the conflict is resolved, you need to commit the changes before pushing to the remote. Click on the Proceed button. 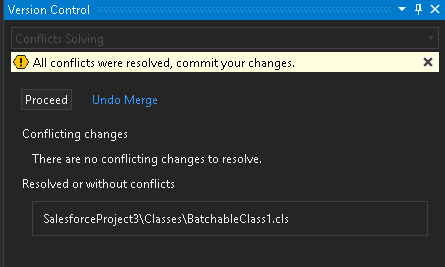
You will see a window with the usual commit functionality. The merge target and the descriptions of the conflicts are written in a commit message. Click Commit to finish. 
How to compare revisions
When you need to compare the versions of the file, a convenient tool is the best solution. An ability to compare changes is especially helpful, when you are trying to find the reason why something went wrong. Git Support in The Welkin Suite includes a built-in functionality for comparing revisions.
You can compare changes in the files in 2 ways:
- before commit—on the Changes tab right-click on the file you want to explore and select Compare:
- from the branch history—open the details of a commit from the Branch History details window, and double-click the file you want to explore in the Commit details window.
Both these actions will open the diff view for comparing changes. By default, The Welkin Suite opens the built-in viewer.
In the diff view, you can see all the changes in the file: 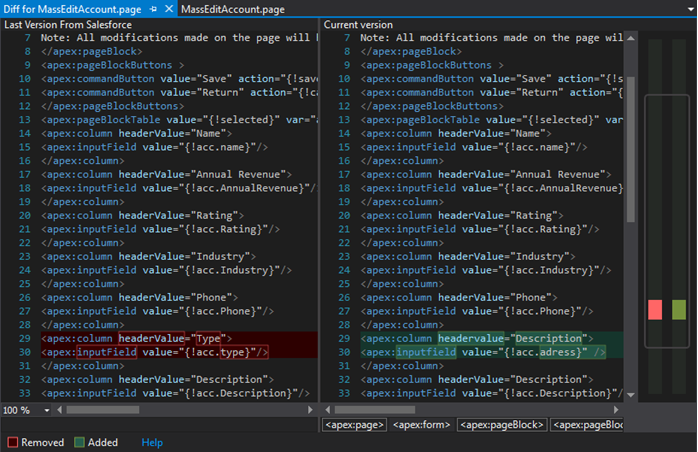
The previous and the current versions are situated side-by-side, so you can easily compare the files. Removed code is marked in a red color, and the added code is marked in a green color. On the right side you can see a scrollbar in a map mode, so if you have a large file with multiple changes, you are able to see them all in the scrollbar.
If the file doesn't support comparing of the revesions, The Welkin Suite will notify you about it: 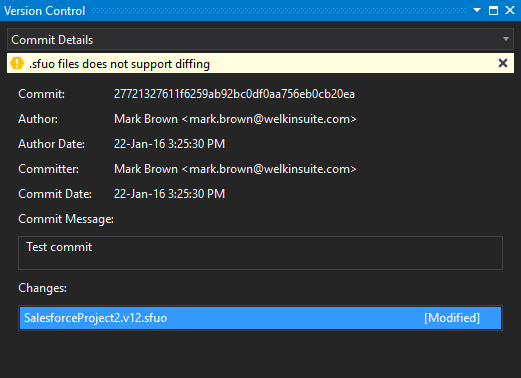
Modifying .gitignore file
Often, you have a group of files that you don’t want Git to automatically add or even show you as being untracked. In this case, you can put such files into the .gitignore file.
You can open the .gitignore file from the Settings tab. 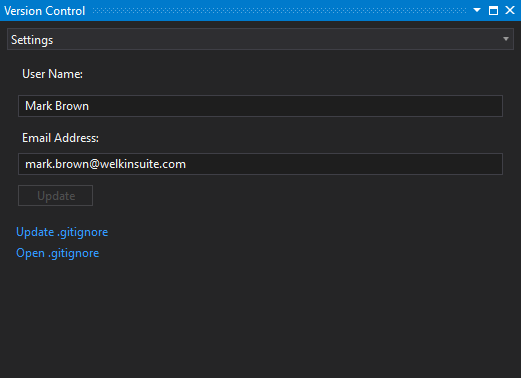
The .gitignore file is created automatically and by default it is empty. Click Open .gitignore, and this file will be opened in the editor. You can specify a list of files you do not want to track using the standard rules for the patterns.
The Welkin Suite also includes its own rules of ignoring into .gitignore file. By default, they are:
- **/.localHistory—all log files of the local history,
- *.sfuo—The Welkin Suite's information about the user settings (like panels location and so on),
- TestCache.xml—a file with a cache of test lists,
- TestsResultsCache.xml—a file with a cache of test results.
To include these exceptions into the .gitignore file, click Update .gitignore. You need to do this only once when setting up the integration with Git. When the file is updated, you will see the following message: 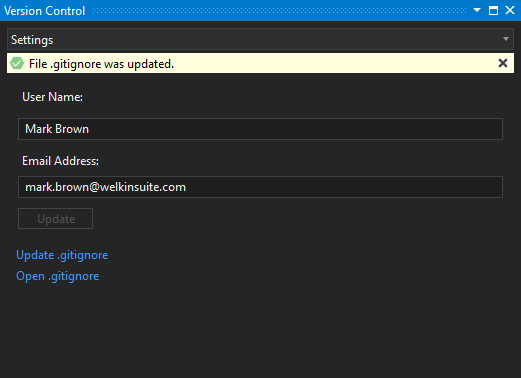
After editing the .gitignore file click Update .gitignore one more time to be sure you have everything up-to-date. 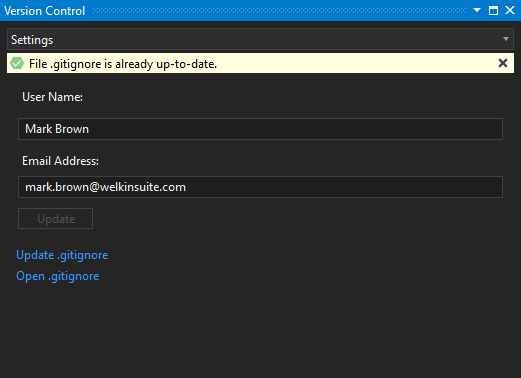
As you can see with The Welkin Suite you have all the control over the Git repository at your fingertips. Share with us your opinion about Git integration in The Welkin Suite!
Check the documentation about this feature!


This does not tell us how to link the repo to welkin suite or where to place it for it to be visible to welkin suite. I have been struggling for hours trying to get welkin suite to notice my git repo. Please update the initial steps to provide more detail in getting welkin suite to recognize your git repo.
Solved:
File Path: C:\Users\UserName\Documents\The Welkin Suite\Projects\TestProject\TestProject
--Above filepath should be your own to the local welkinsuite project
This is where you need to init the git repo, not the first folder, not the main welkin suite project folder or anywhere else. This is where this tutorial failed me by saying "Project folder" there is a folder inside a folder "\TestProject\TestProject". I used git bash so, here was my command lines to get welkin suite to notice my repo.
first line is cd'ing into my project folder (I have changed the names of the user and project folder to be ambiguous" - this cd filepath needs to be your own.
cd \Users\UserName\Documents\The Welkin Suite\Projects\TestProject\TestProject
git init
git add --all
git commit -m "Initial Commit"
Now I reloaded my project and turned on version control panel via the top nav bar - View--> Version Control, thanks.
Hi Justin,
Thank you for your comments and for the provided flow to connect a TWS project to a Git repository.
You can proceed with these steps using a command line or follow steps that we have described in the 'How to start working with a Git repository from TWS' paragraph using a Git-client.
We will add your flow to our documentation also.
Thank you greatly for sharing results of your investigation!
Regards,
Kate
How can I fix problem, that I can't use version control. I have only disabled drop down. I tried restart application, but it still not work. Before this I can't create new branch
Hi Vika,
Thank you for your comment and for the bug report which you've sent.
This is necessary to connect your local and remote repositories and set all the branches in the IDE.
All of the necessary commands are described here:
https://docs.welkinsuite.com/?id=windows:how_does_it_work:teamwork_and_version_control:git_support:how_to_start:start
Also, more additional details I'll send you in the response to your bug report.
Thank you,
Kate
I delete application and install it. I delete my first project and create new. I do all with instruction in your forum and blog, and video in you tube. but I still can't create branch.(error value cannot be null. Parametr name: name)
Thank you for your comment.
We are working on this issue and I'll share with you the results of our investigation at the nearest time.
Regards,
Kate